Quantcast
Channel:
Viewing all 195 articles
Browse latest View live

Q&A during the Interpol Digital Forensics Expert Group 2020

$
0
0

On Tuesday, June 16 Atola’s Yulia Samoteykina spoke at Interpol’s annual Digital Forensic Expert Group. After the presentation about our imagers’ multi-pass imaging system and other damaged media functionality, we received a few follow-up questions. In this blog we would like to reiterate the answers to these questions:

Can Atola imager acquire evidence from damaged SSDs?

As is true with any type of media, the degree of damage will inform how we can help with data recovery from a specific device. SSD failures fall into three major categories: logical errors, hardware issues, firmware failure. 

Atola imagers may be able to image data from an SSD with logical errors or hardware issues (e.g. NAND flash wear-out) with the help of our multi-pass imaging system. A good predictor of success can be the Media Scan stage of the diagnostics process.

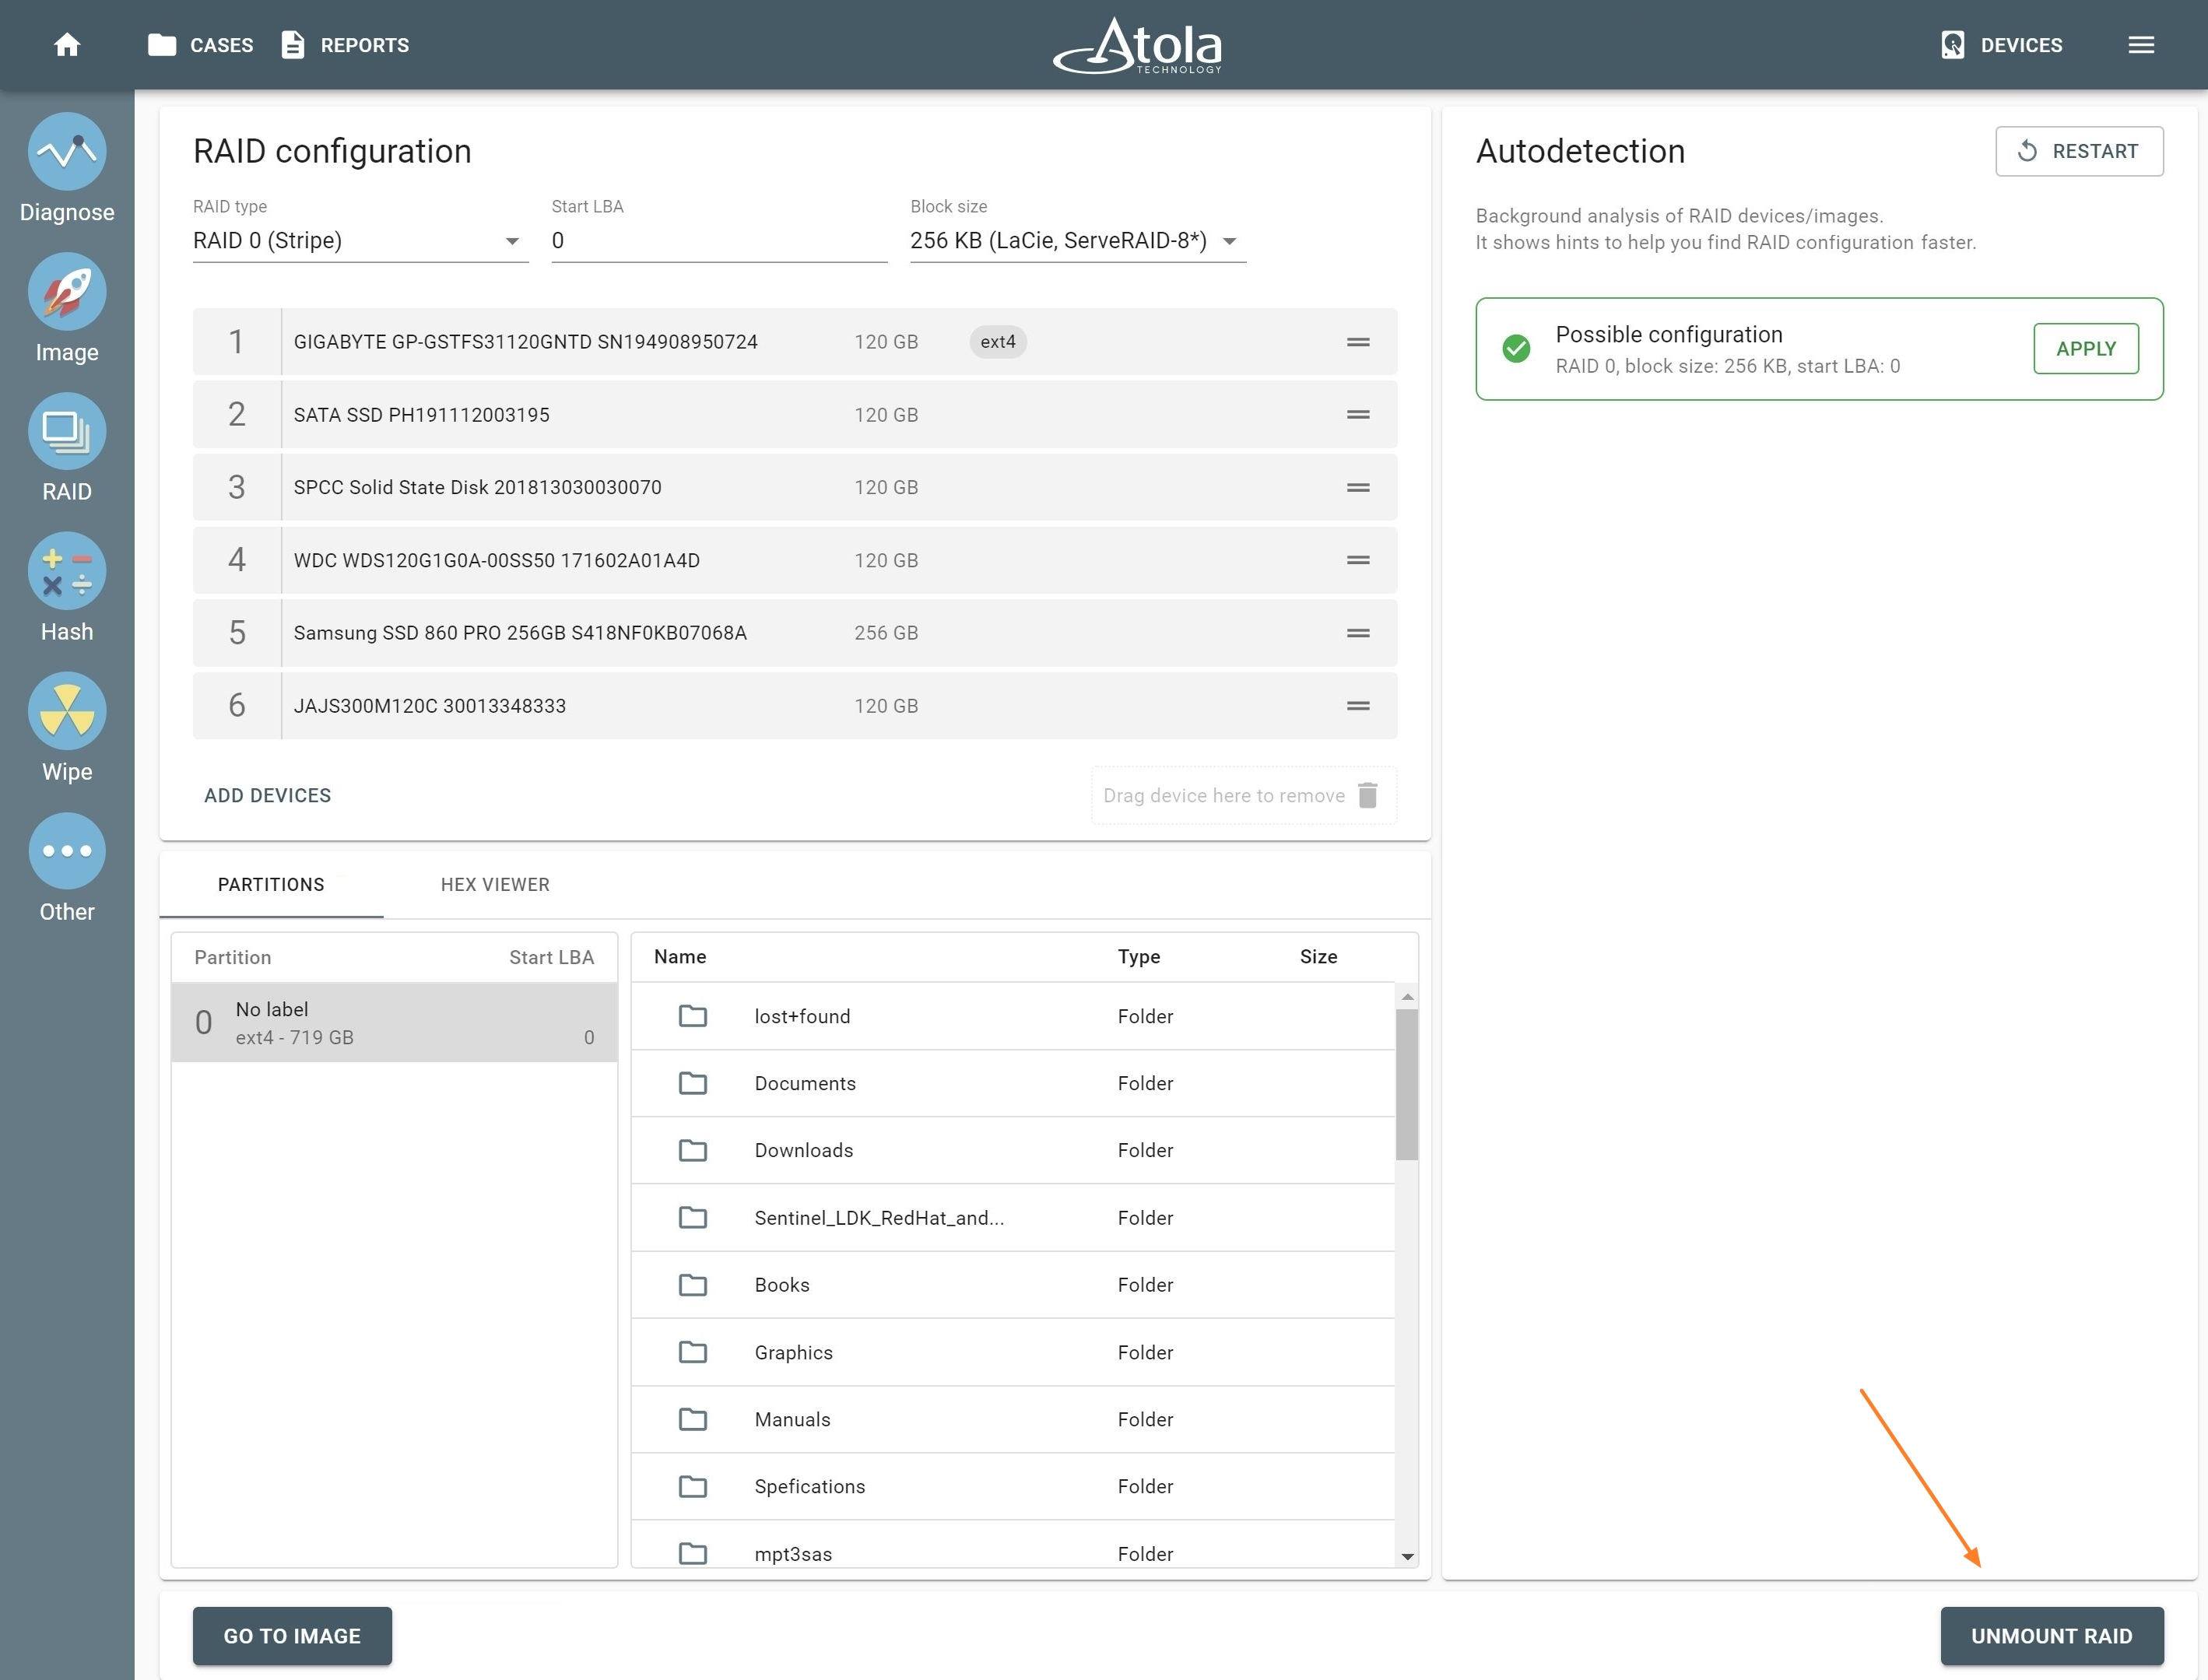
How do you resolve an issue of imaging a drive (Ext4), if “Failed to copy” message showed up while using another forensic imager?

If there are bad sectors in the area where the metadata of the file system is stored, some of the files or the whole of the partition may not be found by regular tools. But the files could have been imaged without the file system’s metadata and may be available for acquisition with the help of Insight’s File Recovery functionality.

Can Atola imagers retrieve data from water-damaged hard drives?

Depending on the kind of contact (it can range from sprinkles to complete submergence), the duration of such impact and even the composition of the water (if there is residue in the form of salts), the impact on the drive could vary substantially. And in some cases, it can be quite dramatic. Therefore Atola engineers recommend you bring such drives to a cleanroom for the initial damage assessment, repair, and cleaning.

Once you receive the repaired drive back from the cleanroom, run diagnostics with an Atola imager. It is very likely that there has been damage to the platters, and our multi-pass imaging system will acquire the image as usual.

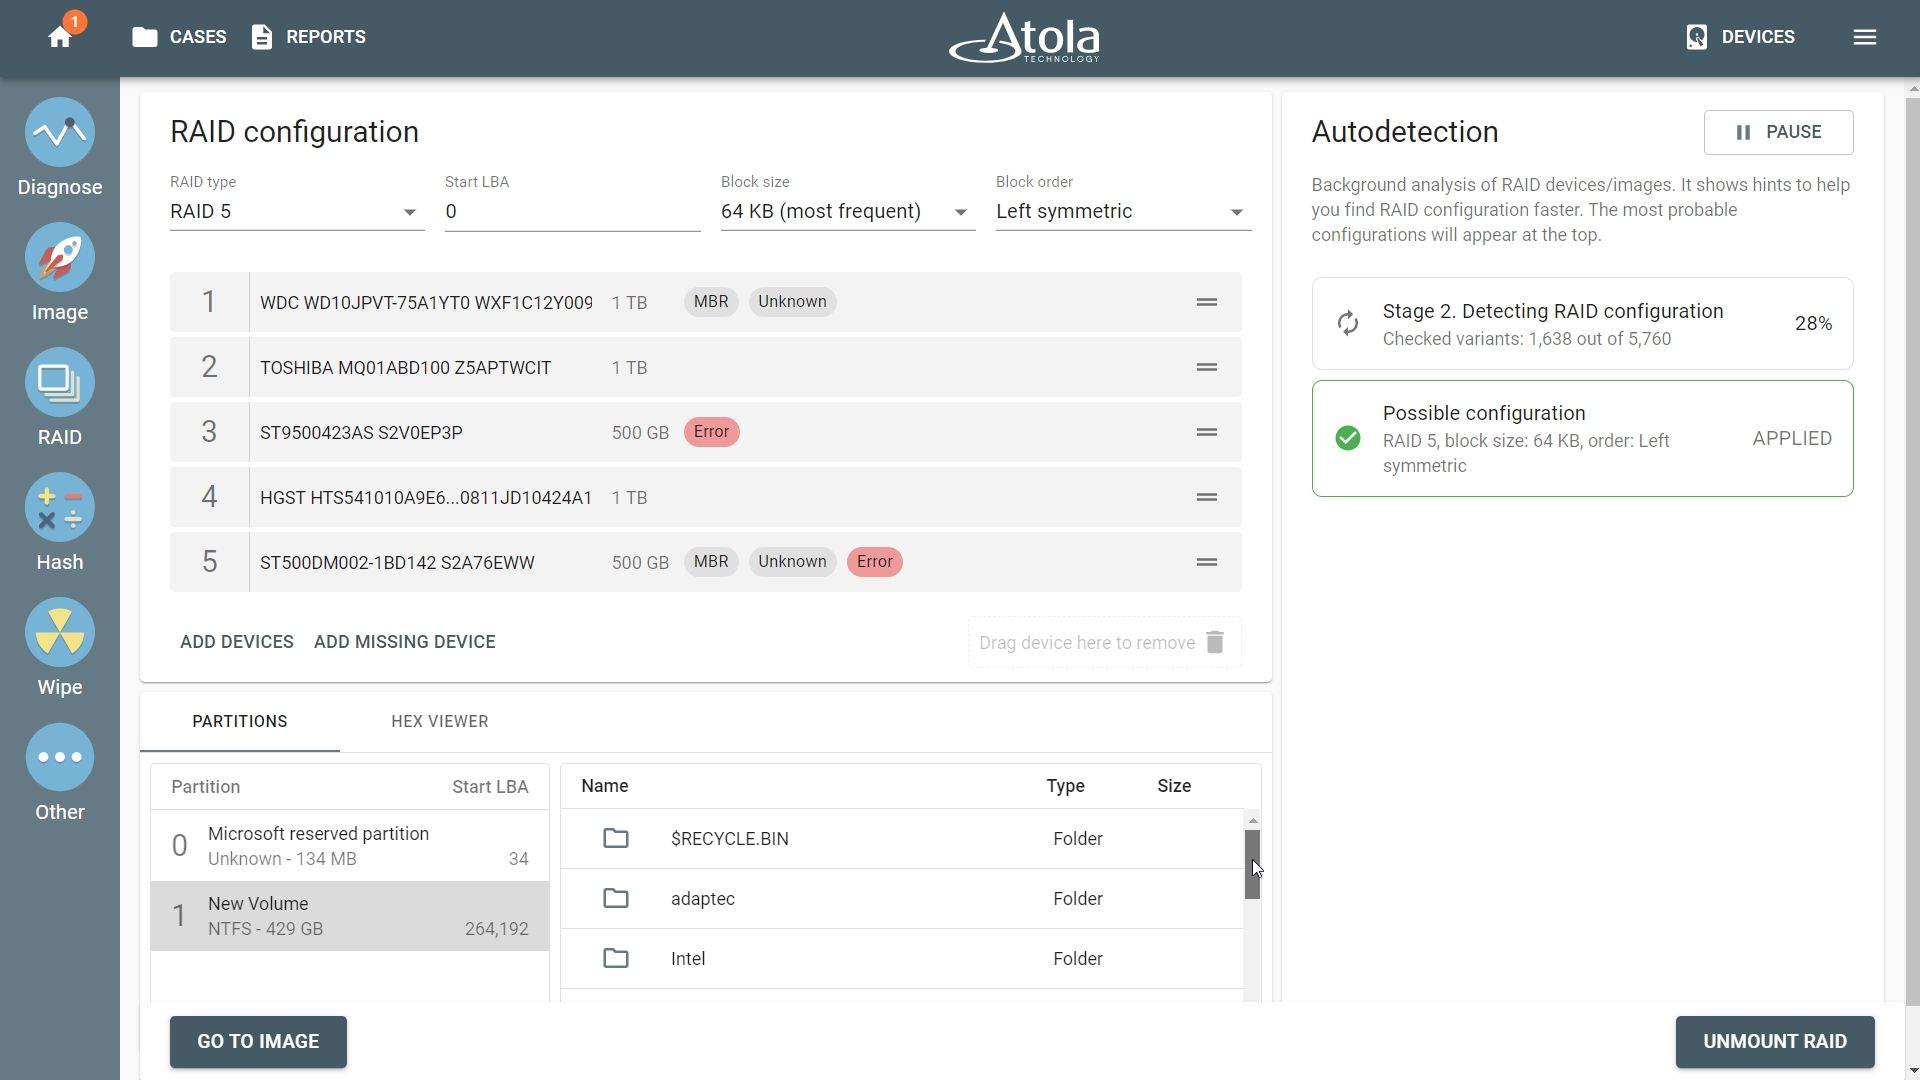
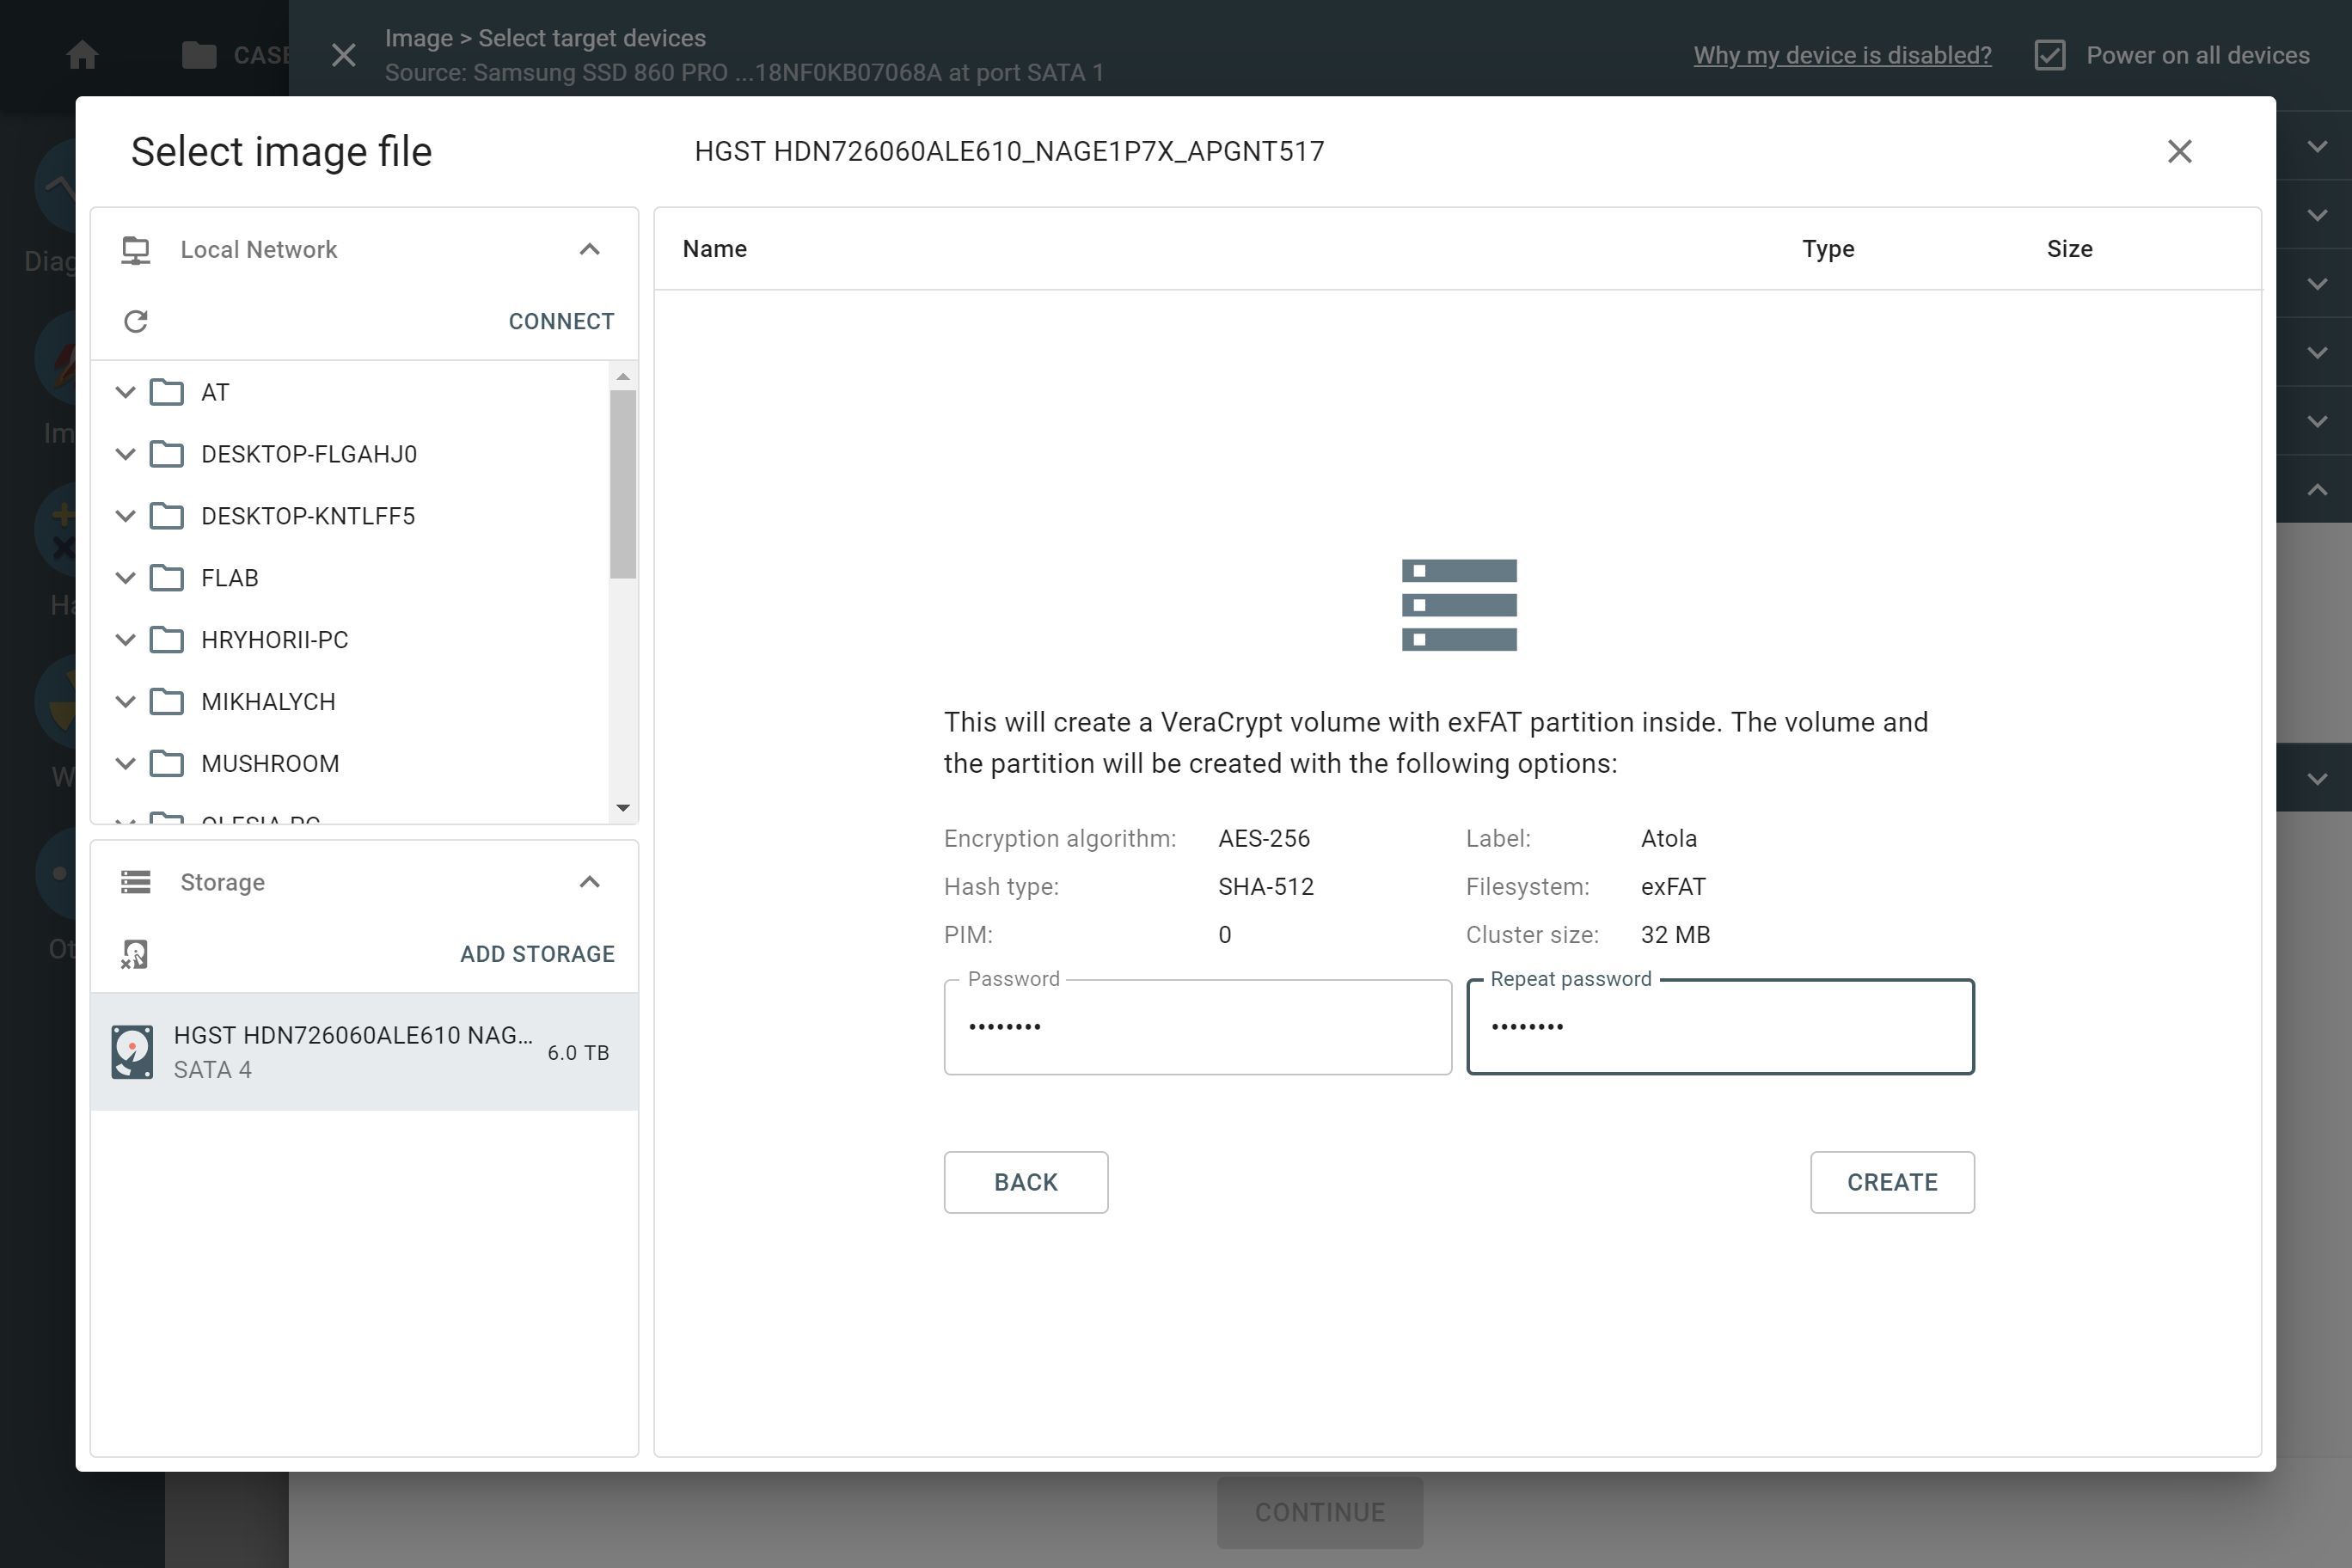
Will Atola TaskForce support AFF4 file format?

Yes, Atola is planning to support AFF4 and other logical image file formats (also including L01 and NFI) in our upcoming releases.

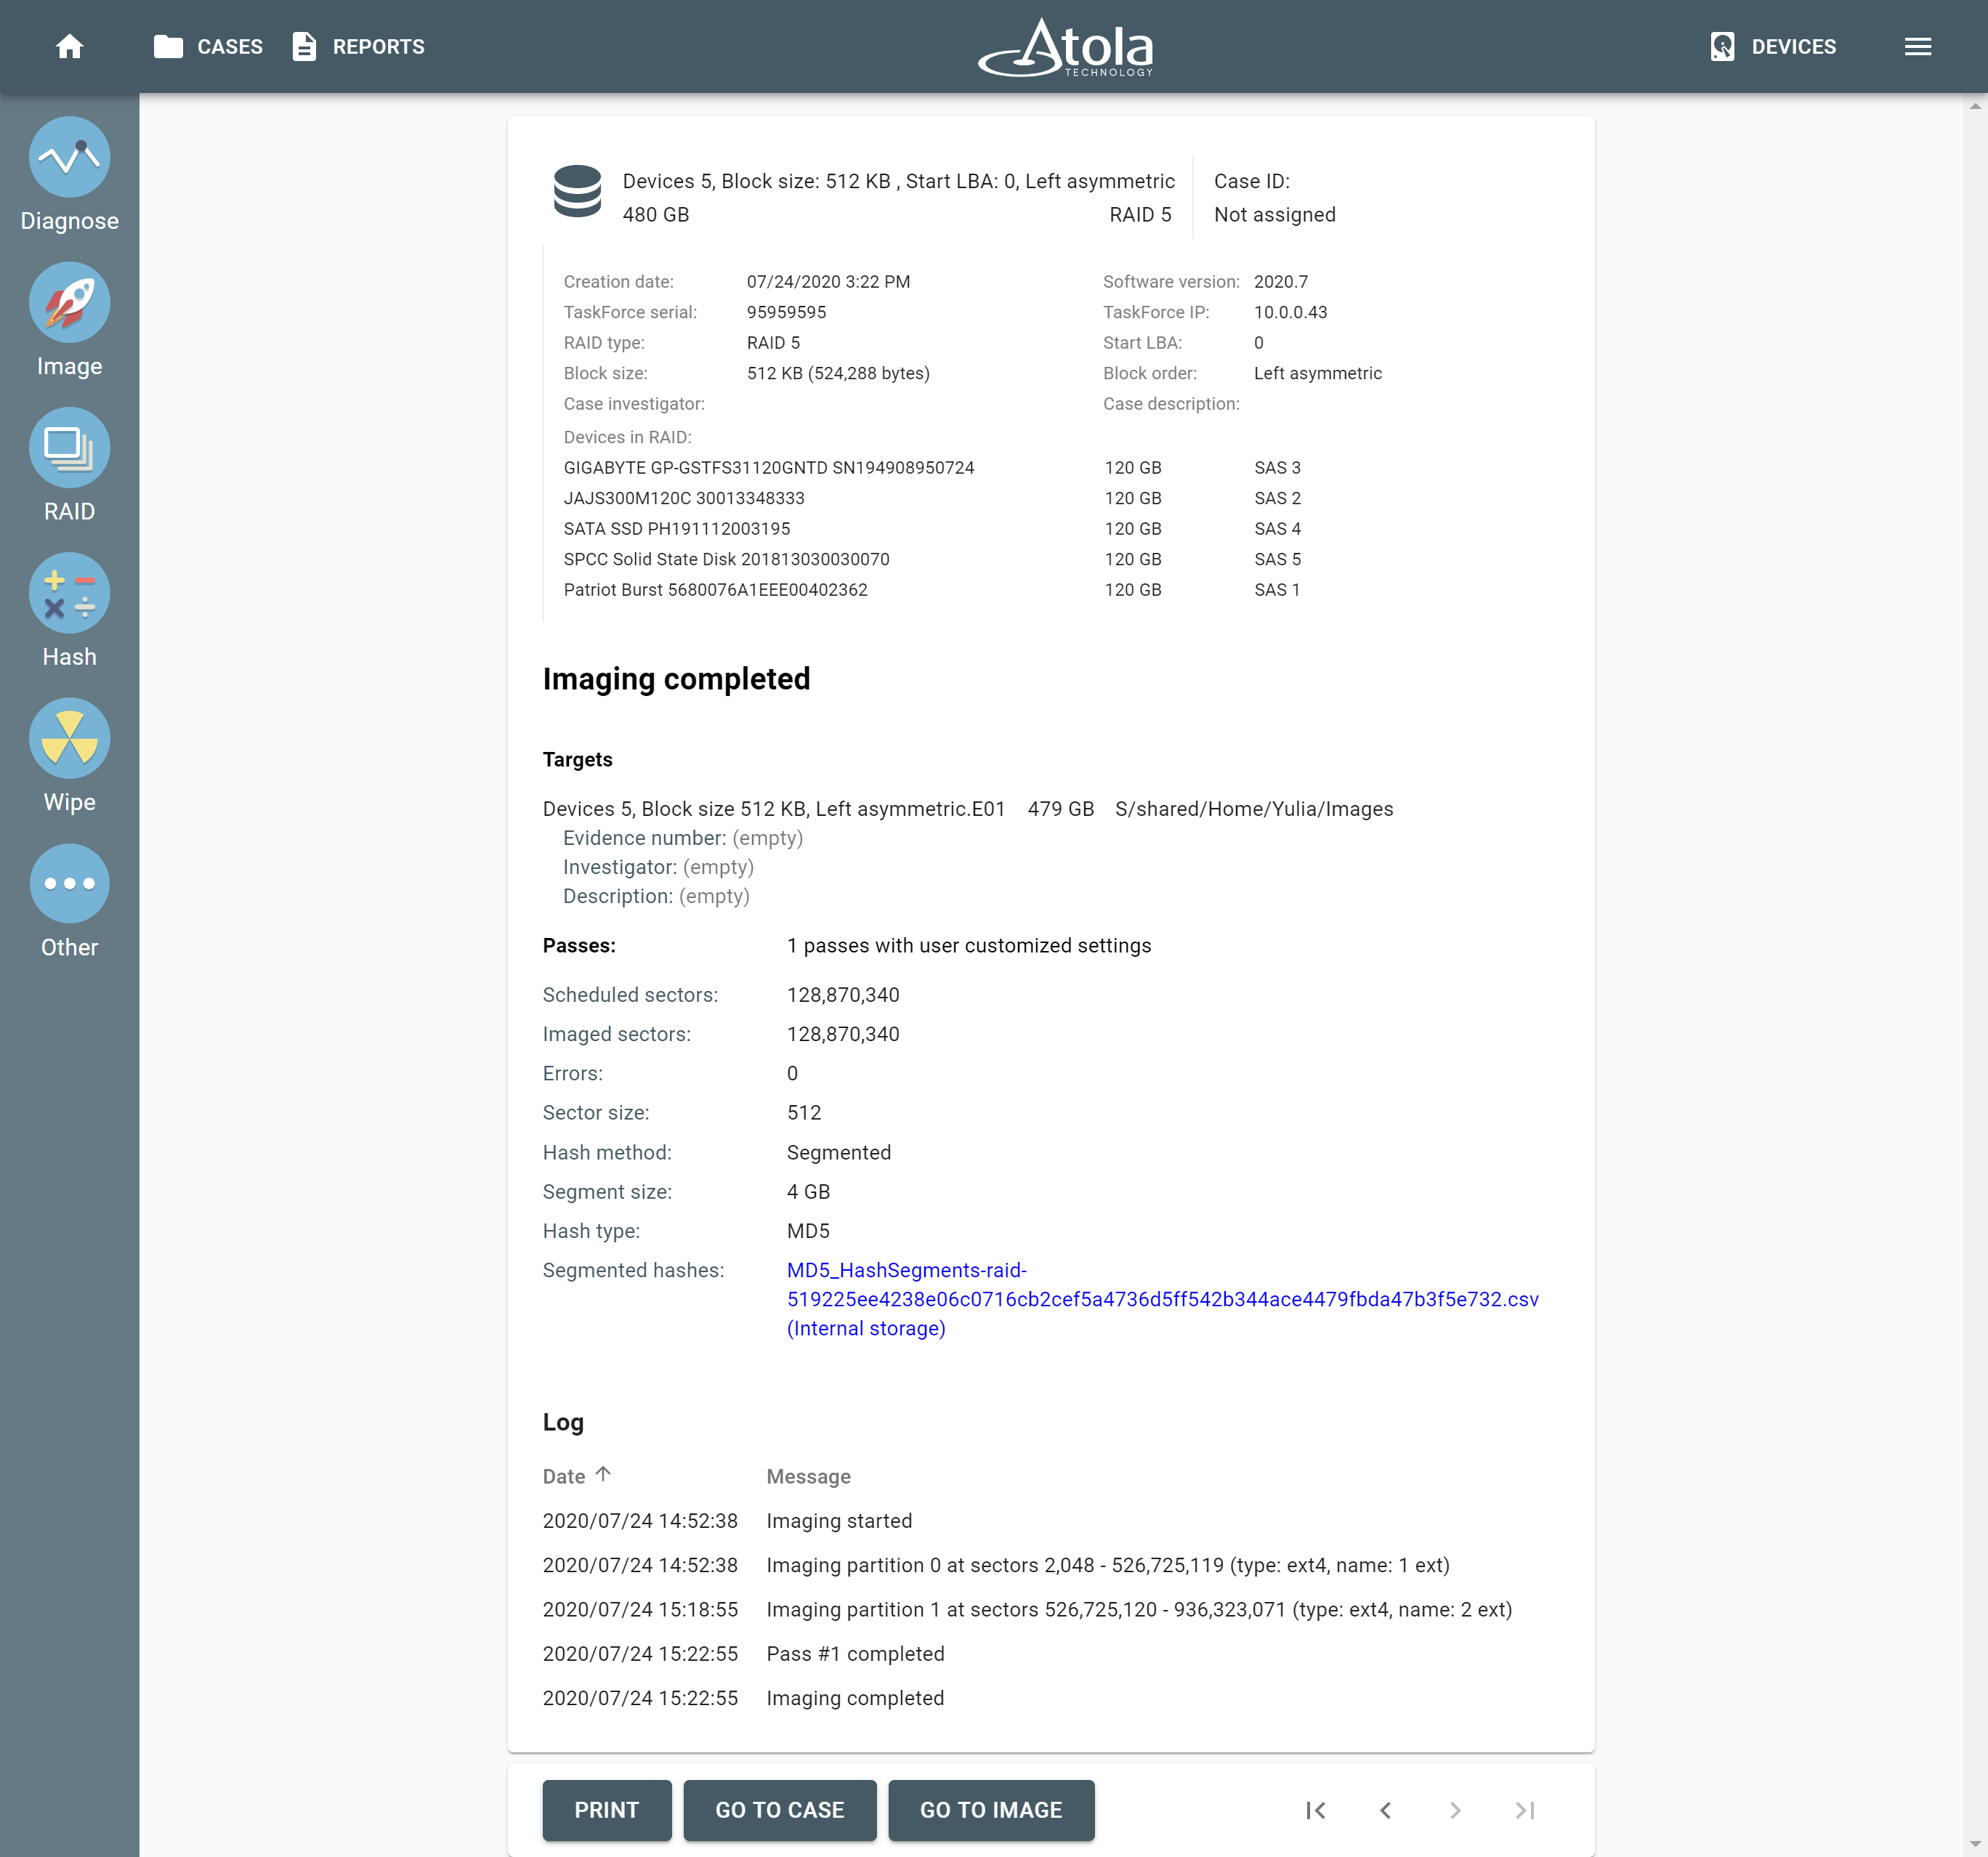
Is segmented hashing accepted in the court of law as a proper way of verifying data?

Yes, segmented hashing has been a principle successfully used by forensic examiners. This principle is well reflected in academic works, it is also widely used in cryptography and secure data modification. In digital forensics, the principle has been adopted by a number of vendors who support AFF4 image files, including X-Ways, BlackBag Macquisition, Evimetry.

With the forensic examiner’s proper understanding of the concept and ability to demonstrate it to the court, segmented hashing is as good a verification method as any.

Join us at our weekly virtual booth session. We always have an engineer with us, and we will be happy to answer any questions you may have!

The post Q&A during the Interpol Digital Forensics Expert Group 2020 appeared first on Atola Technology.


Damaged drive imaging with TaskForce: A drive with a damaged head

$
0
0

A damaged hard drive, especially when it comes to evidence drives, requires a complex imaging approach to avoid the drive’s further deterioration and data loss. TaskForce system enhances your working with damaged evidence drives, minimizing the risk of losing data on the working part of the head stack. 

Diagnostics and selective head imaging

TaskForce’s built-in drive diagnostics module automatically checks all subsystems of the evidence drive. At the end of the diagnostics process, it provides a clear and detailed report about its electronics and motor, head stack, media surface, firmware and file system. 

In the Heads section of the diagnostics report, TaskForce forensic imager provides detailed information about the state of each head. In addition, it offers the recommendation of the optimal imaging strategy for your damaged hard drive.

The above diagnostics report informs the operator that the drive’s hardware has major issues and points to defects in the media and a damaged head (Head#3). The report recommends that the damaged head is disabled in the imaging settings so that the good heads can be imaged first.

Atola engineers recommend imaging the good heads first. The system will prompt you to disable the bad head when you attempt to image the drive.

Alternatively, click the Image category in the left-side menu, select your source and target devices, click Continue. When you get to the Settings page, click Change to adjust the settings for your imaging session. In the Settings screen’s What to Image section, click on All sectors to configure the selective imaging.

Atola TaskForce imaging settings

Unselect the damaged head, Click Save and then click the Start button to launch your imaging session.

Unselecting the damaged head

Multi-pass imaging of bad sectors 

As the imaging session is running to its end, you can see that errors have been found on the space of the drive that is read with the Head#4. It is common for a drive with a bad head to also contain errors on the platters that are read with other heads.

Atola TaskForce: multi-pass imaging algorithm

When encountering a bad sector that belongs to a good head, TaskForce uses its multi-pass imaging algorithm to handle the errors and attempt retrieving data from the bad sectors upon completing the imaging of good sectors. To read more about the multi-pass imaging system, please follow this link

When the selective imaging (from the good heads) is complete, the system pauses the imaging session and produces a detailed Imaging report that includes a log of all actions performed throughout the imaging session.

Atola TaskForce report

TaskForce automatically creates reports for every single action applied to each device connected to it. The reports are stored in the case management system.

Attempting to image the bad head 

Having successfully retrieved data from the good heads of the damaged head evidence drive, you have two options:

  • Replace the head stack before you get down to imaging the remaining data. Please, keep in mind that data on the drive can become unreadable due to head stack replacement;
  • Try imaging data with the Degraded or Damaged head. To image the unselected bad head, simply click Resume.
Resuming imaging session to image the unselected bad head

Atola TaskForce resumes the imaging session and focuses only on the area that belongs to the damaged head. Depending on the severity of the damage, it will safely retrieve as much data as possible or will be skipping the unreadable sectors and log them in the imaging report. 

Atola TaskForce: Damaged head imaging

When imaging the damaged head, pay attention to the progress. If the number of errors keeps growing, while the number of the imaged sectors remains unchanged, it is safe to assume that the head will not be able to read more sectors. 

In such a case, it is advisable to pause the imaging and power down the drive to avoid more potential damage to the platters with the bad head.

Hash method and hash type

In the Imaging report you can see that TaskForce imaged 520,961,167 sectors out of 625,142,448, having extracted as much data from good heads as possible. TaskForce’s Segmented hashing functionality helps you verify the data on the evidence drive with the image, even if not all data was retrieved.

Now you can evaluate how critical the remaining data on the drive may be based on the data retrieved from the good heads. You may already have sufficient evidence. Alternatively, you can choose to bring the drive to a cleanroom, where the drive’s head will be replaced. Then you will be able to image the areas belonging to the replaced head.

This imaging strategy helps you save time by imaging the data from the good heads and avoid causing more damage to the media. 

For more details about the successfully imaged sectors and those that failed to be imaged, scroll down the report and check the Log.

Atola TaskForce log

The post Damaged drive imaging with TaskForce: A drive with a damaged head appeared first on Atola Technology.

Forensic RAID rebuild in Atola TaskForce 2020.7

$
0
0

Today we are introducing the largest firmware update of Atola TaskForce ever – 2020.7. It adds a new facet to the product turning it into the first forensic hardware RAID imager in the world!

I’d like to start by revealing the pain digital forensic experts have these days.

Quotes of forensic examiners about RAID image acquisition:

“How would one go about imaging a “RAID server”

“I will normally use <data recovery tool> to reconstruct they RAID as I like their interface and the ability to manually select different RAID parameters.” 

“I am looking for options to Image a RAID storage on a windows 10 computer”

“…image the drives individually, and then rebuild the RAID from the images. You would need to know the RAID type, drive order and stripe size, to rebuild.”

“I have 4 hard drive E01s that make up a RAID 10. I’ve got the stripe size and the order of the drives. Does anyone know of software that can be used to rebuild this so I can do analysis on it?”

“Personally, I hate rebuilding RAIDs”

“I have a Acer Predator Trion 500 laptop with two PCIe (NVME) drives setup as a RAID0. I’m now trying to figure out the stripe size of the raid but fumbling in the dark…”

We are excited and take pride in how the new RAID module will save time and energy for forensic examiners dealing with such tasks.

How forensic RAID rebuild works 

In a nutshell, your happy path in Atola TaskForce 2020.7 is this:

  1. Select RAID array source devices (drives, raw or E01 image files)
  2. Wait a couple of minutes until Possible configuration hint pops up
  3. Click Apply
  4. Click Go to Image
Forensic RAID rebuild

What is the most impressive thing about rebuilding RAID arrays in TaskForce?

  • In many cases, you do not need to have RAID-related knowledge: RAID types, block size, orders, how RAID data is organized, etc. TaskForce automates the configuration selection process to the max.

Is every case that perfect?

Not yet:

1. In excessively complex cases, there can be multiple hints that require manual selection. For instance, TaskForce can detect RAID 10, showing which drives/images are mirrors of each other. Then it gives a hint of how to split it into two RAID 0 arrays and work with one of them.

Mirrors automatically detected during RAID 10 rebuild

2. Another example is the handling of 8+ drives/images in the RAID array is not yet optimized speed-wise.

The good news is that we are committed to improving it all very soon in the TaskForce firmware update 2020.7.1!

What is currently supported

  • TaskForce 2020.7 firmware supports RAID 0, 1, 5, and JBOD.
  • Partition preview works with NTFS and ext4/3/2 file systems so far.

Atola dev team will be adding new RAID types and file systems in the next releases. We believe forensic RAID rebuild is one of the most valuable product features for the industry.

Automated detection of RAID configuration

Let’s delve into the main UX mechanics built into the new RAID rebuild.

You don’t know the configuration, but you have an assumption. My advice is to try it out immediately. It leads us to one of the main features. Any RAID configuration change you perform prompts the bottom Partitions panel to refresh. If the configuration is correct, file systems are found and validated, you will see folders and files below. 

Forensic RAID rebuild

This way you quickly receive feedback from your actions and can manually specify the correct RAID drive order and block size if you know the right configuration or have educated guesses to try out.

The smart auto-detection module helps out when you have no idea about the RAID configuration. Just follow its hints. Don’t hesitate to click Apply as soon as a Possible configuration hint appears! It makes forensic RAID rebuild faster, checking all possible configurations for you. 

Forensic RAID rebuild - autodetection

2020.7 changelog

New features

RAID support:

  • Autodetection of RAID configuration
  • Convenient assembly with partition preview
  • Supported RAID types: RAID 0, 1, 5 and JBOD
  • Missing drive support in RAID 5
  • Supported file systems for RAID autodetection: NTFS, ext4/3/2

Imaging:

  • Imaging assembled RAID array or its individual partitions
  • Add, change and delete passes of a paused imaging session
  • E01 evidence number, investigator, description are added to the final imaging report
  • Ability to restore image file to 4Kn drive
  • Save report in the target folder option became enabled by default

Case management:

  • SAVE TO button on Reports page. Allows to quickly save and export selected reports in a single ZIP file.
  • Remote work folder. Performance optimization for cases when 15+ tasks are running simultaneously.
  • Improved report search for non-English languages
  • Ability to reindex currently selected Work Folder

Support of SAS drives with sector size above 4096 sectors

UI changes on the device selection panel

  • Fast device actions: Power on/off, Reidentify, Unmount storage
  • Device power indication

Home page. Specific port indicated for each device report

Bugfixes

  • Imaging to E01 could not get started if source device’s serial number was longer than 50 characters
  • Resuming imaging session could fail if target image folder is password-protected
  • Out of memory error while importing large work folder package files
  • Possible minor issues with segmented hashes after imaging paused and resumed
  • Fixed HTML styling when a case report is opened outside TaskForce
  • Seagate SSD 600 Pro drive was not detected in the device selection panel
  • Incorrect values of Last open date in Cases page

Download

You can download the latest update here: TaskForce firmware

Where to buy

If you still do not have an Atola TaskForce and would like to place an order, this can be done directly via Atola Technology, or from a distributor near you:

https://atola.com/wheretobuy/

Please contact Atola Technology sales department to receive more specific information:

  • Call us: +1 888 540-2010, +1 416 833-3501  10am – 6pm ET
  • Or email us

P.S. Dear customers, we appreciate your feedback and take it into consideration when updating our products. Please feel free to write your thoughts and ideas in the comments section below.

The post Forensic RAID rebuild in Atola TaskForce 2020.7 appeared first on Atola Technology.

Imaging RAID 5 array with Atola TaskForce

$
0
0

With 2020.7, Atola TaskForce supports RAID imaging and provides a breakthrough configuration autodetection module for RAID 0, 1 and 5 with NTFS and ext4/3/2 file systems. More RAID types and file systems will be supported in the upcoming releases with RAID 10 coming by the end of 2020. Imaging RAID 5 array with an unknown configuration is effortless in TaskForce.

1. Start by clicking on the new RAID icon in the left-side Task Menu.

2. Next, select the devices that make up the RAID array and click Continue.

NB You can also use images of the individual drives from the RAID array by browsing and selecting images in the FILE subsection of the Select source device menu.

Next you see the RAID configuration screen. It consists of three parts: RAID configuration part at the top is where you see the selected devices or files. Underneath it, there is the RAID Partitions viewer, which allows a preview of partitions and files within them upon a successful RAID assembly. In the right-hand part of the screen, Autodetection module starts running as soon as the screen has been loaded and produces an output of RAID configuration suggestions.

NB Autodetection module reads data on all devices or images that make up the RAID to identify its configuration, namely: RAID type (level), start LBA, block size and block order. If these parameters are known, the operator can set them manually. Depending on the RAID type, its volume, and how metadata is distributed on the drives in the RAID, Autodetection can produce configuration suggestions within a period of 30 seconds to a few hours (when dealing with a RAID of 9+ drives). In some cases, Autodetection can produce several configuration suggestions, which can be applied one by one to find the exact match.

3. Click the Apply button to apply the configuration suggested by the Autodetection module.

If the suggested configuration matches the RAID native configuration, partitions of the RAID will be displayed and a preview of data within the partition will be enabled.

4. Click GO TO IMAGE button in the left bottom corner of the screen to adjust the imaging settings and define the target for the image.

5. Select the target for the imaging session. Both a local server and a target device in Storage mode can be used for imaging of a RAID array.

6. Click + CREATE FILE button and fill out the image details in the Create image file window and click Create.

7. In the Settings page, click the Change button and then the imaging pass settings.

8. Then, in Edit imaging pass window, you can select the individual partitions to be imaged if selective imaging is required and click Save.

9. Click the START button to proceed with imaging.

TaskForce will be imaging RAID 5 array or its partitions as configured in the imaging settings.

At the end of imaging, TaskForce will produce an Imaging completed report with all the details of the source drives, the RAID configuration, the target, the partition, the timestamps, etc.

The post Imaging RAID 5 array with Atola TaskForce appeared first on Atola Technology.

Imaging RAID 0 array

$
0
0

TaskForce is equipped with RAID configuration detection module and an ability to sustain multiple high-speed imaging sessions on its 18 ports. This makes it uniquely positioned to perform assembly of RAID with an unknown configuration and fast forensic imaging of such arrays. 

Assembling and imaging RAID 0 array

To assemble RAID 0 follow these steps:

  1. Connect the drives that make up a RAID array to the TaskForce hardware unit. Make sure to switch the ports to the Source mode;
  2. Click the RAID button in the left-side taskbar

3. Select the drives in Select source device panel and click Continue

Let’s look at the RAID page in TaskForce interface. At the top of the page, there are key parameters of a RAID configuration:

  • RAID type
  • Start LBA
  • Block size
  • Block order (RAID 5 only)

TaskForce smartly uses defaults for these fields specific to the number of drives, found MBR and partition boot sectors. You can enter values manually if the RAID configuration is known. Or simply apply the results produced by the Autodetection module displayed in the right-hand part of the page.

Immediately upon the RAID page is loaded, the Autodetection module starts running. In Stage 1, TaskForce is linearly reading data on the drives to identify the RAID type.

NB You can add or remove drives if needed. Also, you can change the order of the drives in RAID configuration. Simply grab the drive and drag it to change its position or to remove it from the current array by dragging it to the bin.

In Stage 2, TaskForce goes through thousands of possible variants of RAID parameters (Block size, order, and Start LBA). 

4. Click Apply as soon as Possible configuration tile appears. You don’t have to wait for Stage 2 to be completed:

After you click Apply, TaskForce automatically applies the suggested configuration and checks for partitions. At the bottom of the screen, a preview of the partitions is available.

6. After RAID is assembled, you can proceed with imaging RAID 0 array by clicking Go to Image button:

7. Select your target device and click the Continue button

8. Click the Start button to launch your imaging session

Please note that RAID imaging may take longer than ordinary drive-to-drive imaging due to the typically large size of an array. To optimize the speed of imaging, make sure you use a fast target device or a high-speed server.

Atola TaskForce automatically generates reports for every session.

Unmount RAID 0 array

You can unmount the RAID array to make the individual drives available for other tasks.

To unmount the assembled RAID, follow these steps:

Step 1. Click “Devices” in the top right corner;

Step 2. Scroll down to the bottom of the page and click RAID 0 array

Step 3. Click the Unmount RAID button at the bottom of the page

Now that RAID is unmounted, you can proceed with other sessions, using any of the 6 drives connected to the unit.

***

If you want to learn how to autodetect and image RAID 5 array with Atola TaskForce, read our blog:

The post Imaging RAID 0 array appeared first on Atola Technology.

Atola Insight 4.17 with AFF4 support

$
0
0

Our dev team has decided to celebrate 2021 with a new software update. With this release, Atola Insight Forensic has become the first forensic hardware imager in the world that is capable of imaging into AFF4 files!

AFF4 imager

AFF4 image file

So what’s the big deal about AFF4? This file format has several upsides:

  • Open-source format: it can be described in a court
  • Fast compression methods: Snappy and LZ4
  • Block hashes
  • Binary zeroes are stored as spans (in a “sparse file” manner)
  • Vendor-neutral

Since our team is always focused on performance and AFF4 is a highly optimized file format, Insight’s imaging speed will be as impressive as ever!

Another thing worth mentioning is the rapid proliferation of this file format in the industry. AFF4 is already supported by various forensic image analysis tools: Magnet Forensics AXIOM and AUTOMATE, X-Ways Forensics, Cellebrite Blacklight, AccessData FTK.

To learn more about AFF4, visit the official website: AFF4 -The Advanced Forensics File Format

Imaging report for an AFF4 image file

AFF4 imager

Note: AFF4 block hashes feature is not supported yet. It will be added in the next release. Until then, we recommend using segmented hashing.

Entropy calculation while imaging

The DiskSense hardware unit used for Atola Insight is a powerful box. Not only does it calculate linear & segmented hashes in the course of imaging, it can also perform various data analyses with no penalty on imaging performance. In the earlier versions of the software, we added file signatures & artifacts. Now it’s time to show the big picture of source drive data with an entropy map.

Entropy shows the degree of data randomness across the whole space of the source evidence drive. By opening the Entropy tab, you can overview the data distribution. The light pink color means a low entropy level close to 0%. Most likely, you have sectors filled with binary zeroes or a pattern there. Whereas the dark purple color indicates the maximum data randomness. Based on experience, it is a sign of:

  • encrypted files or partitions
  • compressed videos, photos, audio files
  • compressed archive files
Imaging engine is calculating entropy on-the-fly
Entropy. Imaging to AFF4

Changelog

New Features

AFF4 image file support 

New imaging option: Calculate entropy. It enables data randomness analysis in the course of imaging.

Link to the new imaging Cheat sheet added to a few screens

If SATA target is limited via HPA at the start of imaging, a corresponding log message is added

Changed parameters of a new image file are saved and applied during the following imaging

Bugfixes

Blue screen on Windows 10 October update during Atola Insight installation process

Imaging. ‘Disabled read-look ahead’ option was not working

Minor UI bugfixes

Download

You can download the latest update here: Insight Forensic 4.17

Where to buy

If you still do not have an Atola Insight Forensic and would like to place an order, this can be done directly via Atola Technology, or from a distributor near you:

https://atola.com/wheretobuy/

Please contact Atola Technology sales department to receive more specific information:

  • Call us: +1 888 540-2010, +1 416 833-3501  10am – 6pm ET
  • Or email us

P.S. Dear customers, we appreciate your feedback and take it into consideration when updating our products. Please feel free to write your thoughts and ideas in the comments section below.

The post Atola Insight 4.17 with AFF4 support appeared first on Atola Technology.

Top digital forensics conferences in 2021

$
0
0

This a list of 20+ most prominent events in digital forensics worldwide expected to happen in 2021 and beyond. Even though there is no certainty as to when the offline events will be happening again, there is growing enthusiasm and hope for meetings to restart soon.

That’s why we will keep this list regularly updated in case any of these events may get postponed, canceled, held online, or new events get announced. Save the link and check this post for updates as we move into the spring.

The events supported by Atola Technology or our partners are marked with an asterisk (*).

Last updated January 20, 2021

Digital forensics conferences 2021

ConferenceDateLocationRegionRegistration fee
Security & PolicingMarch 9 – 11, 2021onlineEuropefree
Wisconsin ICAC ​Conference​​ April 19 – 20, 2021 (TBC)Madison, WINorth Americafree
National Cyber Crime Conference * April 26 – 28, 2021Norwood, MANorth America$395
IACIS * April 26 – May 7, 2021Orlando, FLNorth America$2,995
GPEC Digital * April 27 – 28, 2021Frankfurt, GermanyEurope€15
ADFSL ConferenceMay 2021 (TBC)Daytona Beach, FLNorth America$398
International Police Expo May 13 – 14, 2021New Delhi, IndiaAsia Pacificunknown
Techno Security & Digital Forensics June 6 – 9, 2021Myrtle Beach, SCNorth America$1,295
InterForensics June 8 – 11, 2021Curitiba, PR, BrazilSouth Americaunknown
Israel Defence and HLS Expo June 15 – 17, 2021Tel Aviv, IsraelMiddle Eastunknown
NSA Annual Education & Technology Expo June 22 – 26, 2021Phoenix, AZNorth America$630
Milipol Asia PacificJuly 21 – 23, 2021Marina Bay Sands, SingaporeAsia Pacificfree
NATIA National Training & Technology Exhibition July 31 – August 5, 2021Milwaukee, WINorth Americaunknown
Techno Security & Digital Forensics * August 2 – 4, 2021Denver, CONorth America$1,295
European Police Congress September 14 – 15, 2021Berlin, GermanyEurope€980
Forensics Europe Expo * September 14 – 16, 2021London, UKEuropefree
Computer Forensis Congress October 15, 2021 (TBC)Lisbon, PortugalEuropeunknown
Milipol  * October 19 – 21, 2021Paris, FranceEuropefree
Techno Security & Digital Forensics * October 25 – 27, 2021San Diego, CANorth America$1,295
F3 November 12 – 14 (TBC)Birmingham, UKEuropeGBP195
FIFE November 25 (TBC)Madrid, SpainEuropeunknown
DEX-XL * November 19-20 (TBC)Utrecht, the NetherlandsEuropeunknown
Ontario Forensic Investigators Association Annual ConferenceMay, 2022 (TBC)Toronto, ONNorth America$400
IAFS * November 20 – 24, 2022Sydney, AustraliaAsia PacificAUD$1,350

NB The registration fees in this table are indicative. Each conference has a range of fees based on the occupation, country of origin or the role of each participant. We mention only the basic rate which does not include discounts or special offers. Please check the websites of these forensic conferences to learn up-to-date information about the applicable registration rates.

The post Top digital forensics conferences in 2021 appeared first on Atola Technology.

Imaging RAID 5 array with errors on multiple drives

$
0
0

When imaging RAID 5 array with errors on multiple drives, Atola TaskForce is still able to detect its parameters and image the whole RAID. Let’s examine a case with a RAID 5 consisting of 5 drives, two of which have bad sectors.

Reassembling RAID 5 array with errors on multiple drives

Click the RAID button in the left-side taskbar and select the drives that make up the RAID array. 

TaskForce autodetection module starts running immediately upon selection of the RAID members. In Stage 1, TaskForce reads data on the drives to identify the RAID type. In case it runs across an error, it displays an Error tag next to the corresponding RAID member. 

To see the number of errors encountered during the media scan, simply hover your cursor over the Error tag.

RAID configuration autodetection and error tags on drives

TaskForce autodetection takes a few minutes to find the best parameters for the RAID. As soon as TaskForce detects the suitable configuration, click the Apply button.

RAID configuration applied

TaskForce automatically applies the suggested configuration and checks the file system for partitions.

Despite the errors on the drives, Atola TaskForce can mount the partitions for preview. This is possible due to data redundancy inherent to the RAID 5 arrays.

Imaging RAID 5 with errors

To image the RAID, select the target device and start the imaging session.

Upon encountering an error, the system automatically reconstructs the missing data on the fly. TaskForce achieves this by using the parity blocks on the remaining RAID members. In the imaging speed graph below, you can see how imaging time dramatically increases when TaskForce encounters an error. The longer imaging time is due to TaskForce performing the reconstruction of data.

Imaging sectors with errors  on a RAID

It is a fully automated process, no operator involvement is necessary. TaskForce seamlessly integrates the reconstructed data to create a complete image. And the image has no data missing.

Imaging of RAID 5

What if …?

What if multiple drives of the RAID 5 array contain errors in the same (corresponding) sectors and data reconstruction is impossible?

In this case, TaskForce’s automated multi-pass imaging system works with RAID arrays just as well as with individual drives. If data in certain sectors is unreadable during the first pass, the multi-pass imaging system will address the same sectors on subsequent passes. On those subsequent passes, TaskForce will spend increasing time periods to thoroughly retrieve the data from the bad sectors. If data is eventually read in the corresponding sectors on all but one of the RAID members, then data reconstruction becomes possible again. In the end, TaskForce will be able to provide you with a complete image of the RAID.

Imaging completed report: successful imaging RAID 5 array with errors on multiple drives

When Atola TaskForce completes imaging, it automatically generates the Imaging completed report. The report informs the operator about all the details: RAID configuration, its members, the imaged sector range, calculated hash, etc.

You can see from the report that TaskForce managed to successfully reconstruct and image the data. That is why the number of errors in the Imaging completed report is zero.  

imaging completed report

With 2020.7 firmware, Atola TaskForce supports RAID imaging and provides a breakthrough configuration autodetection module for RAID 0, 1 and 5 with NTFS and ext4/3/2 file systems. Atola team is working to support more RAID types and file systems in the upcoming releases.

The post Imaging RAID 5 array with errors on multiple drives appeared first on Atola Technology.


Imaging partitions of a RAID array

$
0
0

With time often being an issue, the ability to perform selective imaging becomes vital. Especially when dealing with RAID volumes that in our day and age reach dozens of terabytes in capacity. Here is how TaskForce’s RAID functionality helps you minimize imaging time by imaging partitions of a RAID array.

Once you have selected the drives that make up a RAID array, wait for a Possible configuration suggestion to show up. Then click the Apply button. TaskForce automatically arranges the drives in the correct order and applies other configurations: RAID type (level), Start LBA, block size, etc.

Once you have applied the configuration, TaskForce identifies and verifies the file system. If the file system has been successfully verified, the Partition preview part of the RAID screen allows browsing through the partitions and folders. This may help find potential evidence and prioritize the partitions accordingly.

Finding the suitable RAID configuration

To image a specific partition, click Go to image button and in the imaging settings. Then click All sectors area and switch to All sectors with data in the drop-down menu.

switching to selective imaging

Next, select the partition for imaging and save the settings. Now you are ready to start imaging partitions of a RAID!

selecting partitions for imaging

When you click the Start button, the imaging session will commence. This imaging will take a fraction of the time required for the imaging of the whole RAID array.

Imaging selected partitions

The Imaging completed report will indicate the partitions and sector ranges imaged.

We introduced the RAID functionality in TaskForce with the software version 2020.7. Currently, TaskForce supports RAID 0, 1, 5 and NTFS and HFS file systems. We will support more RAID types and file systems in the upcoming releases.

The post Imaging partitions of a RAID array appeared first on Atola Technology.

Imaging 15+ TB/hour with Atola TaskForce

$
0
0

Minimizing imaging time has been our core priority for the past 10 years. With this idea in mind, we have created Atola TaskForce, a forensic imager with unbeatable capabilities:

  • Parallel imaging: 18 parallel sessions
  • Optimized imaging algorithms: top native speeds of the individual SSD and HDD drives and flash memory storage
  • Hardware: server-grade motherboard and CPU; ECC RAM for data reliability
  • Network: two 10-Gbit Ethernet ports for fast data transfer to servers
  • Configurability: each of its 18 ports can be used as a source or a target thanks to individual Source/write-protection switches

This product design backs the capability of TaskForce to image at the cumulative speed of whooping 15+ TB/hour!

This speed is not theoretical and can be achieved if you use the right setup:

  • imaging 3 SAS ports to 3 SAS ports (all SSD drives)
  • imaging 3 SATA ports to 3 SATA ports (all SSD drives)
  • imaging 2 USB ports to 2 USB ports (all SSD drives)
  • imaging an NVMe drive plugged into the extension port to a network file
  • imaging IDE port (with an IDE drive attached) to a network file

Make sure that you are using fast storage devices in great condition. Another potential performance bottleneck is network bandwidth. To achieve maximum throughput, connect ETH1 port to a network or NAS, and ETH2 port to another network or NAS. It will give you up to 20Gb/s of total throughput, depending on your network hardware and setup. To further optimize your network throughput, check the official TaskForce manual about Jumbo frames for fast imaging to server, Network setup, etc.

If you have all these covered, you can try this “at home” and achieve 15 TB/hour ;)

How TaskForce can transform your process

In the past 3 years, we have watched organizations transform their whole process around the new capabilities they received thanks to their TaskForce imagers. The innovative feature stack that we are constantly updating, allowed them to introduce this hardware imager into their automated workflows, image RAID arrays with unknown configurations, perform multiple zero-click imagings in express mode.

These and other fantastic features make TaskForce a beast of an imager that provides you with unprecedented flexibility and speed!

The post Imaging 15+ TB/hour with Atola TaskForce appeared first on Atola Technology.

Imaging RAID 5 with a missing device

$
0
0

When it comes to RAID imaging, a forensic specialist may be confronted with an array that not only has an unknown configuration but also one of the drives severely damaged or missing. This is when Atola TaskForce comes to the rescue! If this is a RAID 5 with a missing device, TaskForce uses the array’s redundancy to create a full image of the RAID.

All you need to do is select all available RAID members and click the Add missing device button. Auto detection module will recommence when a new image file or device is added. TaskForce can identify the right configuration and reassemble the RAID, using redundancy.

When a possible configuration is found, click the Apply button.

Having applied RAID configuration, proceed with imaging by clicking the Go to image button.

During the imaging session, Atola TaskForce takes advantage of the redundancy to create an image.

In the Imaging report one of the devices will be indicated as missing. The report will provide you with all the details of the imaging session.

Add missing device function becomes your true savior in uncommon yet occurring situations when one of RAID drives is:

  • heavily damaged
  • absent at all

In October 2020, Atola TaskForce 2020.7.1 augmented the RAID functionality and introduced substantial enhancements to TaskForce’s connectivity options.

The post Imaging RAID 5 with a missing device appeared first on Atola Technology.

RAID configuration detection in Atola TaskForce

$
0
0

With RAIDs landing on forensic examiners’ desks often being completely anonymous, finding the correct RAID configuration becomes a tedious manual job that can take hours and days to complete. 

To make this process efficient and effortless, Atola developers equipped TaskForce forensic imager with a breakthrough configuration autodetection module.

This time-saving solution automates the configuration search and allows the operator to focus on the more urgent tasks that require human attention.

TaskForce Autodetection module

TaskForce’s RAID configuration autodetection process commences immediately upon selection of the RAID members, which can be any combination of devices and image files. 

In Stage 1,  the autodetection module reads data on the drives to determine the RAID type.

In Stage 2, the autodetection module uses heuristic algorithms to efficiently go through thousands of possible configurations to identify the suitable device order, block size and block order. 

As soon as TaskForce detects a suitable configuration, click the Apply button.

The number of RAID parameter combinations to check is limited to 100,000,000. With 12 possible block (stripe) sizes – ranging from 512 bytes to 1 MB – the current limit allows TaskForce to check all possible RAID configurations for:

  • 9 devices in a RAID 5 array (17,418,240 variants)
  • 10 devices in a RAID 0 array (43,545,600 variants)

Any RAID configuration change the operator performs prompts the Partitions panel to refresh. In case the configuration is correct, file systems are found and validated, and the operator can see the folders and files within the found partitions.

Depending on the RAID type, volume, metadata distribution, TaskForce Autodetection module can produce configuration suggestions from 30 seconds up to a few hours for large 9+ RAID members. And the speed of this automatic combination search speeds up to the max what would otherwise be a tedious manual process.

There are also cases when the Autodetection module can come up with several configuration suggestions. The operator can apply these suggestions one by one to find the exact match.

mdadm-created RAID

Most RAID arrays are assembled using hardware controllers and NAS. Such RAID arrays require some time for TaskForce Autodetection to try out suitable configurations in search of the right one. As for software RAID arrays created with mdadm in Linux, Atola TaskForce can instantly identify such mdadm-created RAID arrays and their configuration by detecting controller metadata.

A partition displayed in the bottom part of the screen confirms that the applied configuration is correct.

This RAID’s Start LBA is different from 0. TaskForce’s Autodetection module can detect this parameter for different types of RAID arrays and mdadm versions.

Imaging mdadm-created RAID array

TaskForce’s user-friendly interface enables you to intuitively perform all the operations, without having to check each step with the Manual.

To proceed with imaging of the reassembled RAID, simply click the Go to image button at the bottom of the screen and select the target for your session.

Imaging session will start right after you press the Start button, running as fast as the target speed allows.

The imaging report will be generated automatically and will provide all the details of the imaging session.

Atola engineers continue working to support more RAID types and file systems in the upcoming releases to help examiners tackle most of the RAID cases they encounter and make these tricky cases as effortless and fast as possible.

The post RAID configuration detection in Atola TaskForce appeared first on Atola Technology.

AFF4 support in Atola TaskForce 2021.4

$
0
0

Atola is pleased to announce the support of AFF4 files in Atola TaskForce, which makes it the second hardware imager able to create AFF4 files after Atola Insight Forensic!

Imaging to AFF4

AFF4 is a highly optimized open-source forensic file format with a wide range of benefits:

  • Open-source format: you can describe it in a court
  • Supports multi-pass imaging
  • Fast compression methods: Snappy and LZ4
  • Block hashes
  • Stores binary zeroes as spans similar to sparse files
  • Vendor-neutral

AFF4’s block hashes are calculated for small segments of data on the drive and are stored in a table inside AFF4 metadata and there is a Block map hash that represents a single SHA-512 hash value for all the individual block hashes based on Merkle tree model. This is great news for imaging of damaged drives to a file using TaskForce’s multi-pass imaging algorithms.

Multi-Launch

Atola dev team always looks for new ways to improve your experience and expedite your process. Multi-launch has been introduced exactly for these reasons.

Just select the task you wish to perform, and click the Multi-launch check box in the top right corner of the Device menu. This enables a one-action-for-all selection of drives.

Be it diagnosing, hashing or wiping, multi-launch allows starting sessions for multiple drives in one go!

Changelog

New Features

Imaging:

  • AFF4 image file support
  • Imaging to compressed E01. Performance increased by 100%
  • Detailed speed stats during imaging to reveal bottlenecks
  • Manual jump when you click the imaging progress bar
  • Revamped imaging presets: 
    • New local presets which are saved in your browser
    • Damaged drive preset

Multi-launch mode for Wipe, Hash, Diagnose and other single device tasks.

RAID:

  • exFAT support
  • HFS/HFS+ support

Wiping:

  • New wiping method: Secure Erase 
  • Option to automatically unclip HPA/DCO before wiping

Other > Browse Files – file browser for devices and images.

M.2 Extension. Support of NVMe drive hot-swap.

Support of HTTPS with external organizational and self-signed certificates.

Device status tag for quick display of the last diagnostics result or lack thereof.

Bugfixes

Imaging:

  • Image hash was not stored in E01 target file if a read error occurred
  • Possible write error when imaging a 16TB+ drive to an uncompressed E01 target image file
  • Imaging couldn’t launch if target directory had a comma (,) character in its path
  • Inability to resume imaging to E01 compressed file if you pause it during a read error
  • Minor issues with reverse imaging mode and automatic jumps
  • A slight deviation in free space calculation of Storage

RAID:

  • Failed RAID configuration autodetection when facing NTFS partition with filenames longer than 127 bytes

Logs, Non-device reports, Information about the hardware unit’s components were not included when generating a large report from multiple cases.

Download

You can download the latest update here: TaskForce firmware

Where to buy

If you still do not have an Atola TaskForce and would like to place an order, this can be done directly via Atola Technology, or from a distributor near you:

https://atola.com/wheretobuy

Please contact Atola Technology sales department to receive more specific information:

  • Call us: +1 888 540-2010, +1 416 833-3501  10am – 6pm ET
  • Or email us

P.S. Dear customers, we appreciate your feedback and take it into consideration when updating our products, feel free to write your thoughts and ideas in the comments section below.

The post AFF4 support in Atola TaskForce 2021.4 appeared first on Atola Technology.

The Story of TaskForce in 11 Acts

$
0
0

This week, Atola TaskForce is celebrating 3 years of operating in the world’s top digital forensic labs and assisting hundreds of examiners!

Let’s look back at the 11 major software updates (and a few smaller ones) that have been released in these 3 years.

This is a story of transformation of the concept of an imager itself, and of what it can achieve.

2018.1 – The initial release

With the initial release on May 15, 2018, we launched Atola TaskForce.

TaskForce’s feature set was revolutionary in its flexibility of user operation and connectivity. With the range and number of storage devices it supported, and the unprecedented overall performance of 15 TB/hour, TaskForce instantly became the Superman among forensic imagers!

Shortly after, revision 2018.1.1, also enabled imaging to password-protected servers.

2018.8 – Presets. Performance boost

The first firmware update brought over a hundred new features and bug fixes. For example, the introduction of custom settings (aka presets) that help create and share optimal imaging workflows between colleagues. It works both when you use different TaskForce imagers or when the same device is used from different workstations. Look up release 2020.4 to see how this functionality evolved further!

In 2018.8, users received the ability to export lists of sectors on the source drive that have or have not been successfully imaged, as well as the sectors that contained errors.

Select the type of sectors to export

2018.12 – More interfaces. Selective imaging

This firmware version brought, among other features and improvements, NVMe support via M.2 extension module and Imaging of all sectors with data. The latter is a time-saver for those who want to get all the data from the drive while skipping empty sectors.

Imaging an NVMe drive

2019.4 – New target options. Improved performance

Almost a year into TaskForce’s existence, more functionality was released and included imaging to files on target and imaging to E01 compressed file. The release also added drive temperature graphs and drive working timespans to the Diagnostics module (for some investigators, it may provide clues about the way the drive was recently used). On top of that, TaskForce received a considerable performance boost during imaging and wiping.

Saving image files on a drive set to Storage mode

2019.7 – Web API for external automation tools or scripts

Here came a groundbreaking solution for forensic examiners implementing automation solutions in their labs!

By introducing Web API in 2019.7 release and its integration into Magnet AUTOMATE, TaskForce became the first hardware imager able to operate in automated workflows.

TaskForce integrated into Magnet AUTOMATE workflow

2019.9 – Express mode. Selective head imaging

We listened to our customers when they were asking to implement a solution that would reduce the number of clicks to launch imaging with predefined settings. This is a crucial feature when working under time pressure. We brought you the Express mode which allows a zero-click launch of up to 17 imaging sessions.

Just plug the drives and watch them get imaged!

Another important addition was the in-depth head diagnostics functionality and selective head imaging support. This data recovery feature enables you to get evidence from the good heads of the drive without risking causing more damage to the drive with the bad head.

A damaged head is automatically suggested to be disabled as per results of the drive Diagnostics

2020.1 – VeraCrypt-encrypted targets

Atola TaskForce creates an encrypted exFAT partition using VeraCrypt with a 256-bit AES algorithm on the target drive, which the user locks with a password.

This way you make your Storage drive encrypted. All image files remain safe and protected during evidence preservation or transfer.

Creating a VeraCrypt volume on a target drive to store images

2020.2 – Segmented E01 and extended Web API

In 2020.2 release we supported E01 segmentation for those examiners who find it more convenient to store data in smaller chunks.

Creating a segmented E01 file

2020.3 – Segmented hashing

The feature that we equipped Atola Insight Forensic with back in 2016, was finally also introduced in TaskForce. Segmented hashing helps verify images of damaged drives and those that may get corrupt over time.

With Segmented hashing, you are able to prove the integrity of most of the data, lest for the bits affected by the damage.

Calculated segmented hashes in the imaging report

2020.7 – RAID Autodetection & Imaging

Finally, there is a forensic imager that is able to acquire an image of the whole RAID, not just the individual drives!

TaskForce’s automated RAID configuration detection module helps reassemble RAIDs even with unknown parameters. The preview of partitions helps identify meaningful data for subsequent imaging of the whole RAID or its separate partitions. The list of supported RAID types and the file systems will be expanded in the upcoming releases.

TaskForce is even capable of detecting and imaging RAIDs with damaged or missing members.

RAID 5 with a missing device. Configuration autodetected and partition preview

2021.4 – AFF4. Multi-launch. Imaging presets

Finally, in April 2021 TaskForce became the second forensic hardware imager in the world to support AFF4 file format (the first one was Atola Insight Forensic). At the same time, we introduced multi-launch of Hashing, Wiping, Diagnostics and other single-drive tasks.

Both features contribute to efficiency, which is always at the core of our development efforts. We strive to make forensic jobs fast and effortless for our customers.

Multi-launch of wiping

Looking back at these three years, you notice how fast TaskForce has transformed. From an extremely flexible high-capacity imager with a traditional forensic feature set to an even more productive and innovative tool. TaskForce now offers unique solutions for emerging and long-standing problems of forensic examiners like RAID support and automation.

We look forward to new developments to make sure that TaskForce remains your favorite problem-solver in the world of imaging.

The post The Story of TaskForce in 11 Acts appeared first on Atola Technology.

Multi-launch of hashing, wiping and diagnostics in TaskForce

$
0
0

When you need to wipe a bunch of target drives for subsequent imaging sessions or double-check hash values on multiple drives in your archive, multi-launch functionality in TaskForce helps you save time and avoid repeated clicks to complete such multi-drive tasks.

This function is currently supported for single-drive tasks: Hashing, Wiping, Diagnostics.

To use multi-launch:

  1. Click the task in the main menu
  2. In the drive selection panel, enable the multi-launch option and select the drives you would like to run the task on. When it comes to hashing, multi-launch can be applied to both the devices plugged into the system and the locally stored image files.

Optionally, you can click the top panel to see the number of selected devices and double-check the selected devices and their details. The drop-down gives additional info about the drives such as their health status according to the most recent diagnostics and case ID.

3. Check and adjust the settings, that will be identical for all of the currently selected drives and click START

If in the wiping settings, you keep the ‘Check if device contains data’ option enabled, TaskForce will scan all the selected devices. If any data may be overwritten. TaskForce will inform you about such drives containing data before wiping is launched on them.

Next, watch TaskForce hash, wipe or diagnose all the drives in one go!

The case management system automatically generates and saves separate reports to the individual cases.

The post Multi-launch of hashing, wiping and diagnostics in TaskForce appeared first on Atola Technology.


Imaging Presets: create optimal imaging routines and share them with colleagues

$
0
0

To ensure that you are using specific imaging settings for certain types of drives or cases, TaskForce has presets functionality for easy, one-click switching to a specific imaging routine. Presets are easy to share with colleagues who use another TaskForce via a simple export/import.

TaskForce has two pre-existing presets: Default and Damaged, recommended for healthy and faulty drives respectively.

Sharing presets for the same TaskForce

Unlike the previous versions of our soft, the functionality of TaskForce 2021.4 onwards includes the autosave of adjusted imaging settings locally, in the Chrome browser. Such locally saved presets are only available on the current workstation but not to other users operating the same TaskForce.

To create a custom preset that can be shared with your colleagues who use the same TaskForce, adjust the imaging settings and proceed to save them:

  1. Click the three-dot icon in the bottom right corner and click Save to
  2. In the pop-up window, type in the name of the preset and click Save

The saved presets are stored in TaskForce’s Work Folder. They are easy to find by other users of the same imager under the Custom button.

There you can also find the locally saved presets next to the ones you saved in the Work Folder. This is because your Chrome browser is set up to store presets locally for you not to lose them. If redundant, they can be easily deleted from the list.

A local copy of each custom preset is saved on the user’s workstation. If redundant, these local copies are easily deleted.

Sharing presets with another TaskForce

When another TaskForce unit does not have access to the Work Folder used by your current one, to share a preset with colleagues who use another TaskForce imager, you need to export it:

  1. Click the three-dot icon and select Export
  2. The preset will be downloaded in .json format

To import a preset:

  1. Click the three-dot icon and select Import 
  2. In Import settings window, click Select file button
  3. Find the file in the file selector and click Open
  4. Click Import

After import, find the preset in the Custom menu.

The post Imaging Presets: create optimal imaging routines and share them with colleagues appeared first on Atola Technology.

Atola Insight Forensic gets new high-performance hardware!

$
0
0

We are excited to announce a new high-capacity hardware unit for our best-selling product, Atola Insight Forensic!

The new hardware unit named DiskSense 2 is equipped with:

  • a server-grade motherboard
  • CPU
  • ECC RAM
  • 2x 10Gb Ethernet ports

These heavy-duty components allow the new unit to triple the throughput of data, while the ECC RAM also secures maximum reliability of data transfer.

3 imaging sessions + other tasks

All forensic and data recovery features that you are used to, remain there. The increased capacity of the hardware allows you to do more forensic tasks simultaneously, both on good and damaged HDDs and SSDs.

All the while, the speed of imaging remains as impressive as ever!

Three simultaneous imaging sessions on DiskSense 2

The new hardware unit has 6 Source ports:

The Target ports are:

  • 3x SATA 3.0
  • USB 3.2

Two 10Gbit Ethernet ports allow imaging drives into the network at high speeds.

On top of the new imaging capability, the new Insight can simultaneously perform a virtually unlimited number of other tasks including hashing, wiping, artifact search, file recovery on the remaining sources, targets or locally stored images.

The new units are available for purchase starting today! The hardware upgrade programme for existing customers will be announced in 2022: due to high demand, we are focused on accommodating existing pre-orders and new purchases.

7 years of Atola Insight Forensic

In 2014, Atola Insight Forensic helped establish Atola Technology as a prominent technology provider for global forensic markets. By combining the sophisticated yet highly automated data recovery technology with a fast imaging engine and a vast forensic feature set, Atola created a tool that is second to none in the industry.

Over the years, Insight Forensic has helped hundreds of organizations worldwide solve cases, and some of these cases had been cold for years!

Download

You can download the latest update here: Insight Forensic 5.0

Where to buy

If you still do not have an Atola Insight Forensic system and would like to place an order, contact Atola Technology directly, or a distributor near you: https://atola.com/wheretobuy/

Please contact Atola Technology sales department to receive more specific information:

  • Call us: +1 888 540-2010, +1 416 833-3501  10am – 6pm ET
  • Or email us

P.S. Dear customers, we appreciate your feedback and take it into consideration when updating our products. Please feel free to write your thoughts and ideas in the comments section below.

The post Atola Insight Forensic gets new high-performance hardware! appeared first on Atola Technology.

Imaging 3 sources with Insight’s new DiskSense 2 hardware unit

$
0
0

Atola Insight Forensic is known for its fast imaging and highly automated data recovery functionality. The system has just received a revamped hardware unit named DiskSense 2. It is still a very compact device, which nevertheless possesses immense power thanks to the server-grade motherboard and CPU. Another great addition is the ECC RAM module, which helps avoid even the tiniest chance of data corruption during data transfer. 

The hardware revamp is great news for small forensic labs that have been experiencing higher data volumes within their investigations: DiskSense 2 allows performing 3 imaging sessions in parallel.

DiskSense 2 is equipped with 6 source ports:

  • 3 SATA
  • 1 IDE
  • 1 USB
  • Extension port for SAS, M.2 NVMe/PCIe/SATA SSD, Thunderbolt, Apple PCIe SSD.

The 4 target ports are:

  • 3 SATA
  • 1 USB

Imaging sessions can run to 3 targets each. The targets can be a combination of bit-to-bit images and image files sent to the target ports, the host computer, or server via two built-in 10Gbit Ethernet ports.

Insight can perform each imaging session at 500 MB/s as long as all drives involved in the imaging sessions are in good condition and the network configuration is optimal for high data throughput.

Imaging bad drives in parallel

Just as with the old hardware unit, DiskSense 2 supports Insight’s unique damaged drive functionality on any of the parallel imaging sessions. With severely damaged drives, imaging can take hours or even days to complete. And the ability to image 3 drives simultaneously means that other imaging jobs will not be queueing up.

Running other tasks on top of multiple imaging sessions

Furthermore, even with three imaging sessions running, you can perform other tasks by using multitasking capabilities: just click the plus icon in the Ports menu, and add target ports to run wiping, hashing, artifact search or file recovery on it.

Atola Insight Forensic enhanced with the DiskSense 2 hardware unit helps you image more drives, faster.

The post Imaging 3 sources with Insight’s new DiskSense 2 hardware unit appeared first on Atola Technology.

The Story of Atola Insight hardware

$
0
0

Atola Insight Forensic is a product with 13-year-long history, which started with the launch of Atola Insight USB. For some of our readers, it may come as a surprise that Atola Technology started as a technology provider for the data recovery market. Back then, it was our founder Dmitry Postrigan’s ambition to create a tool that would automate data recovery. Atola Insight became a product that immediately allowed imaging as much data as possible from drives with various types of damage including but not limited to:

  • damaged or degraded read/write heads
  • scratches on media surface
  • logical errors within sectors
  • freezing drives
  • worn-out magnetic layer
  • firmware failures

In the span of 13 years, the system received 58 software updates and 4 generations of hardware units, each reflecting changes in the needs of our customers and advances in storage media technology.

By 2014, we discovered that we were selling systems primarily to forensic examiners and this completely shifted our focus to the needs of digital forensics. In 2021, the need to image more drives, faster drove us to launch DiskSense 2 which supports 3 parallel imaging sessions.

In this blog, we will look back at how the system evolved throughout the years and will reflect on the progress we have made.

2008 – Atola Insight Beta

13 years ago exactly, in July 2008, Atola presented to the world the first generation of Atola Insight for beta testing.

Launching a hardware product for data recovery was a logical step towards better, low-level control of damaged media. It also allowed for a more convenient connection of drives: without the need to disassemble a PC in order to plug in the chipboard providing the connection.

Prototype of Atola Insight USB

The software quickly received a few updates, and in November of that same year, the first official software release came out for the first Atola Insight device…

2008 – DiskSense USB

SATA I/II and IDE source ports allowed imaging from drives with the most common interfaces of the time. There were no target ports in this device yet and data had to be imaged directly to the host computer.

The first Atola imager was already equipped with most of its present-day modules: diagnostics, imaging, wiping, file recovery, case management, and access to firmware that allowed detecting both failures and security limitations.

By 2009, the imager’s software was optimized to sustain high imaging speeds. However, to overcome the limitations imposed by the USB 2.0 interface, a new generation of DiskSense had to emerge…

2009 – DiskSense Ethernet

Also known as DiskSense Gigabit Ethernet, this unit was equipped with the speedy Ethernet port of the time. This allowed imaging directly into a RAW file in the network. The unit also had a SATA target port, which allowed imaging data directly onto another hard drive.

The imaging speed tripled compared to the DiskSense USB unit and reached 110MB/s.

At this point, Atola was already receiving numerous orders of both the USB and the Ethernet units from people in the forensic industry. In 2013, hashing was added as a feature specifically for this group of users.

To understand the needs of this growing community, we cooperated with experts in the forensic field to create a device that would tick all boxes in both data recovery and forensic imaging…

2014 – DiskSense Forensic

This generation of DiskSense units was created with the forensic process in mind: the ability to image to 3 targets was an immediate and apparent advantage for forensic examiners. The 1Gbit Ethernet was optionally extended with a 10Gbit extension module, and the built-in 3 SATA and 3 USB target ports allowed using a variety of devices to store the images.

The unit came equipped with 4 source ports: SATA, USB, IDE, and an extension slot for other drives including SAS, M.2 PCIe/SATA SSD, Thunderbolt, and Apple PCIe.

DiskSense Forensic was an instant bestseller and we continuously improved the software to use all the capabilities this hardware could give our users.

2021 – DiskSense 2

With 6 source ports (3 SATA, USB, IDE, Extension) and 4 target ports (3 SATA and 1 USB), 2 built-in 10Gbit ports, server-grade motherboard and CPU, and ECC RAM, DiskSense 2 is the state-of-the-art hardware.

It allows the universally loved Atola Insight Forensic software to not only retrieve data from damaged drives, but also run 3 high-speed imaging sessions. On top of the parallel imaging, DiskSense 2 allows Insight to perform hashing, wiping, and other tasks without compromising the efficiency of imaging and the effectiveness of data recovery.

Atola Insight Forensic is a product with a long history, many achievements, and a huge fandom in the forensic community. We always push our technology to the limit to provide the best imaging solutions to our customers.

The post The Story of Atola Insight hardware appeared first on Atola Technology.

Imaging and hot plug of NVMe drives with DiskSense 2

$
0
0

DiskSense 2 did not only bring 3 parallel imaging and unprecedented multitasking capabilities. This new hardware unit allows you to image NVMe drives using M.2 SSD extension module at high speeds and avoid shutting the system to replace the drive in the extension module.

Fast imaging of NVMe drives

Because NVMe drives are the fastest storage devices out there, the imaging speed is usually limited by the target used during this session.

If you use an SSD drive as a target, your imaging will run at up to 500 MB/sec.

Imaging to an SSD target drive

But when you image to an NVMe drive installed on your host PC which supports a 10Gbit Ethernet connection, you will see much higher imaging rates.

Imaging to the host PC

Hot plug of NVMe drives

The previous generation of DiskSense hardware units was developed way before NVMe drives appeared. Therefore the old DiskSense had limited support of such drives. Thanks to all the great new technology used in DiskSense 2, it supports hot plug of these drives once the M.2 extension has been properly plugged into the system.

Just stick to 2 simple yet important rules:

  1. Power off the system to plug/unplug the M.2 extension.
  2. Power off the extension to plug/unplug the NVMe drives.

For more information about the use of NVMe drives in DiskSense 2, read our manual.

The post Imaging and hot plug of NVMe drives with DiskSense 2 appeared first on Atola Technology.

Viewing all 195 articles
Browse latest View live