Every once in a while forensic examiners come across hard drives that get shorted. In most cases, a drive has become shorted after experiencing overvoltage either due to a power supply failure or as a result of a user error. Here is what happens to drive in these scenarios and how to fix this.
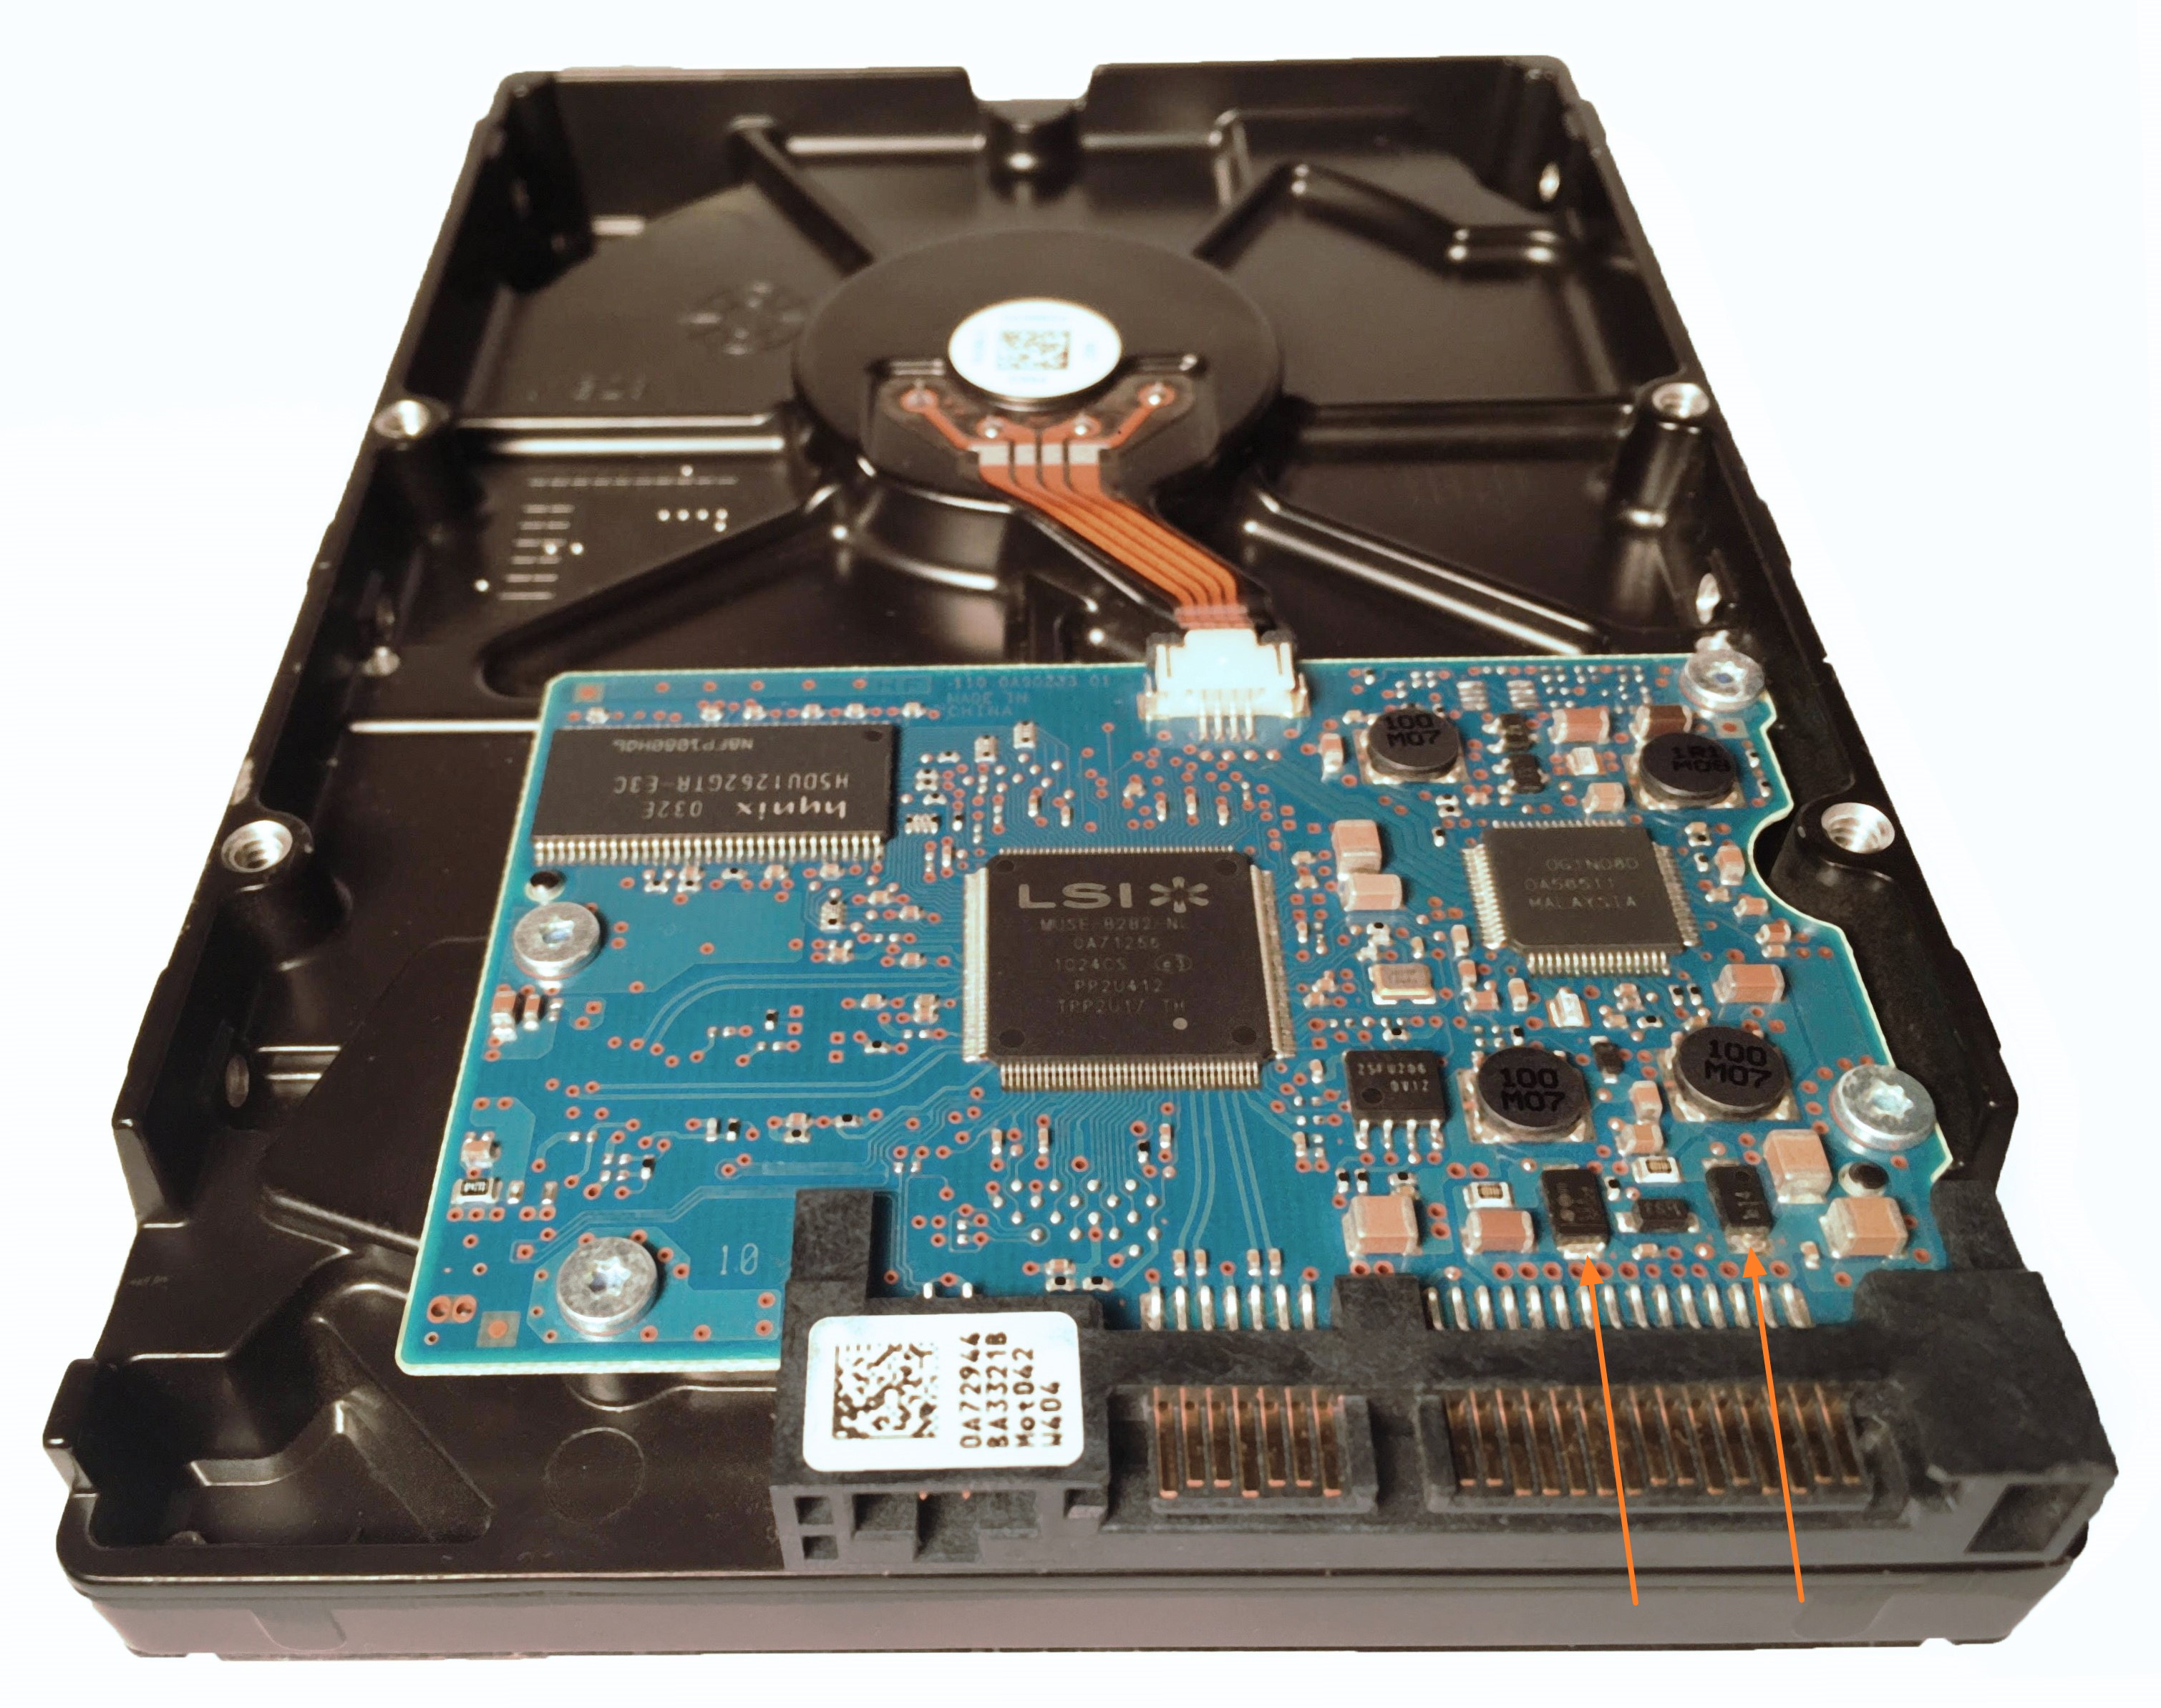
Most drives have two TVS diodes: one on the 5V rail and another one on the 12V rail.
In a situation when a drive experiences overvoltage, these diodes protect the drive’s circuit by converting the surplus electric power into heat energy and warming up. In case of reverse polarity, the current will go in the opposite direction and will completely be flowing through the diode, thus warming it up, too. If overvoltage or reverse polarity episode is relatively short and the dissipated energy is not too high, the diodes will recover and continue working. Otherwise, the diodes “sacrifice” themselves and get shorted.
When the drive is subsequently powered, the diodes create short circuit. This term describes the situation in which there is a low resistance connection between two nodes. That is exactly what happens to a drive when its TVS diodes are shorted.
Hard drive with TVS diodes
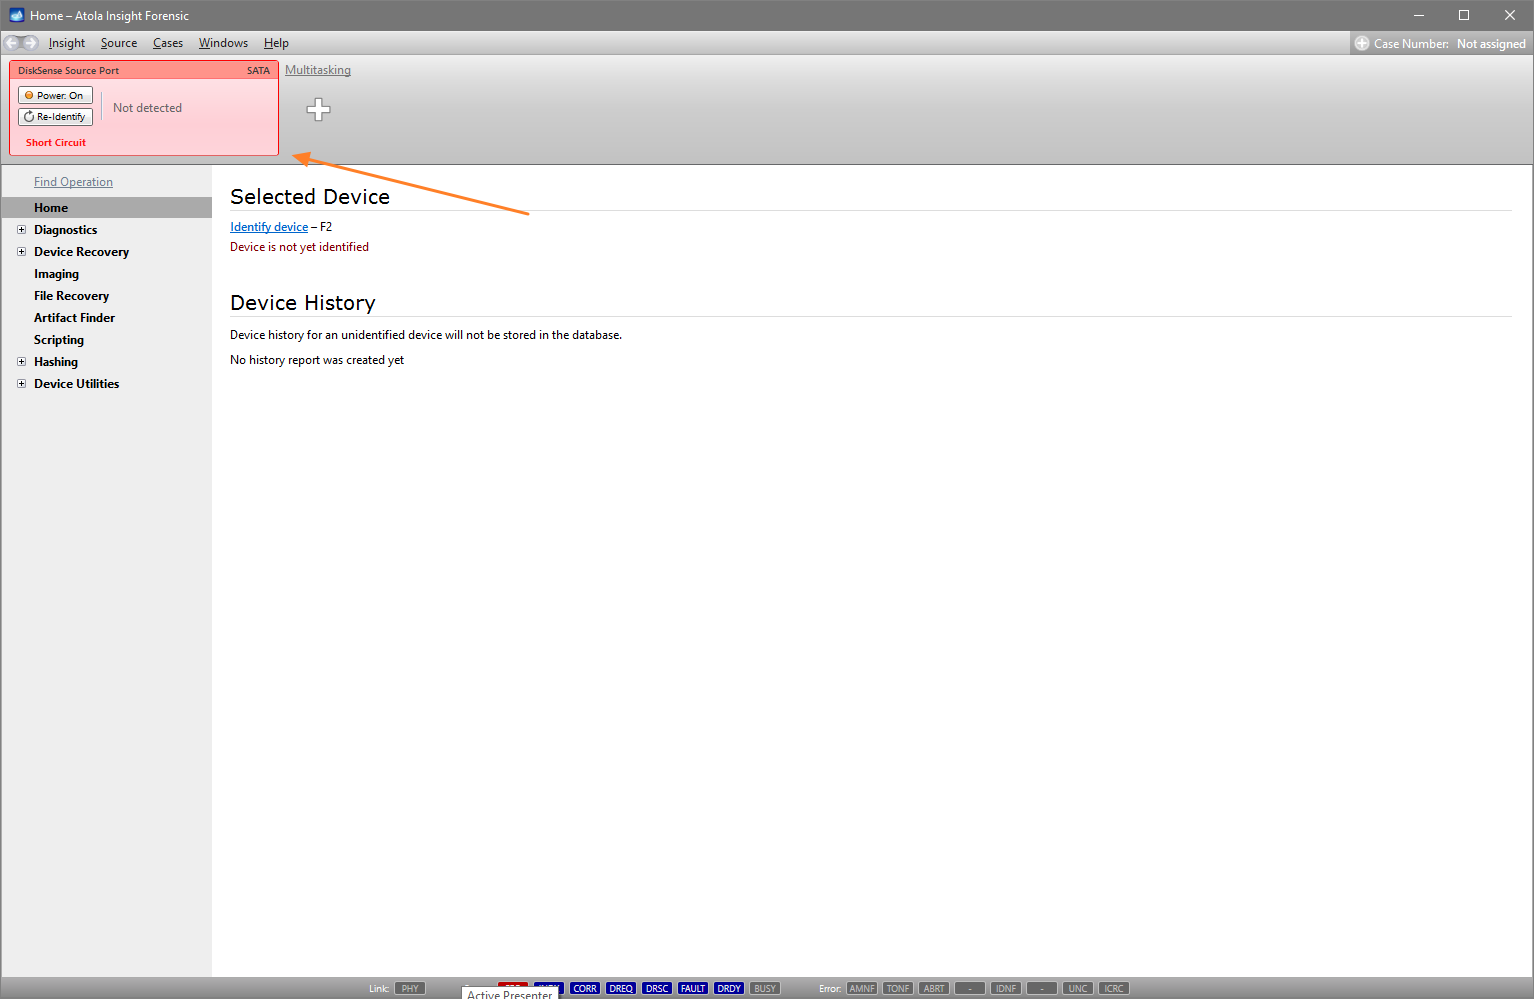
If you try to connect such drive to Atola Insight Forensic, the Source window will have a short circuit alert to notify the operator about the detected issue.
Short circuit alert
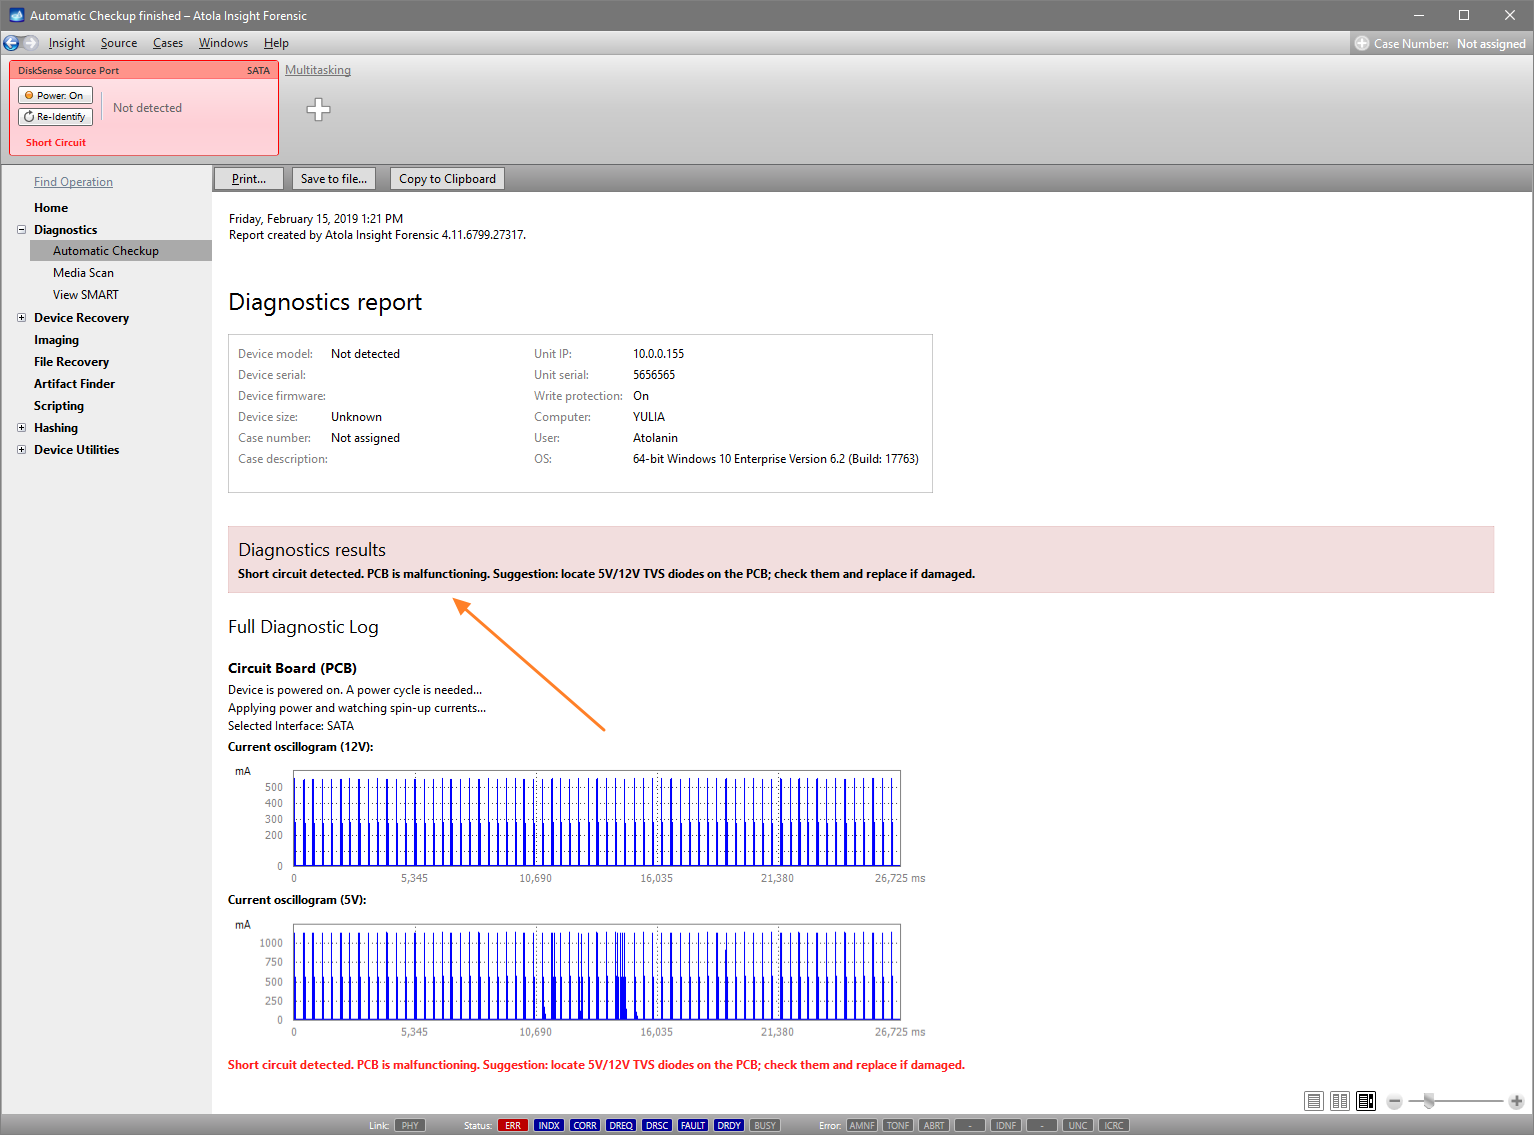
A drive with a shorted TVS diode cannot be identified or imaged. You can try to run diagnostics on the drive, although it cannot be properly diagnosed and the report will suggest that the TVS diodes should be replaced.
Diagnostics report of a shorted drive
However, if you need to image such drive and you have no new TVS diodes at hand to replace the shorted ones, you can actually image such drive with an Atola imager just by removing the diodes!
It is safe to image such drives with any Atola product. Both Atola TaskForce and Atola Insight Forensic have short circuit and overvoltage protection to secure both the imager and the drives attached to it from circuit failures.
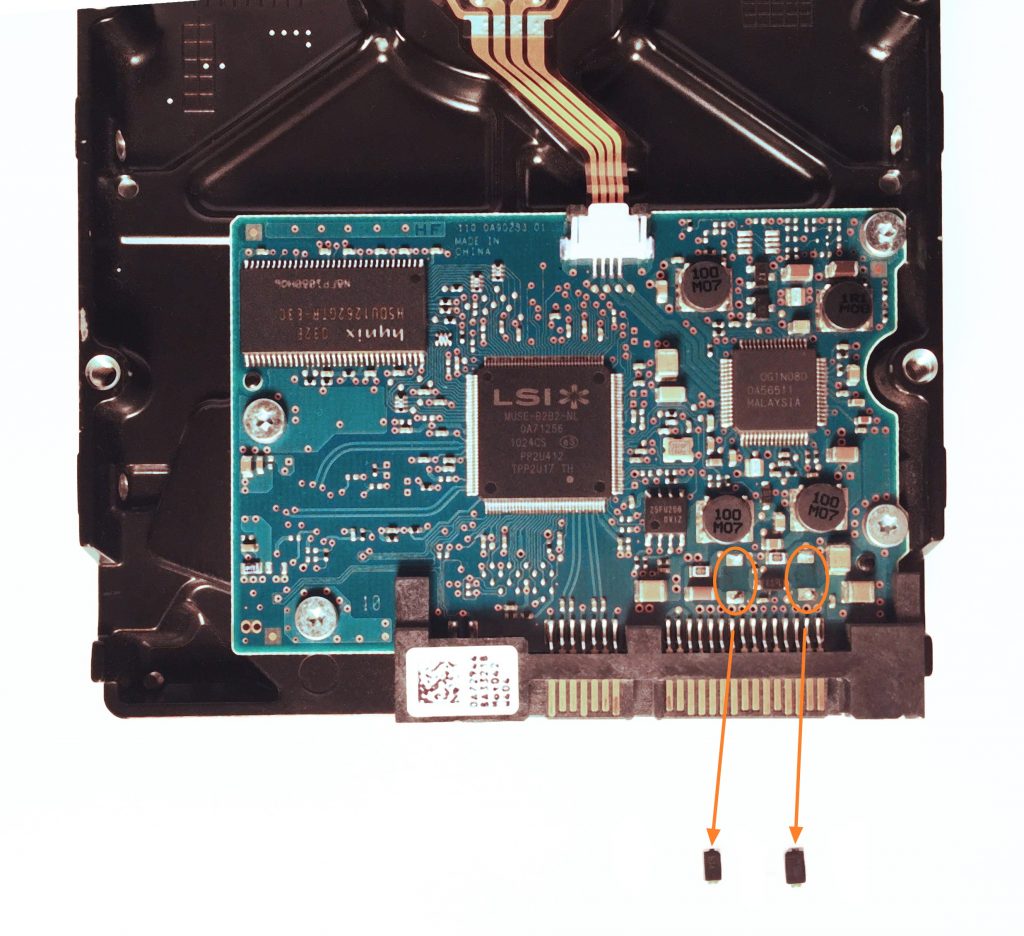
The best way to remove the diodes is by heating the area of the drive where the they are located with a hot fan (e.g. in a hot air soldering station), and then gently removing them with tweezers.
A hard drive with its detached TVS diodes
Once the diodes have been detached, you can plug the drive to Atola Insight Forensic and proceed with imaging data from its platters.
If you need to create multiple images of a drive for different purposes, with Insight you can image to three targets simultaneously. The targets can be of different types: another drive, an E01 (RAW, img, dd) file located on a server/workstation.
Click Imaging in the left-side menu
Click Create new session link
Select the target drives you want to image to and click Select button
If one of the targets has to be a file, follow these steps:
Click Add Image File link in the Target Device Selection window.
2. Select file location, name and format, then click Open button.
3. Once you have selected all targets, click Select button.
4. Double-check imaging settings and click Start Imaging button.
NB The speed of this imaging session will depend on the slowest of the devices involved in it: either on the read speed of the source drive or the write speed of the targets you have selected.
SMART table is a valuable source of information about a hard drive’s health. SMART (Self-Monitoring, Analysis and Reporting Technology) provides stats of a drive’s operation, thus helping predict its future failure. Making a definitive conclusion based on the indices in SMART table is not easy: not all parameters are critical, it is usually a combination of bad values of a few parameters that point to a trouble, time factor plays a role too (how fast has the state of the drive been deteriorating).
SMART table is included in Diagnostics report. If you want to have a look at the current indices:
Click Other in the left-side menu
Click View SMART
Select the drive
Click Start button
SMART table attributes may differ depending on the drive manufacturer. The most critical attributes are:
Reallocated sectors count
Current pending sector count
Uncorrectable sector count
When RAW value of any of these attributes is greater than zero, TaskForce will highlight it in yellow.
The worse the values, especially in these critical attributes, the more carefully the drive needs to be treated.
To keep track of the changes occurring to the attributes of the SMART table, the imaging settings can be easily adjusted to record SMART table indices prior and after each imaging session.
By comparing the two tables, user can evaluate whether the health of a drive has been deteriorating throughout the imaging session and thus assess how quickly its health has been getting worse. Any discrepancies between the two SMART tables will be highlighted in yellow.
Whenever you need to evaluate how the state of the drive has been changing long-term, you can go to previous imaging sessions
and look up SMART table. TaskForce will store this information in its case management system.
E01 file format is the de facto standard format for forensic examiners to store images due to its ability to store not only a copy of the evidence drive, but also case and evidence details. E01 file can also store both MD5 and SHA1 hash values calculated during imaging.
To image a source evidence drive to an E01 file, you have to create a new target file.
Creating a new E01 file
Click Image in the left-side menu
Select the source evidence drive in Select source device panel
Click Select File in Select target devices panel
In the file selector, find the folder to store the image and click the plus (+) button in the bottom right corner
In the pop-window, select E01 file type and click Create button
Fill in E01 file information and click Create button.
Click Continue button
Create an E01 file
Enable dual-hash and start imaging
Once you have selected the source drive and created the target file, you end up in Settings summary page. Click Change button to adjust the imaging settings.
In the Hashes tab make sure that Hash source during imaging is selected, also select both MD5 and SHA1 hash types.
Click Start button to proceed with imaging.
Adjust imaging settings
The report and the E01 file
The report
Upon completion of imaging, you can see both MD5 and SHA1 hash values indicated in the Imaging completed report.
E01 file with calculated MD5 and SHA1 hashes
It is also possible to look up the information of the created E01 file. To do that, perform the following actions:
Open the Devices menu by clicking the Devices button in the upper right corner.
In the File section, you can see the recently created files.
Click the corresponding E01 file to view its metadata.
When you image data from an evidence drive, but the target drive is larger than that of the source, the hash values for the source and for the target drives will not be identical.
This will happen even if there is no data in the remaining space of the target.
To avoid it, you can limit your SATA target drive’s capacity using Host Protected Area (HPA).
It will make the sectors beyond this limit inaccessible to the hashing tools or the end user. In TaskForce, it only takes one quick adjustment to the imaging settings:
Click Image in the left-side task menu and select the source and the target
In the Settings page click Change button.
In Miscellaneous tab activate the Limit target disk size to source size using HPA (SATA target ports only) option.
Enabling HPA restriction for target
You can now proceed with the Imaging process by clicking Start button.
Before the imaging starts, TaskForce looks up the size of the evidence drive and limits the space of the target using HPA to make its capacity identical to that of the evidence drive.
When Imaging is complete, the report will contain information about the time when HPA was enabled.
Imaging report indicates the change to the target drive capacity
The target disk’s port in Devices menu now contains an HPA indicator, thus informing you that HPA has been enabled on this drive.
HPA indicator in the port of the Device menu
There will also be a report created in the case management system, which indicates the old (native) and the new (as set by HPA) max address.
Report about HPA activation
Now you can calculate hash on both drives to make sure the hash values are identical.
NB Enabling HPA is an option available only for SATA target drives.
To learn how to unclip HPA, read this article in our manual.
TaskForce’s complex imaging functionality allows imaging even physically damaged drives, while avoiding further drive deterioration. Damaged media require a sophisticated imaging approach to balance out thorough data extraction with forensics’ need in expediency and careful treatment of damaged media.
Most forensic imagers can only do linear imaging, which dramatically slows down imaging process whenever a bad sector is encountered, and, as a result, the drive may freeze. To speed up imaging of damaged media and maximize the amount of successfully retrieved data, TaskForce has a special imaging algorithm that includes deliberate timeout and block size control.
Using small block size pays off when you need to thoroughly retrieve maximum data from an unstable drive, but it also significantly slows down the imaging process. What’s worse, such imaging approach may cause further damage to the media. That’s why TaskForce’s multi-pass imaging engine uses large blocks with short timeouts on the first few passes, scheduling reads inside slow areas for later and then using the smallest block size on the last pass when very few sectors are left to be read.
This technique allows the bad areas to be approached in the most gentle way, while achieving imaging speeds of up to 550 MB/sec in good areas of the drive and reaching an unbeatable overall speed of imaging.
TaskForce handles block size automatically, to provide the best possible results in the shortest time span. This makes TaskForce faster at virtually any job than any other data recovery or image acquisition tools commercially available.
Block sizes and timeouts are adjustable. However, the default settings of the passes are based on our decades-long experience in data recovery market to fit most types of damage to the drives. That’s why we suggest that you use the default settings unless a particular drive requires a specific imaging approach.
Multi-pass imaging settings
On the first pass, TaskForce allows 1-second Timeout per block, and the Max read block size is set to 4096 sectors. This allows smooth sequential imaging of all healthy modern drives. But when imaging damaged media, these settings allow TaskForce to skip any areas that slow down the process and perform Jump on error by 1,000,000 sectors at a time. This way all the good areas of the drive are imaged at top speed, while forcing TaskForce to return to the problematic areas on the next passes, narrowing down the bad areas and allowing more time to retrieve the data within them.
Imaging on the first pass. Empty areas where errors were encountered and jumps were performed
While Max read block size remains the same during the second and the third passes, the Jump on error is set to 20000 sectors and 4096 sectors respectively and slightly longer, 5-second Timeouts are allowed for attempted reading of the blocks.
Empty areas start filling up with data, as the jumps become smaller
On the fourth pass, both Jump on error and Max read block size are reduced to 256 sectors.
The amount of data retrieved is already 99%
On the fifth pass, TaskForce allocates 60-second Timeouts to read the Maximum block size of 256 with just 1-sector Jump on error. It is the last and the most thorough attempt to retrieve data from the remaining bad areas of the drive.
On the fifth pass TaskForce attempts to read the data for the last time
After the final pass, the Imaging Results report will indicate the eventual number of errors on the drive and other detailed statistics.
By clicking on one of the imaging passes in the imaging settings, you can adjust all parameters of the pass. Reverse direction option may help handle some of the damaged media. With this function selected, TaskForce will approach skipped areas of the drive from the opposite side on any selected pass. This way TaskForce can get more data from a drive before entering a damaged zone, which needs to be concentrated on during the following passes.
Reverse direction and disable read look-ahead functions may prove to be a good strategy with some damaged media
Another option in the imaging pass settings, which is worth mentioning is Disable read look-ahead. Most contemporary hard drives have read look-ahead functionality, which makes the drive sequentially read more blocks than requested in a command. In good drives, this functionality helps the drive to operate faster by reading more data and caching them. But with bad drives, read look-ahead leads to bad areas being addressed more often, which slows down the process and may lead to a complete freeze of the drive. In such cases, disabling read look-ahead option is advisable.
We are excited to introduce this highly anticipated feature to TaskForce! Now a target can be put in Storage mode and serve as a destination for multiple images.
Storage mode can be activated when you select target for imaging
When a new drive is put in Storage mode, it is formatted to exFAT with large cluster size (32 MB) to ensure the fastest possible imaging
Files on a destination drive in Storage mode
A drive in Storage mode is marked with a special blue icon in device panels
Device selection menu with a destination drive in Storage mode and a RAW file created on that drive
Imaging to E01 compressed file
E01 compression is now supported. It helps save space on the destination device, in some cases, quite substantially.
Creating a compressed E01 file: simply tick the box
Thanks to TaskForce’s mighty processor, E01 compression takes no more time than regular imaging. In fact, if data on the evidence drive is highly compressible, there will be less time required for writing this data onto a target, therefore imaging may run much faster.
Storing case data on a server
Keeping in mind that some of our customers require individual certification for any drive that stores case data, which makes using TaskForce’s own NVMe drive somewhat problematic for such organizations, we have now enabled reconfiguration of case management system so that location of the Work folder (i.e. the database of cases and reports) can be moved to a local server.
Other changes
Imaging:
Imaging to E01. Performance increase by 100%.
Imaging. Performance enhancement for SAS ports: 100-200% increase depending on the combination of source and target types.
Cases. New option “Set case details before task start”
Diagnostics. Drive temperature graph and drive working timespans
Wiping. The speed of random and LBA pattern methods accelerated by 100%.
New method of TaskForce firmware update: from USB stick
Japanese language support
Bugfixes
It was impossible to select an image file with “+” sign in its filename
USB drives. Intermittent unsuccessful identification of certain USB drives
INTEL SSDSC2KB240G7 solid-state drive model was not identifiable
False “Device isn’t connected to TaskForce or is not responding” message on certain enterprise SAS drives
Diagnostics. Rare incorrect “According to the status register, circuit board is malfunctioning” message for drives on SAS ports
Diagnostics. Estimated imaging time indication was missing for old drives with capacity below < 7 GB
Diagnostics. Short circuit diagnostics could be missing when short circuit is detected.
Where to buy
If you still do not have an Atola TaskForce and would like to place an order, this can be done directly via Atola Technology, or from a distributor near you:
P.S. Dear customers, we appreciate your feedback and take it into consideration when updating our products. Please feel free to write your thoughts and ideas in the comments section below.
With TaskForce, Atola introduced the fastest and most capable imaging engine to the forensic market. While cumulative imaging speed in TaskForce constitutes 15 TB/h, the engine is capable of wiping up to 18 drives connected to it, thus achieving a cumulative speed of 15TB/h, 20TB/h or even more.
TaskForce’s task-oriented and efficient user interface has been developed with the intention to launch every operation in just a couple of clicks to expedite work with multiple evidence drives.
Atola TaskForce has 18 ports (6 SATA, 6 SATA/SAS, 4 USB, 1 IDE, 1 Extension slot for Atola Thunderbolt, Apple PCIe SSD and M.2 NVMe/PCIe/SATA SSD extension modules), all of which can be used for simultaneous wiping sessions.
TaskForce can wipe 18 devices simultaneously at their top native speeds when using the standard wiping method.
To perform multiple wiping sessions:
Connect the drives to TaskForce
Switch the ports, to which the drives are connected, to Target mode by using the individual Source switches on each port
3. In the user interface, click Wipe icon in the left-side taskbar
4. In Selectdevices window, select a drive
5. Adjust wiping settings:
the range of sectors to be wiped
wiping method
enter a pattern and its format (HEX/ASCII)
6. Click Start.
Wiping process is consecutively launched for each device. Repeat the same with all the drives you want to wipe.
Once the operations are launched, you can track the progress of all tasks in the Homepage, where the percentage of wiped drive area and the time left until the end of the planned session are displayed. By clicking on an individual wiping session, you can open it to see more details on the progress.
Click Atola logo in the center of the top bar to reveal the current overall speed of wiping. In this case, we were able to achieve 18 TB/h. This high-speed wiping capability allows a forensic expert to complete the process of preparing drives for wiping in minimal time.
NBPlease note that a wiping session can take longer if a different wiping method is selected. E.g. NIST 800-88 method implies not only wiping but also rereading of the wiped range. In its turn, DoD 5220.22-M method wipes the same range three times.
To ensure maximum transparency and effectiveness, Atola TaskForce documents every operation by creating detailed reports and logs. Click Reports button in the top bar and find the report in the list or by using the Search bar at the top of the page.
We are excited to inform you that the latest software release of Atola Insight Forensic has arrived and it features a number of new capabilities for Insight customers, namely:
NVMe drive support via QNINE NVMe-to-USB adapter
revamped connectivity for networks with multiple DiskSense units
and other great features
NVMe support
Insight now supports NVMe drives with the help of QNINE NVMe USB Enclosure based on JMS583 chip. It is a third-party adapter that has been tested by our QA team which can be purchased on Amazon or from other retailers.
The speed of imaging is limited by the adapter’s data transfer rate and constitutes up to 300 MB/sec.
Revamped DiskSense unit connectivity
For the users who have multiple Insights in their network, we have improved the connectivity process. In the DiskSense unit Selection window, click the device you need and the LED indicators on the front panel of the unit you selected will start blinking, thus helping you to identify the unit. A unit’s hostname in the table is easily adjustable in the settings.
Now DiskSense has a new setting that allows an external DHCP server (either a router, the computer to which Insight is connected directly or a local server module) to assign a dynamic IP address on demand.
The dynamic IP mode is available in Insight > Modify DiskSense Unit IP menu.
Other features
SMART:
New Power cycles and Power on hours values indices in the readable format above SMART table
Added many vendor-specific attribute names making SMART table more informative
Case management:
E01 image details are added to the imaging report
If source case data is specified, Insight automatically fills target E01 file details with it
Enable source device check option. When the option is disabled, source device check before imaging start is replaced with a question in a message box.
Bugfixes
UnsupportedOperationException when attempting to start selective head imaging with some models of Toshiba drives
Several errors when ‘Sector list from file’ selected as What to Image option
Formatting of WD USB Smartware drives as Image File on Target container didn’t work
SMART temperature graph missing after the case is exported and then imported
2 articles were missing in the offline manual (F1)
Where to buy
If you still do not have an Atola Insight Forensic and would like to place an order, this can be done directly via Atola Technology, or from a distributor near you.
Please contact our Atola Technology sales to receive more specific information:
P.S. Dear customers, we appreciate your feedback and always take it into account when making changes to the product. Please feel free to write your thoughts or ideas as comments below.
We strongly believe that digital forensic world needs faster solutions to save your precious time, tackle routine tasks easily, and focus on what matters most. That’s why we have been continuously improving Atola TaskForce’s imaging engine to provide our users with:
up to 18 simultaneous imaging sessions
the optimal speed of an imaging session
The next big thing to save your time is automation. Complete more tasks in less clicks!
Atola team is proud to release TaskForce firmware update 2019.7 that introduces Web API. It is built into TaskForce. We made Web API available to the public for information purposes: http://atola.com/products/taskforce/api
TaskForce Web API will optimize your workflow in many ways. Let’s have a look at the examples below.
How to use Web API in a browser
Web API is extremely handy as it allows you to use it in scripts, via CLI tools like curl, and simply by typing commands in the browser address bar.
1. Start imaging a source drive plugged into TaskForce SATA 4 port.
2. Track imaging session status using task key received in response to the command above.
Here is what it looks like in action:
Instantly start imaging all source drives
Imagine you have 12 TaskForce ports switched to Source mode and source drives plugged into them. Firmware version 2019.7 enables you to instantly launch 12 imaging sessions with the power of Web API.
Python script utilizes /start-image API request and prints task keys of all started imaging sessions.
import sys
if sys.version_info[0] < 3:
    raise Exception("Please use Python 3 to run this script")

import urllib.request
ports = ["SATA1", "SATA2", "SATA3", "SATA4", "SATA5", "SATA6", "SAS1", "SAS2", "SAS3", "SAS4", "SAS5", "SAS6"]
tasks = []
errors = {}

for port in ports:
    try:
        res = urllib.request.urlopen("http://10.0.0.4/api/start-image?source=%s&targetFolder=//Vitaliy/Share" % (port))
        tasks.append(res.read().decode('utf-8'))
    except urllib.error.HTTPError as e:
        errors[port] = e.read()

print("IDs of started imaging tasks:")
print('\n'.join(tasks))
Automatic forensic analysis upon imaging completion
With TaskForce, you can track the status of the started imaging sessions using /check-task API request. It reports the imaging progress enabling you (or your code) to notice when the task gets completed. Once this notification is received, it makes perfect sense to automatically start the forensic analysis of the target image. Powershell script below shows how one can create this kind of automation flow:
Start imaging a source drive on TaskForce SATA port 4 to the target folder \\Vitaliy\Share
Wait for imaging completion using /check-task
Launch Autopsy Ingest via command-line when the target image is ready
NB. Autopsy Ingest v4.11 does not work with network file paths from the command line. That’s why this example shows a shared folder located at PC where PowerShell script is executed. Therefore \\Vitaliy\Share points to C:\Share folder.
All changes
New Features
Introduction of simple Web API with 5 commands:
/start-image – launches an imaging session
/check-task – returns the status of an imaging task
/scan-devices – find all source drives available for imaging
/stop-task – stops imaging session
/help – opens API documentation
New system setting:
Store shared folder logins and passwords in TaskForce
Case ID is now displayed in the device selection window.
Bugfixes
Target drive serial numbers were missing in imaging reports
Restoring file image from password-protected network folder denied
File selection window was too wide when open on mobile phone
WrappedApiResultException when parsing partition with bad sectors
Where to buy
If you still do not have an Atola TaskForce and would like to place an order, this can be done directly via Atola Technology, or from a distributor near you:
P.S. Dear customers, we appreciate your feedback and take it into consideration when updating our products. Please feel free to write your thoughts and ideas in the comments section below.
Atola TaskForce is designed to perform multiple processes simultaneously and provide its users with unprecedented flexibility when it comes to a variety of devices and configurations in which they can be used. TaskForce also makes sure to efficiently communicate how a device is being used and helps a user to handle drives correctly.
When connecting a drive to the system, make sure the right mode is set on the port: in source mode, an evidence drive is automatically write-protected. It can only be changed with Source hardware switches.
Source hardware switches
As soon as you choose a particular task or click Devices button in the top bar, TaskForce starts sequentially supplying power and sending commands to identify all connected devices.
After a connected drive receives power supply and identification commands from the unit, it responds with device info including:
device model and serial number;
device capacity;
limitations of the drive.
TaskForce software also immediately detects whether the drive is locked by ATA password or the drive’s max readable address is limited via HPA/DCO. The unit indicates these restrictions and notifies a user about those with red color indication in the device menu.
TaskForce detects ATA, HPA/DCO limitations
These indicators allow a user to make informed decisions on how to proceed with the device, whether unlocking is required to get access to the whole drive space before starting an imaging session.
Notification device not detected may point to one of these issues:
there is no device on the port;
the cable is not properly plugged in;
the device is connected to another port;
the device is heavily damaged.
Notifications device not detected
If a source drive is busy with a running operation, the port will be temporarily unavailable for selection when launching other tasks. In such case, the fonts in the respective box will be a lighter shade of grey, making the port unclickable.
Busy source drive
When selecting a target device for wiping or imaging, source drives are also unavailable to ensure that data on an evidence drive doesn’t get overwritten by mistake.
Selecting target device
To accommodate our users’ needs in a fast forensic process, Atola engineers are working to significantly reduce the amount of time needed for drive identification in the upcoming firmware releases. This will make TaskForce faster yet!
New version of TaskForce firmware introduces a couple of top-notch time-saving features.
Express mode. When the mode is activated, every imaging session starts automatically upon plugging source drive into TaskForce.
Head support. Disablingdegraded and damaged heads to image good heads first.
Express mode
We understand that forensic investigators work under tight deadlines and dealing with large amounts of data is time-consuming. We developed an innovative solution, which helps tackle the problem.
From now on you have the option of launching multiple imaging sessions automatically, without a single click!
When the Express mode is activated, the Image icon in the Task panel turns into Express one and both the top panel and the Express icon change their color to teal.
To make sure all drives are ready for self-launching imaging, we recommend starting with diagnostics of the source drives.
Once connected Source devices get diagnosed, TaskForce launches individual imaging sessions automatically.
In case a drive has issues or session was interrupted, TaskForce notifies you showing “User action required” message:
When user action is needed, TaskForce also displays the number of the required actions on the IP screen on the front panel of the unit.
Head support
With 2019.9 firmware update, TaskForce runs a thorough diagnostics of each head separately, providing you with a detailed report and recommendations on each particular case.
Trying to read sectors with a damaged head adds a lot of time to the process and can cause more damage to the hard drive. To avoid this and to optimize the imaging process, Atola team enhanced the head support. It allows to disable degraded/damaged heads and image good heads first.
TaskForce smartly prompts to disable a particular damaged or degraded head. Once the operator clicks yes, the system automatically disables the head. If the user clicks no the degraded head can still be disabled manually in the imaging settings.
After the damaged head is disabled, TaskForce images the areas that belong to the good heads first.
All Changes
New features Imaging
Express mode – a self-launching imaging mode. Plugging a source drive into port automatically starts imaging process
Imaging by selected heads. Support for most of Seagate, WD, Hitachi, Toshiba models
Suggestion to disable damaged/degraded heads when starting the first imaging session
Diagnostics
Detection of degraded and damaged heads
By-head speed graphs
Showing SMART’s Power on Time in human-readable form
Storages
Automounting of Storage drives
Imaging into more than E01/Raw file on Storage
Save report in the target folder option supported
Showing available space and image files Storage drive contains
Stricter check and confirmation request when someone attempts to wipe Storage
Open file selection dialog after one clicks Storage in the device selection panel
Ability to resume imaging session to compressed E01 located on Storage
Other
Drive identification is now 3-4 times faster when you open the device selection panel
Support of damaged USB flash drives which are in read-only mode
Improved recognition of vendor-specific SMART attributes
Bugfixes Imaging
It was impossible to resume imaging session after target device write error
Errors when writing USB drives with a capacity above 2 TB
SATA drive plugged into SAS port could get paused after source drive hung up
Possible errors when imaging 4kN SAS drive to 4kN SATA drive
Export of imaged sector list was failing when CSV file became larger than 5 MB
Empty image file could be created when imaging fails to start
Few corner-case issues when using reverse imaging passes
Other fixes
File selection dialog was showing E01 image size instead of real file size
Diagnostics. Last significant work time interval was not always correct
False detection of DCO max address limitation in rare cases
Where to buy
If you still do not have an Atola TaskForce and would like to place an order, this can be done directly via Atola Technology, or from a distributor near you:
P.S. Dear customers, we appreciate your feedback and take it into consideration when updating our products. Please feel free to write your thoughts and ideas in the comments section below.
We are happy to share the voiced Atola TaskForce video. It thoroughly explains how one can save a lot of time when facing a problem of imaging many evidence drives.
High-resolution version of the video is available for download here: Atola TaskForce Demo
Express mode enables automatic launch of multiple imaging sessions on all ports that are set to source: just plug a drive into TaskForce and the imaging session will start automatically.
Activating Express mode
Just like everything else in TaskForce’s interface, this feature is designed to be intuitively easy to set up.
Source evidence drives can be imaged to E01 (regular or compressed) or RAW files located in a specfied folder on the local server. Two 10Gb Ethernet ports enable high data throughput.
As essential as imaging speed is, the proper treatment of evidence drives remains a priority. To enable the automatic launch of imaging of the healthy devices and avoid potential deterioration of drives in a shaky condition, the Express mode settings have 2 handy options: select Diagnose source drive before imaging so that diagnostics is launched automatically, then select Start imaging only if diagnostics has no issues.
Atola’s signature automated diagnostics module checks all drive systems: hard drive’s motor and electronics (PCB), head stack, media surface, all firmware/system areas, partitions, and file systems. We recommend that diagnostics is always run upon a drive is connected to TaskForce for the first time.
Last but not least, you can select one of the imaging presets at the bottom of the express mode activation screen (they can be easily configured in the imaging screen). This will ensure that all imaging sessions in express mode will fit your organization’s demands and procedures.
Once express mode settings are specified, simply click the Activate button and connect your evidence drives for an immediate start of imaging upon a source drive is plugged.
17 self-launching imaging sessions
Once all settings are configured and express mode is activated, simply plug in the drives one by one and watch the imaging sessions start automatically!
TaskForce can process 17 self-launching imaging sessions in Express mode on almost all of its ports with the exception of the Extension slot. The ports that can be used for imaging in express mode are, therefore:
6 SATA
6 SATA/SAS
4 USB
IDE
When activated, express mode controls all source ports, leaving target ones available for other tasks. If a port is switched from target to source, it also becomes available for imaging in express mode.
TaskForce’s 8-thread Xeon processor, ECC RAM, and the server-grade motherboard sustain multiple fast and reliable data acquisitions.
Getting it all under control
Express mode substantially speeds up imaging of evidence drives while enabling a user to configure settings for optimal handling of evidence drives.
And should TaskForce detect an issue with an imaging session, User action required notification will prompt the user to take the decision.
In addition, TaskForce keeps the user updated by displaying the number of actions required on the IP screen on the front panel of the unit.
In short, Express mode’s self-launching imaging is a perfect solution when it comes to processing large amounts of data under time pressure, while still allowing gentle treatment of damaged media.
Atola team is pleased to announce that from now on TaskForce can be integrated into new Magnet AUTOMATE 2.0 software.
By automating the most time-consuming part of an investigation process, Magnet AUTOMATE significantly reduces backlogs and substantially increases the number of completed cases.
In addition to expediting evidence acquisition and processing, Magnet AUTOMATE allows creating a repeatable workflow for each particular type of investigation and saving it as a pattern to operate in the future. This way, forensic professionals can focus on urgent tasks, requiring human attention, entrusting a well-planned workflow to the selected toolkit as controlled by Magnet AUTOMATE.
Now Magnet Forensics and Atola Technology join forces to speed up your work with evidence even further!
With Atola TaskForce, which supports up to 18 parallel imaging sessions at the cumulative speed of 15 TB/hour, Magnet AUTOMATE controls the imaging progress of multiple drives and launches their subsequent analysis in parallel, boosting evidence processing speed to the maximum.
As always, you can also track the progress remotely from desktop PC, laptop, tablet, and smartphone: simply enter the IP address in a Chrome browser. Reports on each session are created both in the Magnet Automate and in TaskForce itself.
Atola team is excited to announce arrival of the latest Atola Insight Forensic 4.15 release. From now on Insight supports imaging into a file on an encrypted target drive and is reinforced with a number of other great features.
Target image encryption
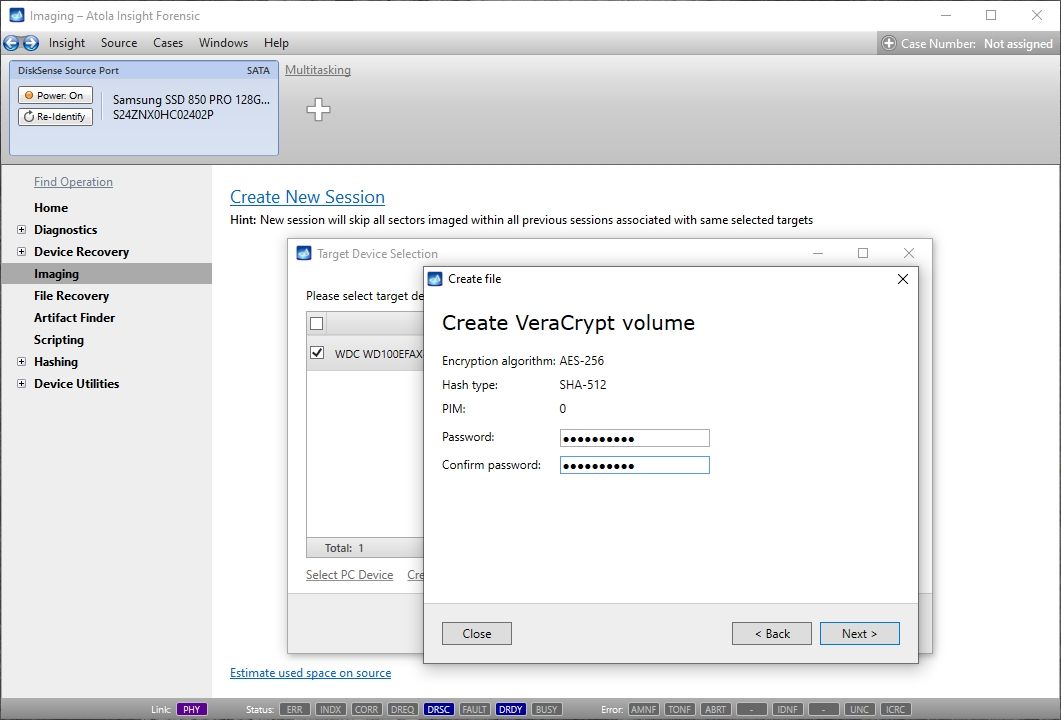
Using VeraCrypt with a 256-bit AES algorithm for strong data encryption, Atola Insight Forensic allows creating exFAT partition on the target drive, locking it with your password.
After the imaging session is completed, a user can safely plug the target drive into his/her computer and quickly find the VeraCrypt volume. To safely access encrypted data from your drive, simply use the password set prior to the imaging session.
Other features
Imaging to a file on a target drive:
Create encrypted password-protected VeraCrypt volume on a target drive to store images
Save image report in the target folder option supported for image files on target drives
Imaging:
Support of damaged USB flash sticks in read-only mode
A new format for Save image report in the target folder option – Text (Simplified)
Improved support of 4Kn drives
Identification and detection of locked WD Smartware drives
SSD Trim became a non-blocking operation: multi-tasking is available after SSD Trim is started
DiskSense information window shows MAC address of the active Ethernet card
Bugfixes
SMART. Fixed incorrect Power on Time for Samsung IDE drives
Attempt to open E01 file froze the software if the file was involved with a different task
Issue with changing IP from Dynamic to Static
Removed 20-second connection delay when switching between DiskSense units
Where to buy
If you would like to place an order for Atola Insight Forensic or extend the subscription to make use of this software updated, this can be done directly via Atola Technology, or from a distributor near you.
Please contact our Atola Technology sales to receive more specific information:
P.S. Dear customers, we appreciate your feedback and always take it into account when making changes to the product. Please feel free to write your thoughts or ideas as comments below.
Atola Insight Forensic supports imaging into a file on an encrypted target drive, using VeraCrypt for data encryption. After your source drive is identified by the system, take the following steps:
Go to the Imagingcategory in the left-side menu on the home screen;
Click the Create New Session link to launch an imaging session;
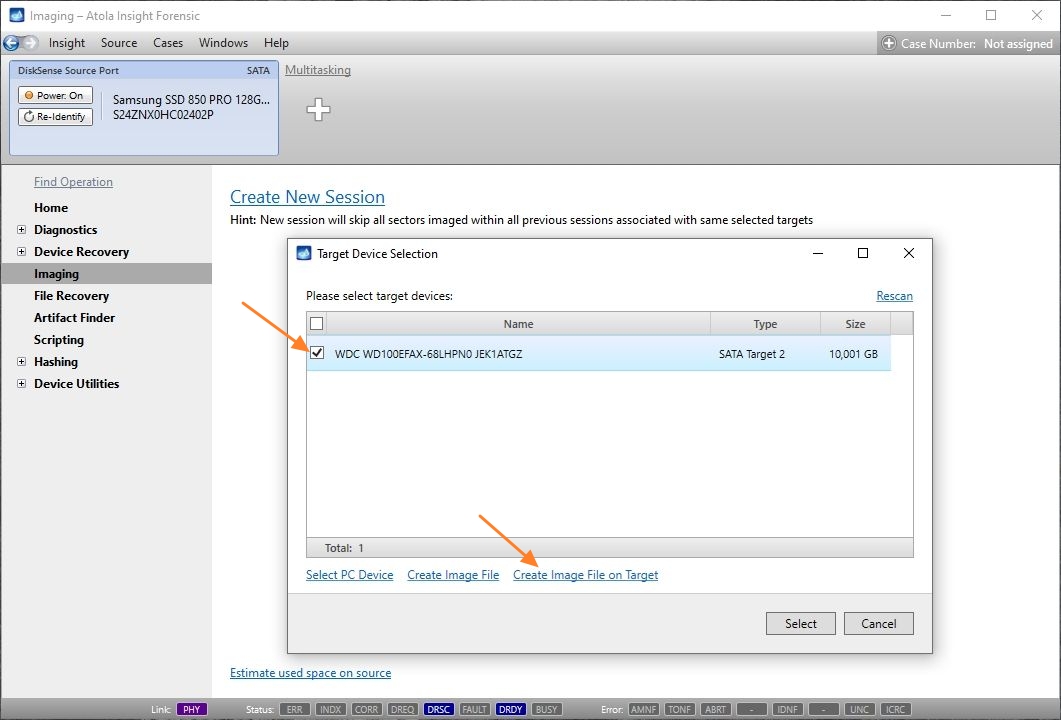
Tick your target device;
Click the link Create Image File on Target.
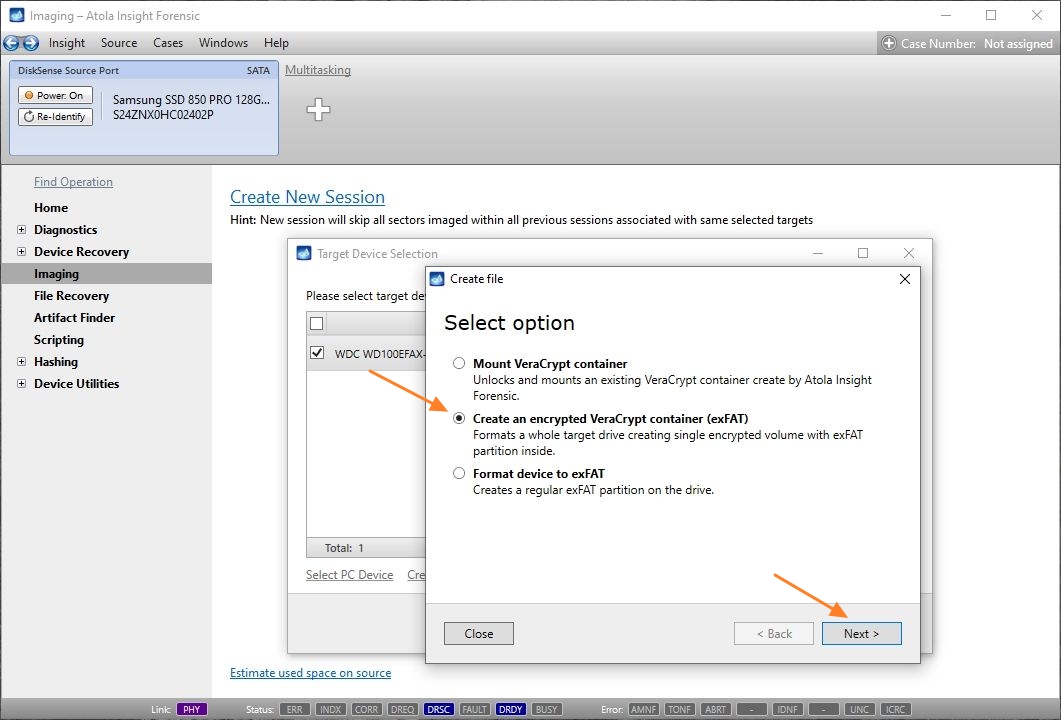
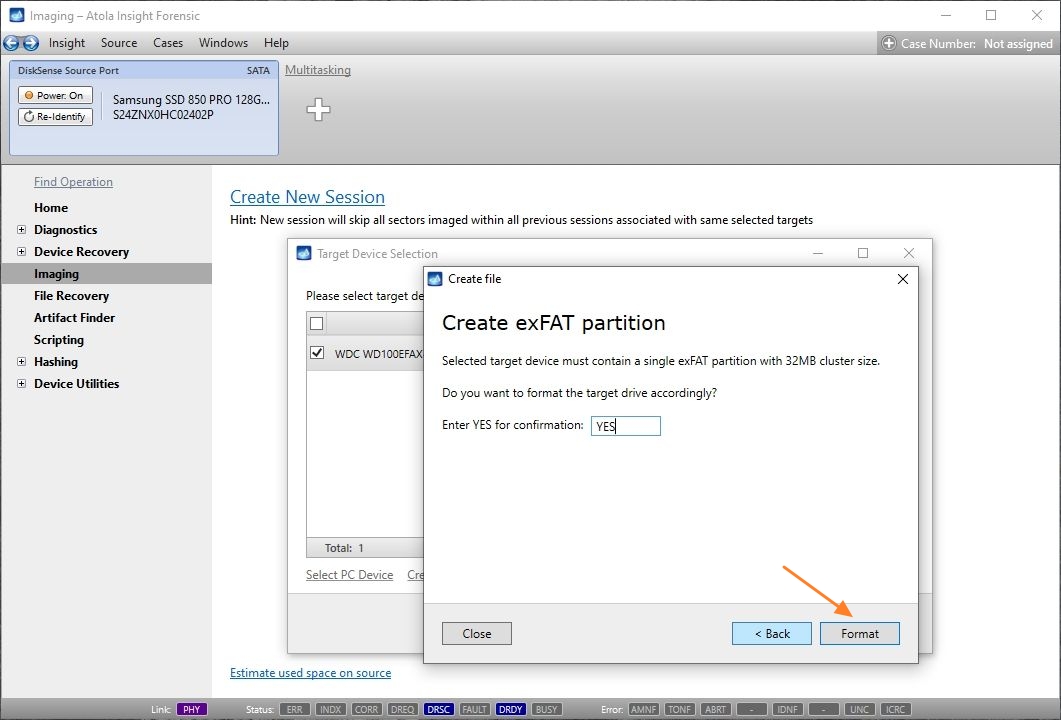
5. In the pop-up window, select Create an encrypted VeraCrypt container (exFAT) option and click the Next button.
6. To complete the creation of a VeraCrypt volume, enter the password.
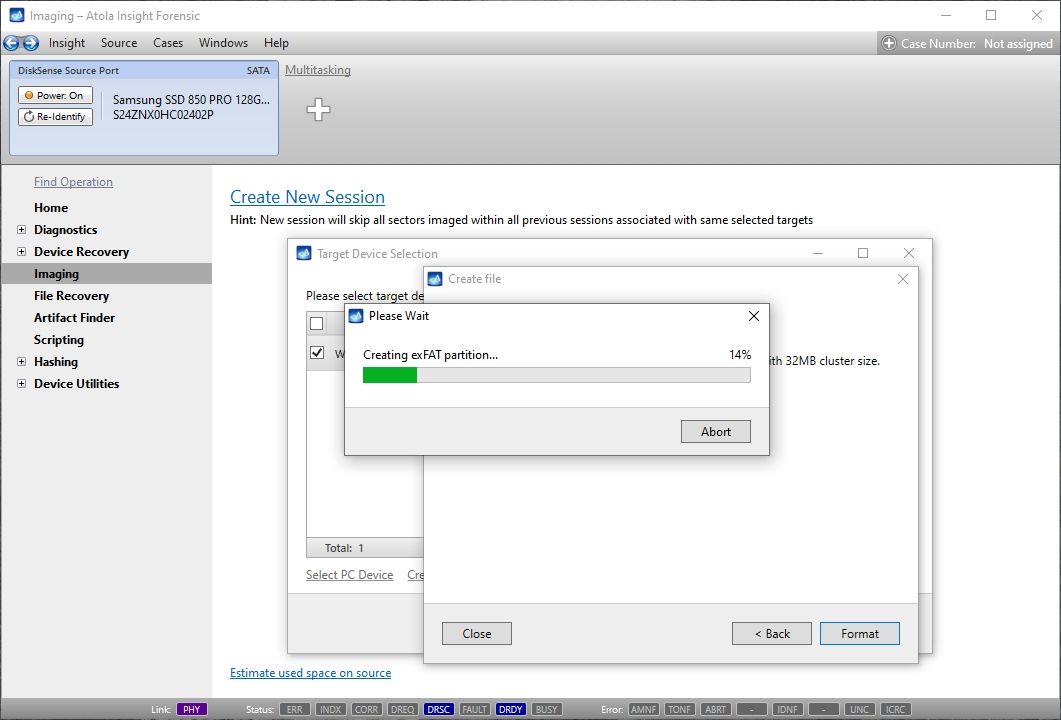
7. Enter YES and click Format to confirm formatting the drive to create the encrypted partition.
Formatting will take a few seconds.
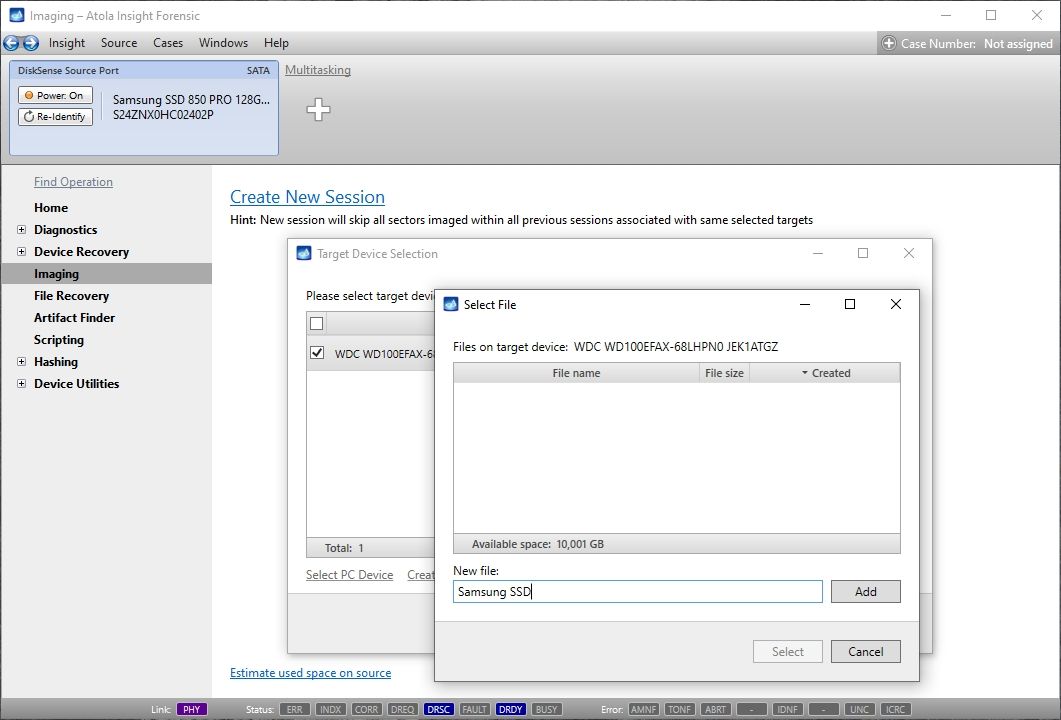
8. Name new image file, click the Add button and then click Select.
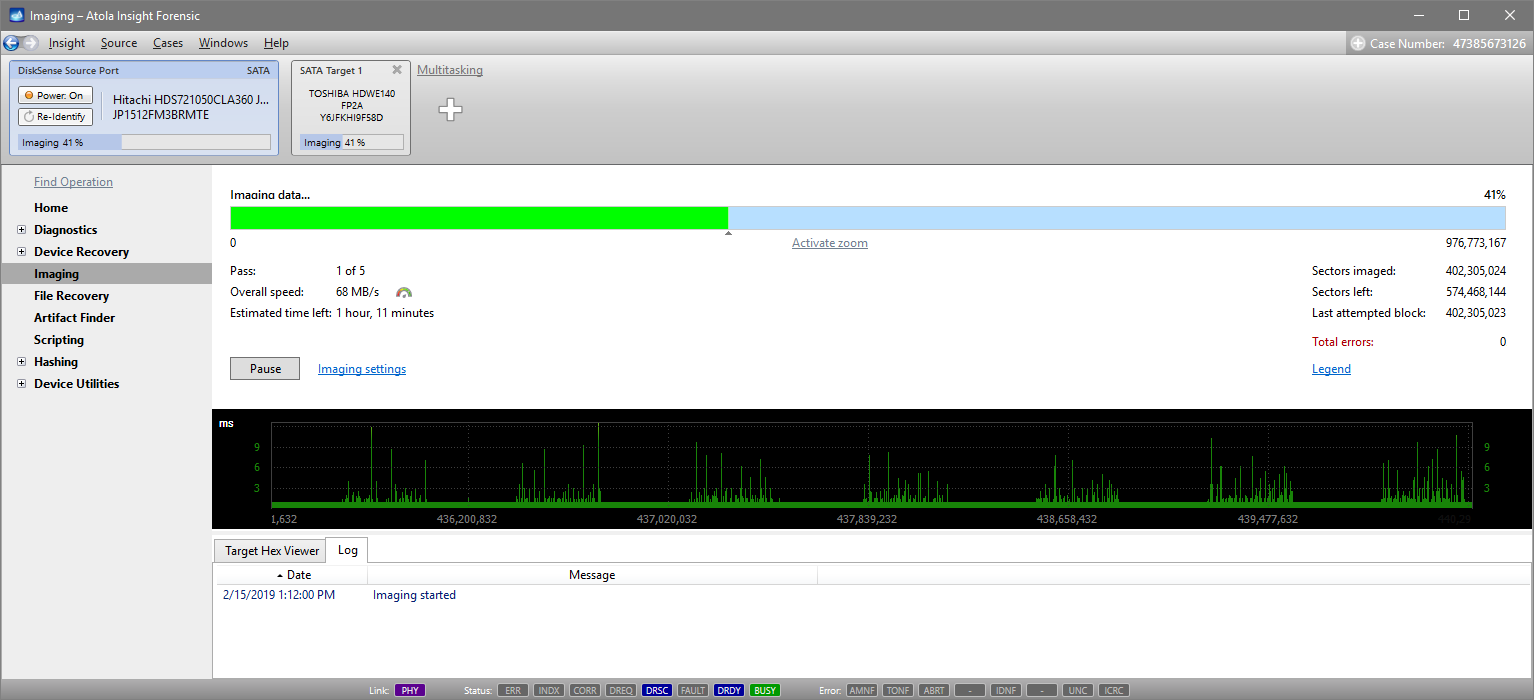
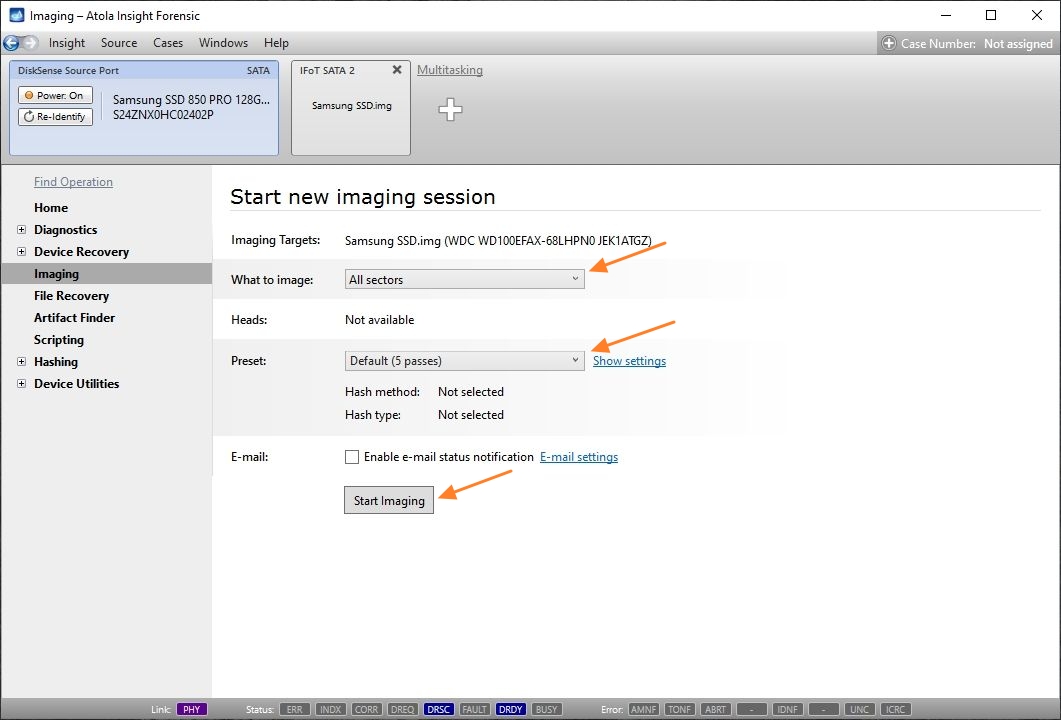
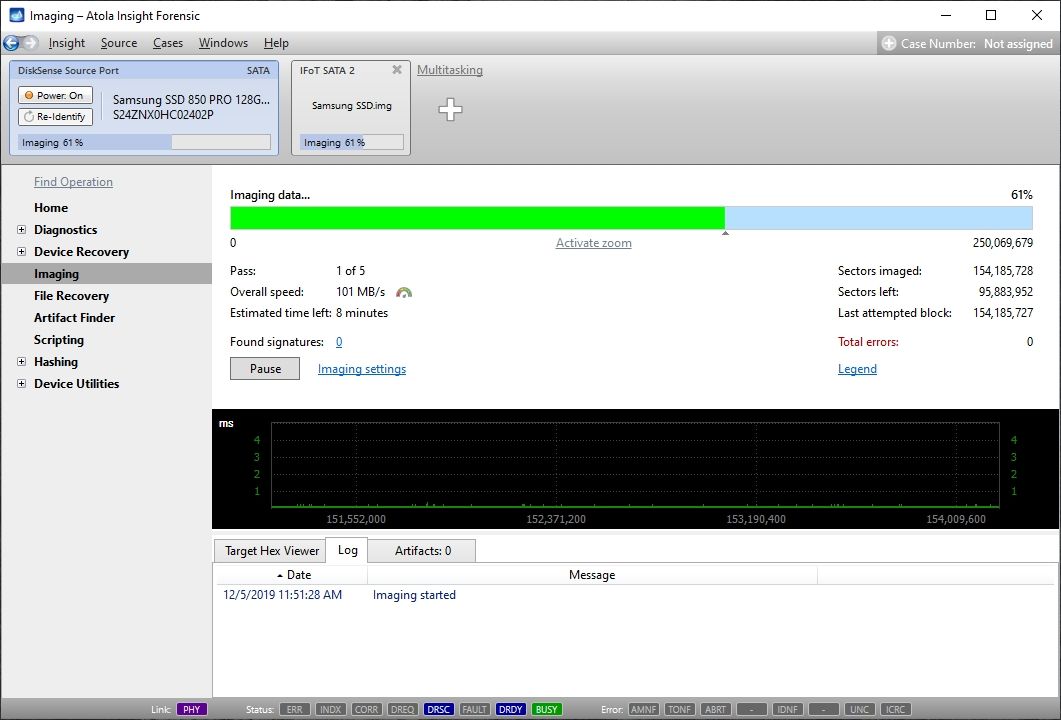
9. Specify the settings for this imaging session and click the Start Imaging button.
After you click the Start Imaging button, Insight will begin imaging data into the file on your encrypted target.
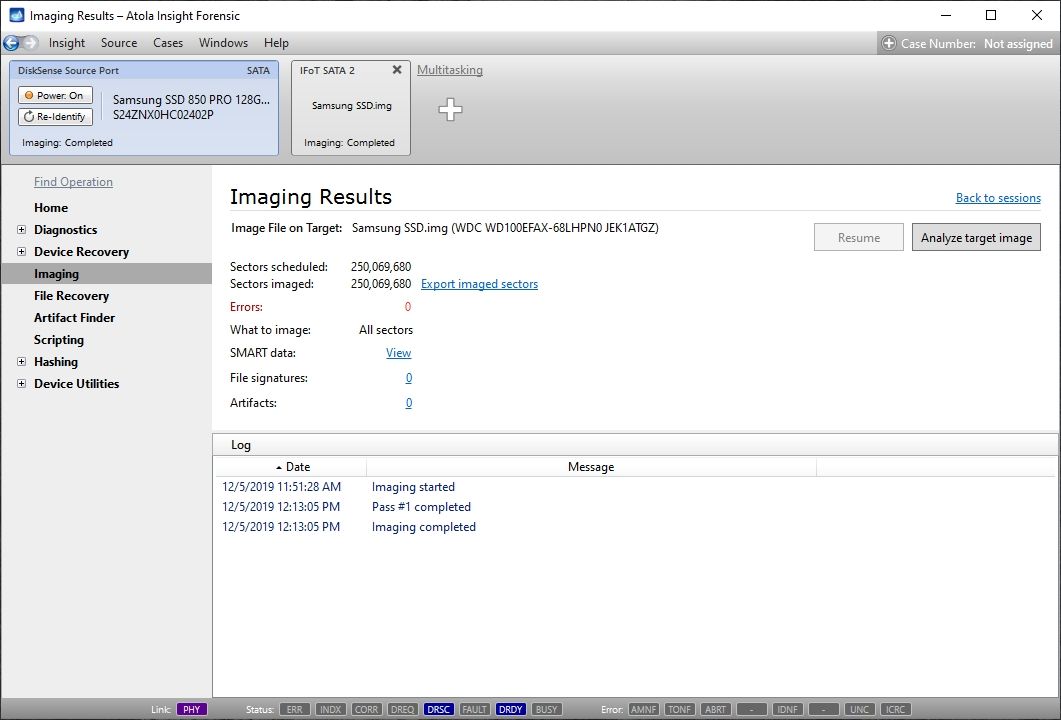
Upon completion of the imaging session, check the Imaging results screen.
Data Extraction:
To find the VeraCrypt volume and the imaged file, plug the target drive into your computer;
Use VeraCrypt software to safely access encrypted data from your drive;
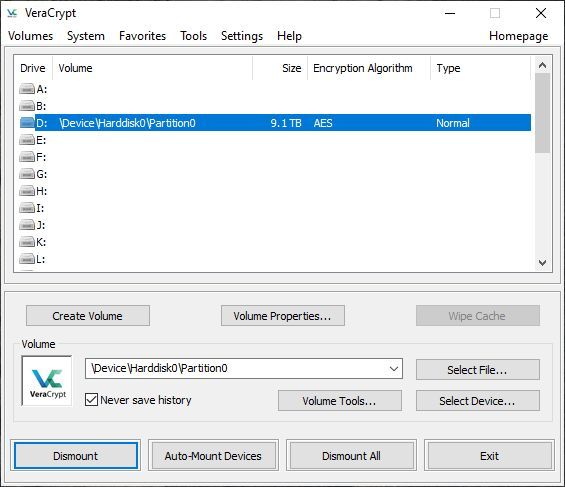
Select the drive label (A, B, C, etc.) on which you want the volume to be mounted;
Click Select device button;
In the pop-up window select your encrypted volume;
Click the Mount button.
Now you can view the partition name, size and encryption algorithm.
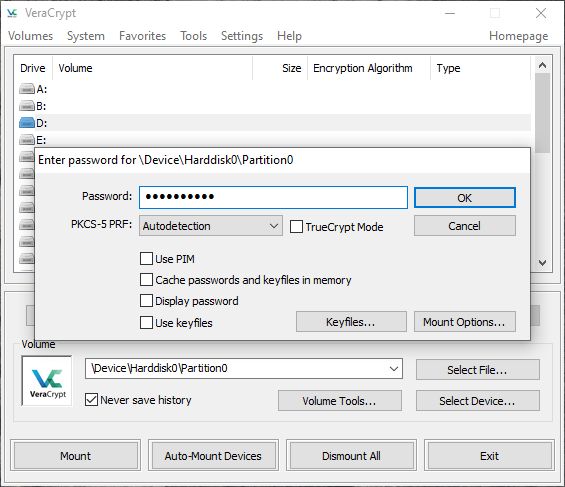
7. Next, use the password set prior to the imaging session to get access to the encrypted volume.
Once you have entered the password, the volume will be mounted and you can access it from Windows Explorer and use the image for subsequent operations.
It is the final days of the year and we would like to reflect back on the fantastic year and a decade really!
In 2019 we have done a lot! The incomplete but impressive record looks like this:
3 versions of Atola TaskForce firmware
3 updated versions of Atola Insight Forensic software
Atola collaborated with Magnet Forensics to get our tools integrated
our team has grown again
we traveled the world to meet many of our customers
TaskForce integration into Magnet AUTOMATE’s workflows
In July, Atola TaskForce 2019.7 firmware introduced Web API built into TaskForce, which allows TaskForce integration into third-party automation tools.
As we are preparing this article, our software development team continues to work on the new batch of features for TaskForce that will be released in just a few weeks!
Insight Forensic: Target encryption
We introduced target encryption in Atola Insight Forensic 4.15 software release. Now an exFAT-formatted target drive can store a VeraCrypt volume and store one or multiple images.
Creating a VeraCrypt container on an exFAT-formatted drive
Insight Forensic: NVMe support
We continue to support new drive interfaces, file formats, etc. Our 4.13 release of Insight software included NVMe support via QNINE NVMe-to-USB adapter.
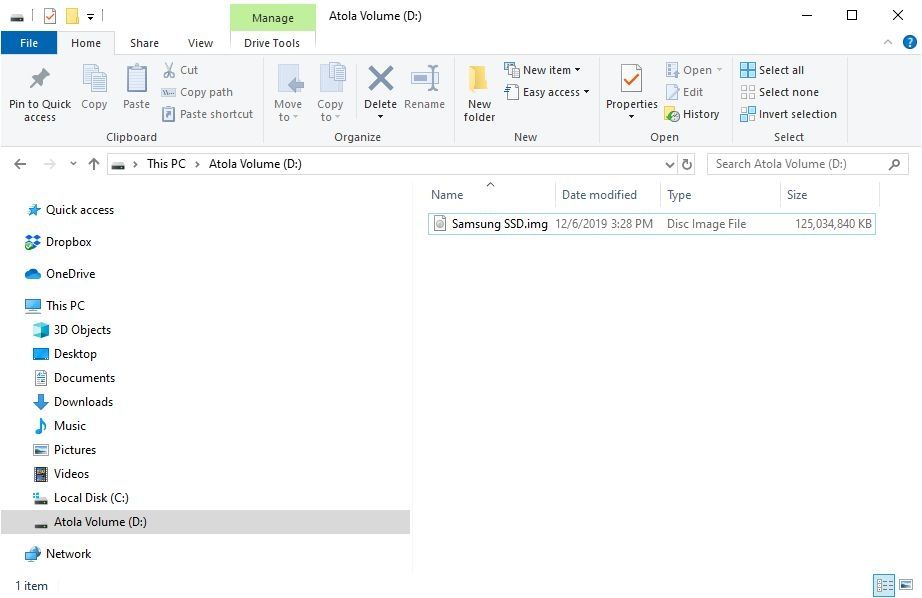
Insight Forensic: Imaging from a file on a source drive
With Insight, imaging from a file on a source drive has been available since January 2019. Simply select the file as a Source you want to image and proceed as usual:
The team growth
This year we welcomed Olga Milishenko to join our marketing team. Olga has since become an integral part of the Atola family and has contributed to our marketing efforts in 2019.
Atola in Events
In 2019 we participated in dozens of events worldwide and expanded our geography to Latin America!
Training sessions and presentations
In 2019 we continued to hold training sessions and presentations for our existing and potential customers. We thank all the great audiences we got to speak to!
See you in 2020!
Throughout this year we have been tweaking our process and experimenting with new development techniques and implementing innovative ideas, all to assist our users in solving more cases, faster! Our team is motivated by all the great feedback we have been receiving from our customers this year and we promise to keep up the good work!
We look at 2020 and the decade that follows with great optimism and ambition to contribute to the industry’s progress!
Here is a list of 50+ most prominent events in digital forensics held worldwide in 2020. These digital forensics conferences and exhibitions present an excellent opportunity to learn about the latest trends from the industry’s best speakers, get to know the newest technology showcased by vendors and network with other professionals working in the field.
This list is constantly updated, so if you want to keep up to date on the digital forensic conferences and exhibitions, save the link and check this page later. We keep track of new events and any changes to the already planned ones.
The events at which Atola Technology or our partners will be exhibiting are marked with an asterisk (*).
NB The registration fees in this table are indicative. Each conference has a range of fees based on the occupation, country of origin or the role of each participant. We mention only the basic rate which does not include discounts or special offers. Please check the websites of these forensic conferences to learn more about the applicable registration rates.