Quantcast
Channel:
Viewing all 194 articles
Browse latest View live

Atola TaskForce 2018.1.3 – Accessing password-protected servers

$
0
0

We are launching version 2018.1.3 of Atola TaskForce.

This release includes access to password-protected servers. It allows saving image files on such servers, imaging or calculating hash of the files located there, etc.

To create an image file on a password-protected server:

1) Click Image button in the left-side menu

2) Select the source device

3) Click SELECT FILE in FILE section of the target device menu and click Continue.

4) In the file dialog, click the server from the list. If the server does not appear in the list, click Refresh icon to search for all available directories. If the server still does not appear in the list, click Connect.

Select server from the list

5) Whether you have selected the server from the list, or clicked Connect, Connect to server dialog box will open. Here, you need to enter the name of the server and fill out login details including domain or workgroup and click Connect. To learn these details, contact your network admin.

NB. TaskForce supports NTLM protocol, which is enabled by default in Active Directory and Windows.

Enter server and login details, click Connect

6) Go to the folder on the server where you need to store your image, and click the Plus icon in the right bottom corner of the window.

Create new file in the directory


7) Enter the name of the new image file and select the format. Click Create button.

Enter name and select the format of the new image file


8) Click Continue button.

Click Continue


9) Check your imaging settings and click Start button to proceed with imaging.

Click START

The post Atola TaskForce 2018.1.3 – Accessing password-protected servers appeared first on Atola Blog.


Atola Insight Forensic 4.11 with APFS support

$
0
0

We have just released version 4.11 of Atola Insight Forensic software. This edition includes APFS support in Imaging, File Recovery and Diagnostics, as well as extended Artifact search functionality and other great features!

APFS

Atola Insight now supports logical imaging of APFS partitions. To start the imaging, select All sectors with data in imaging settings and click Start imaging.

Image the data


Once the imaging is done, you can see the partition and file structure on the target:

  1. Go to File Recovery category in the left-side menu
  2. Click the partition you want to have a closer look at. Should it be encrypted, unlock it with a known password or recovery key.

Unlock the drive


Inside the partitions, look through the directories’ structure and select the files you want to recover.

Open the partitions

Artifact Finder

Now you can search artifacts on a drive not only in the course of imaging, but as a separate operation, both on sources and targets.

Go to Artifacts Finder in the left-side menu. You will now see if any artifacts have previously been looked for. If you want to make an additional search, select the artifacts you are interested in, and click Start button.

Start artifact search


As the Artifact Finder is still running, you can look at the progress in the Artifacts tab below the progress bar and click the diagram to see the list of found artifacts. If you only want to look at a certain category, click it in the list next to the diagram.

Click a category


To find a specific artifact, use the search bar and filter the results.

Click an artifact in the list to see the sector in which it is located.

Select an artifact


It allows you to see the context, in which this artifact is placed.

Artifact within the sector and the context


For more information about this software update, go to our Changelog:

http://atola.com/products/insight/changelog.html


Where to buy

If you still do not have an Atola Insight Forensic and would like to place an order, this can be done directly via Atola Technology, or from a distributor near you:

http://atola.com/wheretobuy/

Please contact our Atola Technology sales to receive more specific information:

P.S. Dear customers, we appreciate your feedback and will take it into account when making changes to the product. Therefore, please feel free to write your thoughts or ideas as comments below.


The post Atola Insight Forensic 4.11 with APFS support appeared first on Atola Blog.

Top forensic conferences 2018-2020

$
0
0

With this post, we want to share with you the list of the most prominent worldwide events in digital forensics. If you want to keep up to date with the exhibitions and conferences organized around the globe, save this link and check this page later: we are going to update the list as we receive info on new events and get the dates of the already planned ones confirmed.

The events, where Atola Technology or our partners will be exhibiting, are marked with an asterisk (*).

last updated August 30, 2018

Conference Date Location Region Registration fee
IFIP Working Group 11.9 on Digital Forensics January 3 – 5 New Delhi, India Asia Pacific $290
CyberTech Israel January 29 – 31 Tel Aviv, Israel Middle East €575
21st European Police Congress * February 6 – 7 Berlin, Germany Europe €895
West 2018 February 6 – 8 San Diego, CA North America $625
NSA Winter Legislative & Technology Conference February 10 – 13 Washington D.C. North America unknown
70th Annual Scientific Meeting February 19 – 24 Seattle, WA North America $515
10th GPEC February 20 – 22 Frankfurt, Germany Europe €5
2018 CHIA Conference * February 27 – March 2 Las Vegas, NV North America $375
Mid-Atlantic Regional Gang Investigators Network March 4 – 7 Annapolis, MD North America unknown
Forensic Europe Expo * March 6 – 7 London, UK Europe free
Security & Policing 2018 March 6 – 8 Hampshire, UK Europe free
DFRWS EU 2018 March 21 – 23 Florence, Italy Europe €550
Emirates International Forensic Conference & Exhibition * April 9 – 11 Dubai, UAE Middle East AED 1,937
Forensecure 2018 April 12 – 13 Wheaton, IL North America $200
2018 Minnesota HTCIA Spring Conference April 18 – 19 Shoreview, MN North America unknown
National Cyber Crime Conference * April 23 – 25 Boston, MA North America $350
IACIS * April 23 – May 4 Orlando, FL North America $2,795
2018 Wisconsin Crimes Against Children Conference May 7 – 8 Green Bay, WI North America unknown
IMF 2018 May 7 – 9 Hamburg, Germany Europe €455
International Police Expo * May 10 – 11 New Delhi, India Asia Pacific unknown
Ontario Forensic Investigators Association * May 15 – 17 Niagara Falls, ON, Canada North America $400
China International Exhibition on Police Equipment May 15 – 18 Beijing, China Asia Pacific unknown
ADFSL Conference May 17 – 18 San Antonio, TX North America $248
IACP Technology Conference May 21 – 23 Providence, RI North America $750
Enfuse * May 21 – 24 Las Vegas, NV North America $1,895
Techno Security & Digital Forensics * June 3 – 6 Myrtle Beach, SC North America $1,295
DFIR Summit & Training 2018 June 7 – 14 Austin, TX North America $1,870
Eurosatory * June 11 – 15 Paris, France Europe unknown
National Law Enforcement Training on Child Exploitation June 12 – 14 Atlanta, GA North America unknown
2nd World Conference and Exhibition on Forensic Science June 11 – 12 Rome, Italy Europe $699
NSA Annual Education & Technology Expo * June 15 – 19 New Orleans, LA North America $595
18th Annual DFRWS USA 2018 July 15 – 18 Providence, RI North America $800
WCSF 2018 August 1 – 3 New York, NY North America unknown
Future of Forensics August 2 – 3 Pretoria, South Africa Africa unknown
Crimes Against Children Conference *  August 12 – 16 Dallas, TX North America $600
113th CACP Annual Conference August 12 – 15 Halifax, NS, Canada North America $795
HTCIA International Conference & Training Expo * August 20 – 22 Washington, D.C. North America unknown
Youth, Technology & Virtual Communities Conference August 27 – 29 Gold Coast, Australia Asia Pacific $750
Information Security Summit September 4 – 5 Wanchai, Hong Kong Asia Pacific HKD 450-1250
PFIC September 5 – 6 Park City, UT North America $399
ANZFSS 24th International Symposium on Forensic Science September 9 – 13 Perth, Australia Asia Pacific $1,700.00
ICDFJS 2018 September 10 – 11 Tokyo, Japan Asia Pacific €450
ICDF2C * September 10 – 12 New Orleans, LA North America €843
Techno Security & Digital Forensics West * September 17 – 19 San Antonio, TX North America $1,299
GovWare 2018 * September 18 – 20 Suntec, Singapore Asia Pacific 1100 SGD
Financial Crimes & Digital Evidence September 18 – 20 Salem, OR North America $195
I.A.C.P. * October 6 – 9 Orlando, FL North America $725
2018 Northwest Regional ICAC Conference * October 10 – 12 Redmond, WA North America unknown
OSDFCon October 17 Herndon, VA North America $350
O.P.P. Strategy * October 22 – 25 Niagara Falls, ON, Canada North America $200
Milipol Qatar October 29 – 31 Doha, Qatar Middle East free
GCC Forensics Exhibition and Conference 2018 * October 30 – 31 Abu Dhabi, UAE Middle East $150
Florida ICAC Symposium December 10 Orlando, FL North America unknown
CyberTech Israel January 28 – 30, 2019 Tel Aviv, Israel Middle East unknown
22nd European Police Congress February 19 – 20, 2019 Berlin, Germany Europe €895
2019 CHIA Conference February 26 – March 1, 2019 Las Vegas, NV North America unknown
13th Annual Gang Training Conference March 3 – 6, 2019 Hanover, MD North America $155
Security & Policing 2019 March 5 – 7, 2019 Hampshire, UK Europe free
Forensic Europe Expo * March 8 – 9, 2019 London, UK Europe free
Techno Security & Digital Forensics West Coast March 11 – 13, 2019 San Diego, CA North America unknown
GPEC digital 2019 March 19 – 20, 2019 Berlin, Germany Europe €300
Milipol Asia Pacific 2019 April 2 – 4, 2019 Marina Bay Sands, Singapore Asia Pacific free
Techno Security & Digital Forensics * June 2 – 5, 2019 Myrtle Beach, SC North America $1,295
3rd World Conference and Exhibition on Forensic Science June 3 – 4, 2019 Berlin, Germany Europe $899
Israel Defence and HLS Expo 2019 June 4 – 6, 2019 Tel Aviv, Israel Middle East unknown
Milipol 2019 * November 19 – 22, 2019 Paris, France Europe free
23rd European Police Congress February 19 – 20, 2020 Berlin, Germany Europe €895
11th GPEC February 21 – 23, 2020 Frankfurt, Germany Europe €5

NB The registration fees in this table are indicative. Each conference has a range of fees based on the occupation, the country of origin or the role of each participant. Therefore we mention only the basic rate which does not include discounts or special offers. Please check the websites of these forensic conferences to learn more about the applicable registration rates.

The post Top forensic conferences 2018-2020 appeared first on Atola Blog.

Release of Atola TaskForce 2018.8 is here!

$
0
0

We have just released version 2018.8 of Atola TaskForce software. This release includes over a hundred of new features and bug fixes.

Among them are some advanced custom settings. For organizations that need to ensure that imaging is always performed with special settings, we have created the possibility to create a special preset, which can also be exported from one TaskForce device and imported to another one.

Create custom settings:

  1. Click Image icon in the left-side menu and select source and target devices
  2. Click the Imaging preset management icon in the right bottom part of the window
  3. Select Create option
  4. Type in the name of the preset and click Create
  5. To adjust the settings, click Change button
  6. Change the settings (e.g. hashing options)
  7. Click back and preview the summary of the new settings saved in the preset

Creating a preset (GIF)


To export a preset:

  1. Click the Imaging preset management icon
  2. Click Export option
  3. The preset will be downloaded in .json format

Exporting a preset


To import a preset:

  1. Click the Imaging preset management icon
  2. Click Import option
  3. In Import settings window, click Select file button
  4. Choose the file in the file selector and click Open
  5. Double-check the preset in Import settings window and click Import

Importing a preset (GIF)


Exporting sector lists from an imaging session

When an imaging session is completed or paused, it is possible to see its summary in the Imaging sessions summary page. Now there is also a possibility to export lists which would clearly indicate which of the sectors on the source drive have been successfully imaged, which have not (if any), and which of the sectors contained errors.

To export such list:

1) Click Image icon in the left-side menu and select the source drive

2) In the session summary, click the Export icon

Click Export icon

3) Select the sectors you are interested in (e.g. Imaged sectors)

Select the type of sectors


4) Save the downloaded .csv file

This file shows the ranges of imaged sectors:

Exported list of imaged sectors


NB Should an imaging session be completed, the list of non-imaged sectors will be blank. 


Here are other improvements to the imaging functionality included in this release:

  • Overall performance increase by 25% when imaging to network shared folders
  • Sparse file support when writing into target images
  • Improved damaged drive support for disks that freeze in the course of imaging
  • Option to automatically limit target drive capacity to match that of the source via HPA

For the full list of new TaskForce features and fixes in this release, please view the changelog.


Where to buy

If you still do not have an Atola TaskForce and would like to place an order, this can be done directly via Atola Technology, or from a distributor near you:

http://atola.com/wheretobuy/

Please contact our Atola Technology sales to receive more specific information:

  • Call us: +1 888 540-2010, +1 416 833-3501  10am – 6pm ET
  • Or email us

P.S. Dear customers, we appreciate your feedback and will take it into account when making changes to the product. Therefore, please feel free to write your thoughts or ideas as comments below.

The post Release of Atola TaskForce 2018.8 is here! appeared first on Atola Blog.

Finding reports in TaskForce

$
0
0

TaskForce automatically creates reports for every single action applied to each drive connected to it. The system also allows browsing through all cases and reports, without corresponding devices being connected to the unit.

The reports are listed and can be easily retrieved in different parts of TaskForce software.

1. Via case page

All reports related to the case are listed at the bottom of the case page. Scroll down and turn pages to view all the reports, sort them by date or by title, use the search bar to look for specific reports by their titles.

Case page with reports


To open a report, click the respective line.

2. Via View reports

If you need to search among all existing reports, click View reports button at the bottom of the Cases page.

Click View reports button

This will redirect you to the page with all existing report that can be filtered by date, title, case ID or device details. Search for a specific report by entering report title or drive details.

View reports page


Open the report you need by clicking it in the list.

3. Via Home page

Similarly, recent reports can also be found on the Home page underneath the Active tasks.

Home page is the place where you can look up active and completed tasks and view reports for all completed tasks.

Find specific reports quickly by entering filters in the search field.

Finding reports on the Home page

The post Finding reports in TaskForce appeared first on Atola Blog.

Atola is growing again!

$
0
0

We are again looking to extend our team of engineers!

A new Hardware Engineer will join our Hardware team with the ever-increasing amount of work assembling units and developing new hardware solutions.

We would like to extend and enhance our existing QA team and its skills set with a new QA Automation Engineer.

Finally, we look to find a Software Engineer with strong knowledge of modern programming languages and frameworks to help us develop the new great features for Atola TaskForce and Atola Insight Forensic.

We look forward to greeting the new reinforcement to our team who would be enthusiastic, curious and gracious, skilful and hard-working.

Atola provides a friendly and stable working environment and we promise to encourage and support the talents who join us this fall.

The post Atola is growing again! appeared first on Atola Blog.

Imaging an evidence drive to 5 targets

$
0
0

Atola TaskForce allows imaging to up to 5 targets at a time.

The targets may include

  • E01 or RAW (.img, .dd) file on a network server
  • target drive plugged into one of 18 TaskForce ports

To start an imaging session that includes 5 targets:

1) Click Image icon in the left-side menu

2) Select source and target devices. To create a target file, click Select file icon in the target drive menu and click Continue button.

Select targets


3) In Select image file, open the folder on the server where you want the file to be created and click the Plus icon.

4) In Create image file pop-up window, type in a name for the file and select its type (E01, RAW, img., or dd.), click Create and click Continue button in Select target devices window.

Enter the name of the file


5) In the summary page, double-check imaging settings and the targets selected for the imaging session and click Start button.

Check the settings and click Start button


In the imaging page, there are two diagrams that show the progress of imaging. The upper one is called imaging map bar and shows imaging progress throughout the whole drive space (all successfully imaged sectors on the source drive are marked green, all damaged ones are marked red). The lower diagram is called read speed graph and shows the time TaskForce spent reading sectors on the source drive. 


NB Overall imaging speed is always limited by the slowest device: either by the read speed of the source or the write speed of the slowest target. 

Imaging in progress


When imaging is completed, you are redirected to the imaging summary page, where you can review the details of the session including source and target drive details, imaging settings, hash values and the time when imaging session started and when it was completed.

Imaging completed


The post Imaging an evidence drive to 5 targets appeared first on Atola Blog.

Atola celebrates 15 years!


Top 30+ forensic conferences in 2019

$
0
0

Here we share with you the list of the most prominent worldwide events in digital forensics. These forensic conferences and exhibitions present an excellent opportunity to learn about the latest trends from the industry’s best speakers, see the new technology presented by the vendors and network with other professionals working in digital forensics.

If you want to keep up to date with the exhibitions and conferences organized around the globe, save the link and check this page later. We update the list as we receive info on new events and get the dates of the already planned ones confirmed.

The events at which Atola Technology or our partners will be exhibiting, are marked with an asterisk (*).

last updated December 12, 2018

Upcoming events 2019-2020

Conference Date Location Region Registration fee
CyberTech Israel January 28 – 30 Tel Aviv, Israel Middle East $810
Forensics Asia Expo January 29 – 30 Marina Bay Sands, Singapore Asia Pacific GBP 650
NSA Winter Legislative & Technology Conference February 9 – 12 Washington D.C. North America $570
22nd European Police Congress February 19 – 20 Berlin, Germany Europe €895
CHIA Conference February 26 – March 1 Las Vegas, NV North America unknown
13th Annual Gang Training Conference March 3 – 6 Hanover, MD North America $155
Security & Policing March 5 – 7 Hampshire, UK Europe free
Forensic Europe Expo * March 5 – 6 London, UK Europe free
Techno Security & Digital Forensics West * March 11 – 13 San Diego, CA North America $1,295
GPEC digital  * March 13 – 14 Berlin, Germany Europe €300
Magnet User Summit April 2 – 3 Nashville, TN North America $349
Milipol Asia Pacific April 2 – 4 Marina Bay Sands, Singapore Asia Pacific free
Emirates International Forensic Conference & Exhibition * April 9 – 11 (TBC) Dubai, UAE Middle East AED 1,937
FORENSECURE 2019 April 11 – 12 Wheaton, IL North America $200
National Cyber Crime Conference * April 23 – 25 (TBC) Boston, MA North America $350
DFRWS EU April 24 – 26 Oslo, Norway Europe €550
IACIS * April 29 – May 10 Orlando, FL North America $2,995
IACP Technology Conference May 20 – 22 Jacksonville, FL North America $750
InterFORENSICS * May 21 – 24 Sao Paolo, Brazil South America $280
Ontario Forensic Investigators Association Annual Conference * May 28 – 31 Toronto, ON, Canada North America $400
Techno Security & Digital Forensics * June 2 – 5 Myrtle Beach, SC North America $1,295
3rd World Conference and Exhibition on Forensic Science June 3 – 4 Berlin, Germany Europe $899
Israel Defence and HLS Expo June 4 – 6 Tel Aviv, Israel Middle East unknown
NSA Annual Education & Technology Expo June 15 – 19 Louisville, KY North America $630
19th Annual DFRWS USA July 14 – 17 Portland, OR North America $800
International Police Expo July 19 – 20 New Delhi, India Asia Pacific unknown
DFIR Summit & Training July 25 – August 1 Austin, TX North America $1,890
Crimes Against Children Conference *  August 12 – 15 Dallas, TX North America $600
114th CACP Annual Conference August 12 – 15 Halifax, NS, Canada North America $895
Youth, Technology & Virtual Communities Conference August 26 – 28 Gold Coast, Australia Asia Pacific $750
HTCIA International Conference & Training Expo * September 22 – 25 Chicago, IL North America unknown
Techno Security & Digital Forensics Texas * September 30 – October 2 San Antonio, TX North America $1,295
Northwest Regional ICAC Conference * October 10 – 12 (TBC) Redmond, WA North America unknown
O.P.P. Strategy * October 22 – 25 (TBC) Niagara Falls, ON, Canada North America $200
I.A.C.P. October 26 – 29 Chicago, IL North America $725
GCC Forensics Exhibition and Conference * October 28 – 30 Manama, Bahrain Middle East $150
Milipol  * November 19 – 22 Paris, France Europe free
23rd European Police Congress February 19 – 20, 2020 Berlin, Germany Europe €895
11th GPEC February 21 – 23, 2020 Frankfurt, Germany Europe €5
Milipol Qatar October 26 – 28, 2020 Doha, Qatar Middle East free


Past events 2018

Conference Date Location Region Registration fee
IFIP Working Group 11.9 on Digital Forensics January 3 – 5 New Delhi, India Asia Pacific $290
CyberTech Israel January 29 – 31 Tel Aviv, Israel Middle East €575
21st European Police Congress * February 6 – 7 Berlin, Germany Europe €895
West 2018 February 6 – 8 San Diego, CA North America $625
NSA Winter Legislative & Technology Conference February 10 – 13 Washington D.C. North America unknown
70th Annual Scientific Meeting February 19 – 24 Seattle, WA North America $515
10th GPEC February 20 – 22 Frankfurt, Germany Europe €5
2018 CHIA Conference * February 27 – March 2 Las Vegas, NV North America $375
Mid-Atlantic Regional Gang Investigators Network March 4 – 7 Annapolis, MD North America unknown
Forensic Europe Expo * March 6 – 7 London, UK Europe free
Security & Policing 2018 March 6 – 8 Hampshire, UK Europe free
DFRWS EU 2018 March 21 – 23 Florence, Italy Europe €550
Emirates International Forensic Conference & Exhibition * April 9 – 11 Dubai, UAE Middle East AED 1,937
Forensecure 2018 April 12 – 13 Wheaton, IL North America $200
2018 Minnesota HTCIA Spring Conference April 18 – 19 Shoreview, MN North America unknown
National Cyber Crime Conference * April 23 – 25 Boston, MA North America $350
IACIS * April 23 – May 4 Orlando, FL North America $2,795
2018 Wisconsin Crimes Against Children Conference May 7 – 8 Green Bay, WI North America unknown
IMF 2018 May 7 – 9 Hamburg, Germany Europe €455
International Police Expo * May 10 – 11 New Delhi, India Asia Pacific unknown
Ontario Forensic Investigators Association * May 15 – 17 Niagara Falls, ON, Canada North America $400
China International Exhibition on Police Equipment May 15 – 18 Beijing, China Asia Pacific unknown
ADFSL Conference May 17 – 18 San Antonio, TX North America $248
IACP Technology Conference May 21 – 23 Providence, RI North America $750
Enfuse * May 21 – 24 Las Vegas, NV North America $1,895
Techno Security & Digital Forensics * June 3 – 6 Myrtle Beach, SC North America $1,295
DFIR Summit & Training 2018 June 7 – 14 Austin, TX North America $1,870
Eurosatory * June 11 – 15 Paris, France Europe unknown
National Law Enforcement Training on Child Exploitation June 12 – 14 Atlanta, GA North America unknown
2nd World Conference and Exhibition on Forensic Science June 11 – 12 Rome, Italy Europe $699
NSA Annual Education & Technology Expo * June 15 – 19 New Orleans, LA North America $595
18th Annual DFRWS USA 2018 July 15 – 18 Providence, RI North America $800
WCSF 2018 August 1 – 3 New York, NY North America unknown
Future of Forensics August 2 – 3 Pretoria, South Africa Africa unknown
Crimes Against Children Conference *  August 12 – 16 Dallas, TX North America $600
113th CACP Annual Conference August 12 – 15 Halifax, NS, Canada North America $795
HTCIA International Conference & Training Expo * August 20 – 22 Washington, D.C. North America unknown
Youth, Technology & Virtual Communities Conference August 27 – 29 Gold Coast, Australia Asia Pacific $750
Information Security Summit September 4 – 5 Wanchai, Hong Kong Asia Pacific HKD 450-1250
PFIC September 5 – 6 Park City, UT North America $399
ANZFSS 24th International Symposium on Forensic Science September 9 – 13 Perth, Australia Asia Pacific $1,700.00
ICDFJS 2018 September 10 – 11 Tokyo, Japan Asia Pacific €450
ICDF2C * September 10 – 12 New Orleans, LA North America €843
Techno Security & Digital Forensics West * September 17 – 19 San Antonio, TX North America $1,299
GovWare 2018 * September 18 – 20 Suntec, Singapore Asia Pacific SGD 1100
Financial Crimes & Digital Evidence September 18 – 20 Salem, OR North America $195
FT-Day September 25 – 26 Karlsruhe, Germany Europe free
I.A.C.P. * October 6 – 9 Orlando, FL North America $725
Digital Experience 2018 October 9 – 11 Utrecht, Netherlands Europe unknown
2018 Northwest Regional ICAC Conference * October 10 – 12 Redmond, WA North America unknown
OSDFCon October 17 Herndon, VA North America $350
O.P.P. Strategy * October 22 – 25 Niagara Falls, ON, Canada North America $200
Milipol Qatar October 29 – 31 Doha, Qatar Middle East free
GCC Forensics Exhibition and Conference * October 30 – 31 Abu Dhabi, UAE Middle East $150
3rd International Policing Cybercrime Summit November 5 – 7 Fredericton, NB, Canada North America $300-750
Feria de Informática Forense en España (FiFE´18) November 20 Madrid, Spain Europe unknown
Florida ICAC Symposium December 10 Orlando, FL North America unknown
3rd Annual Future Police Technology & Forensics Summit December 10 – 11 Abu Dhabi, UAE Middle East $1999


NB The registration fees in this table are indicative. Each conference has a range of fees based on the occupation, country of origin or the role of each participant. We mention only the basic rate which does not include discounts or special offers. Please check the websites of these forensic conferences to learn more about the applicable registration rates.

The post Top 30+ forensic conferences in 2019 appeared first on Atola Blog.

Atola TaskForce 2018.12 release is out!

$
0
0

Welcome to the December release of Atola TaskForce! In this firmware version you will enjoy:

NVMe support: imaging of NVMe drives using M.2 extension module

Imaging of all sectors with data: skip empty sectors and image data only, one partition at a time

Improved interface: clickable and editable elements are now easily recognizable

and other features and improvements.

NVMe support

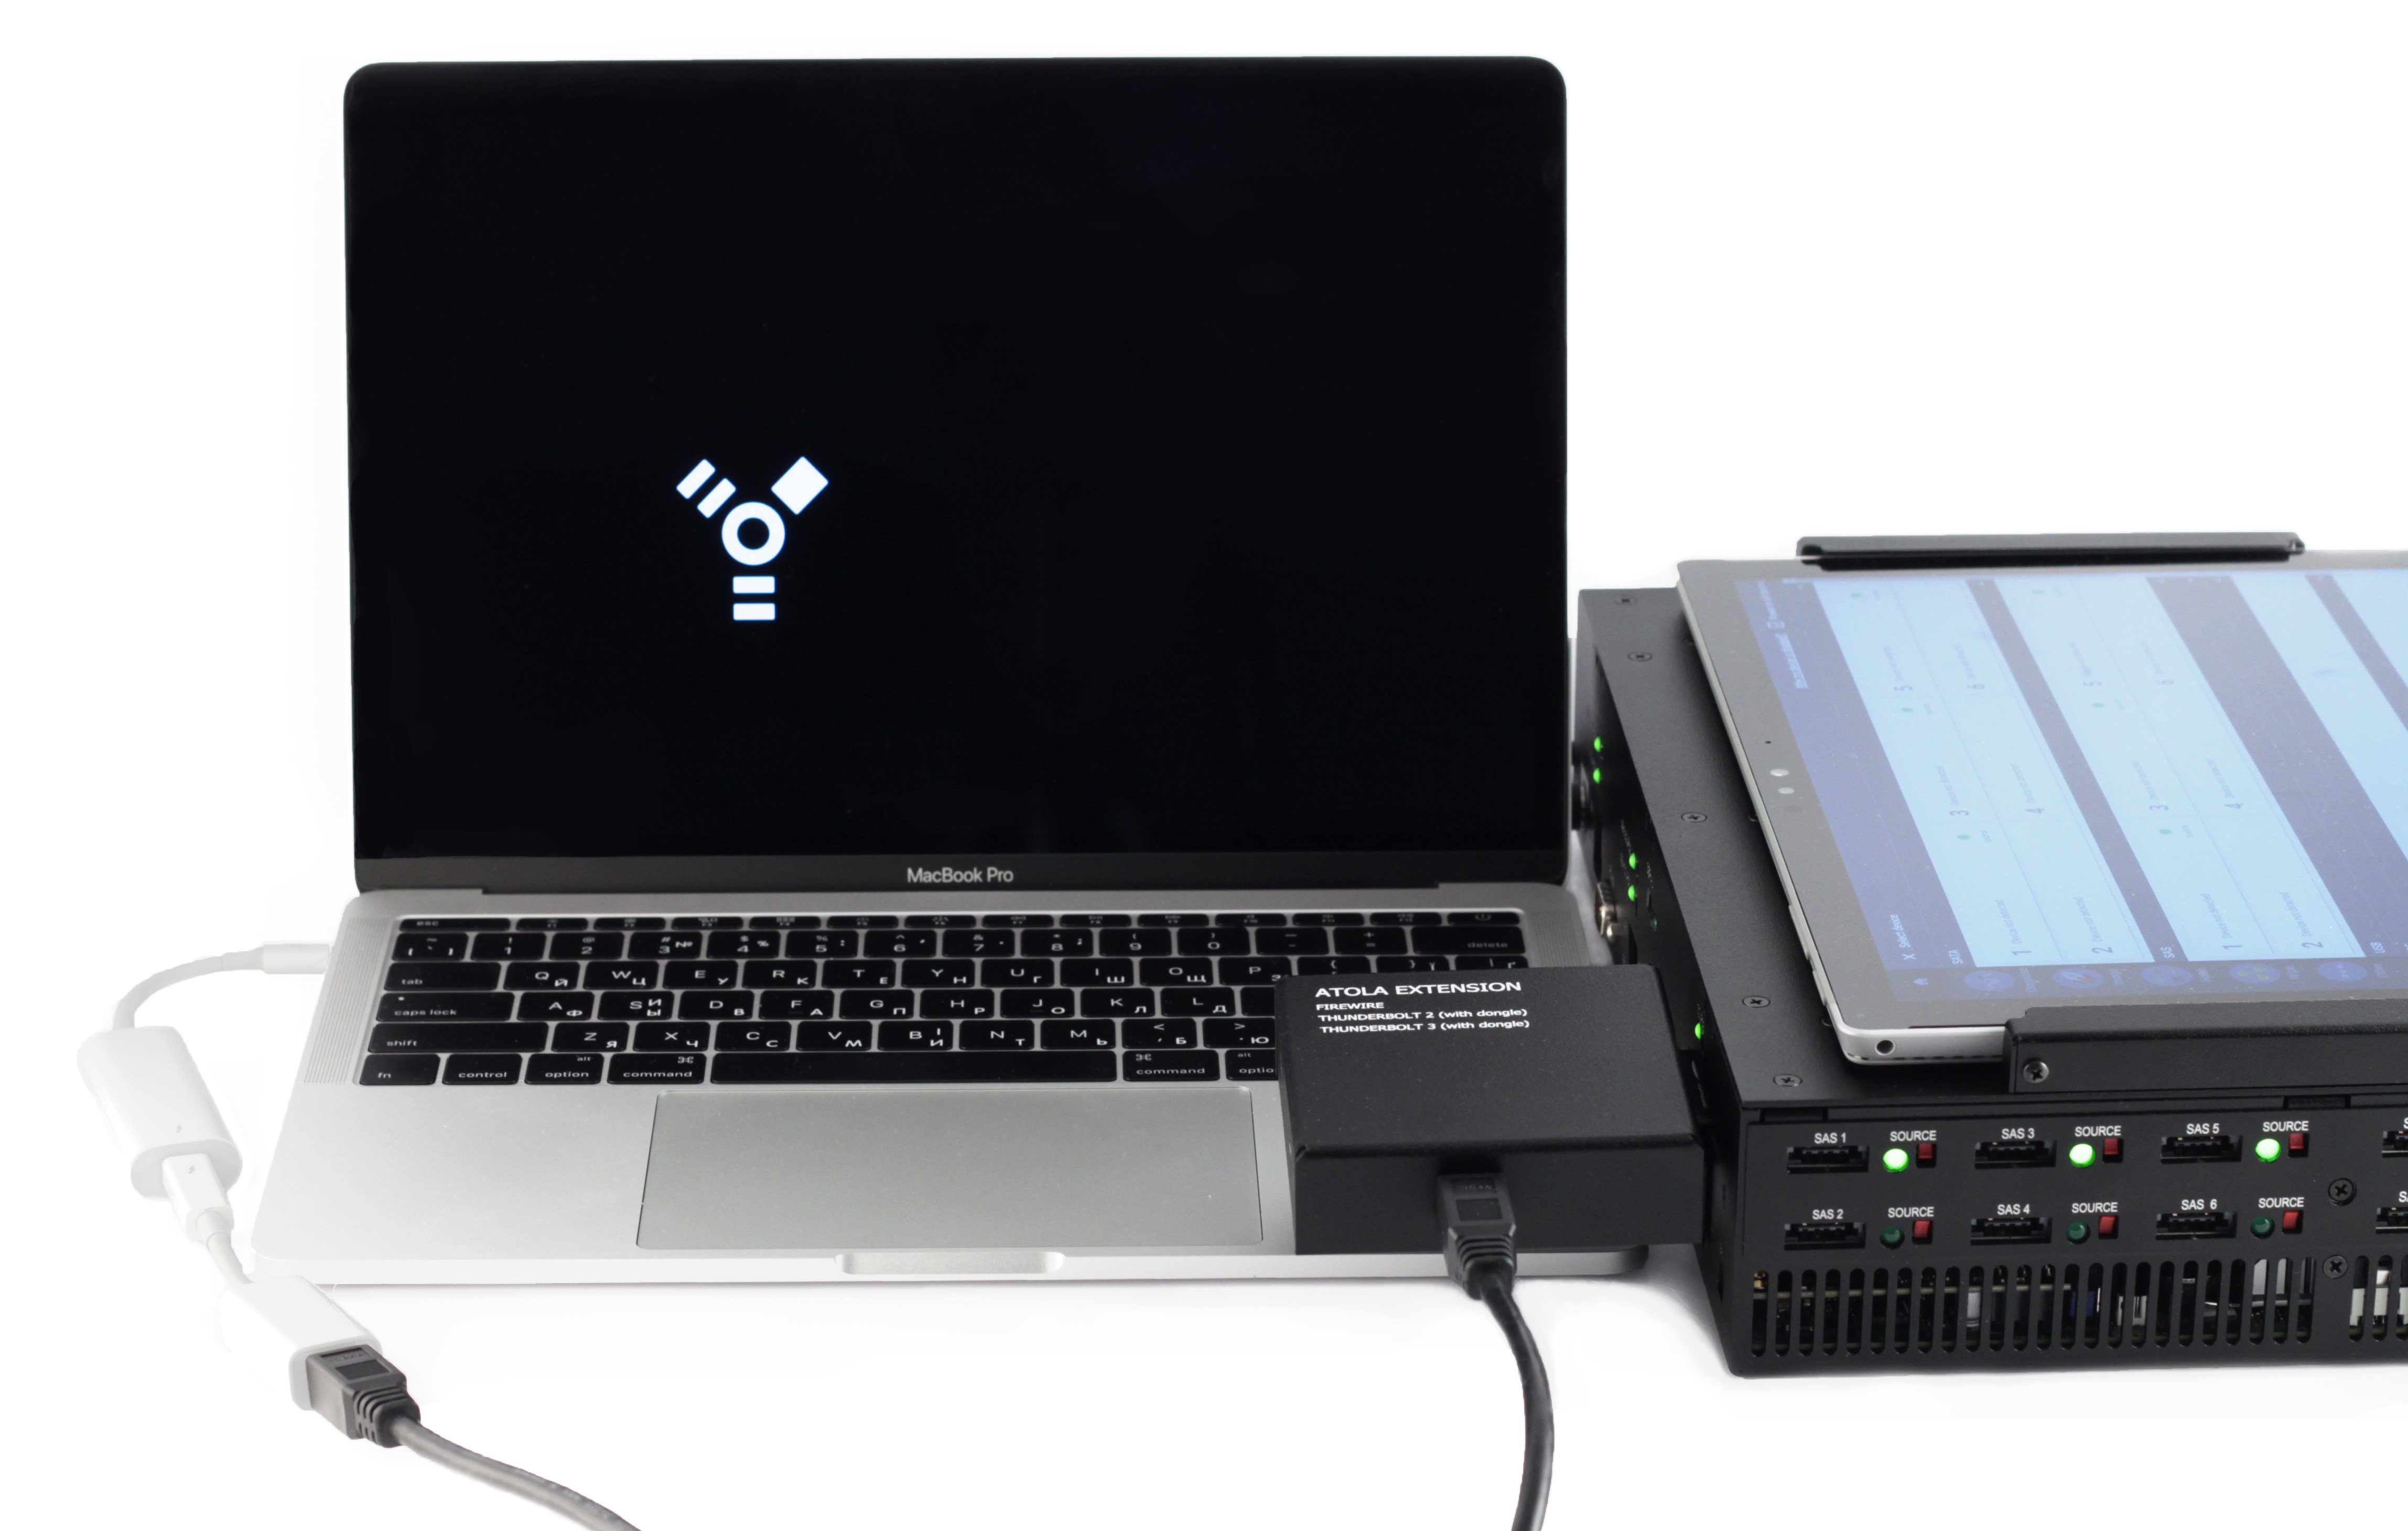
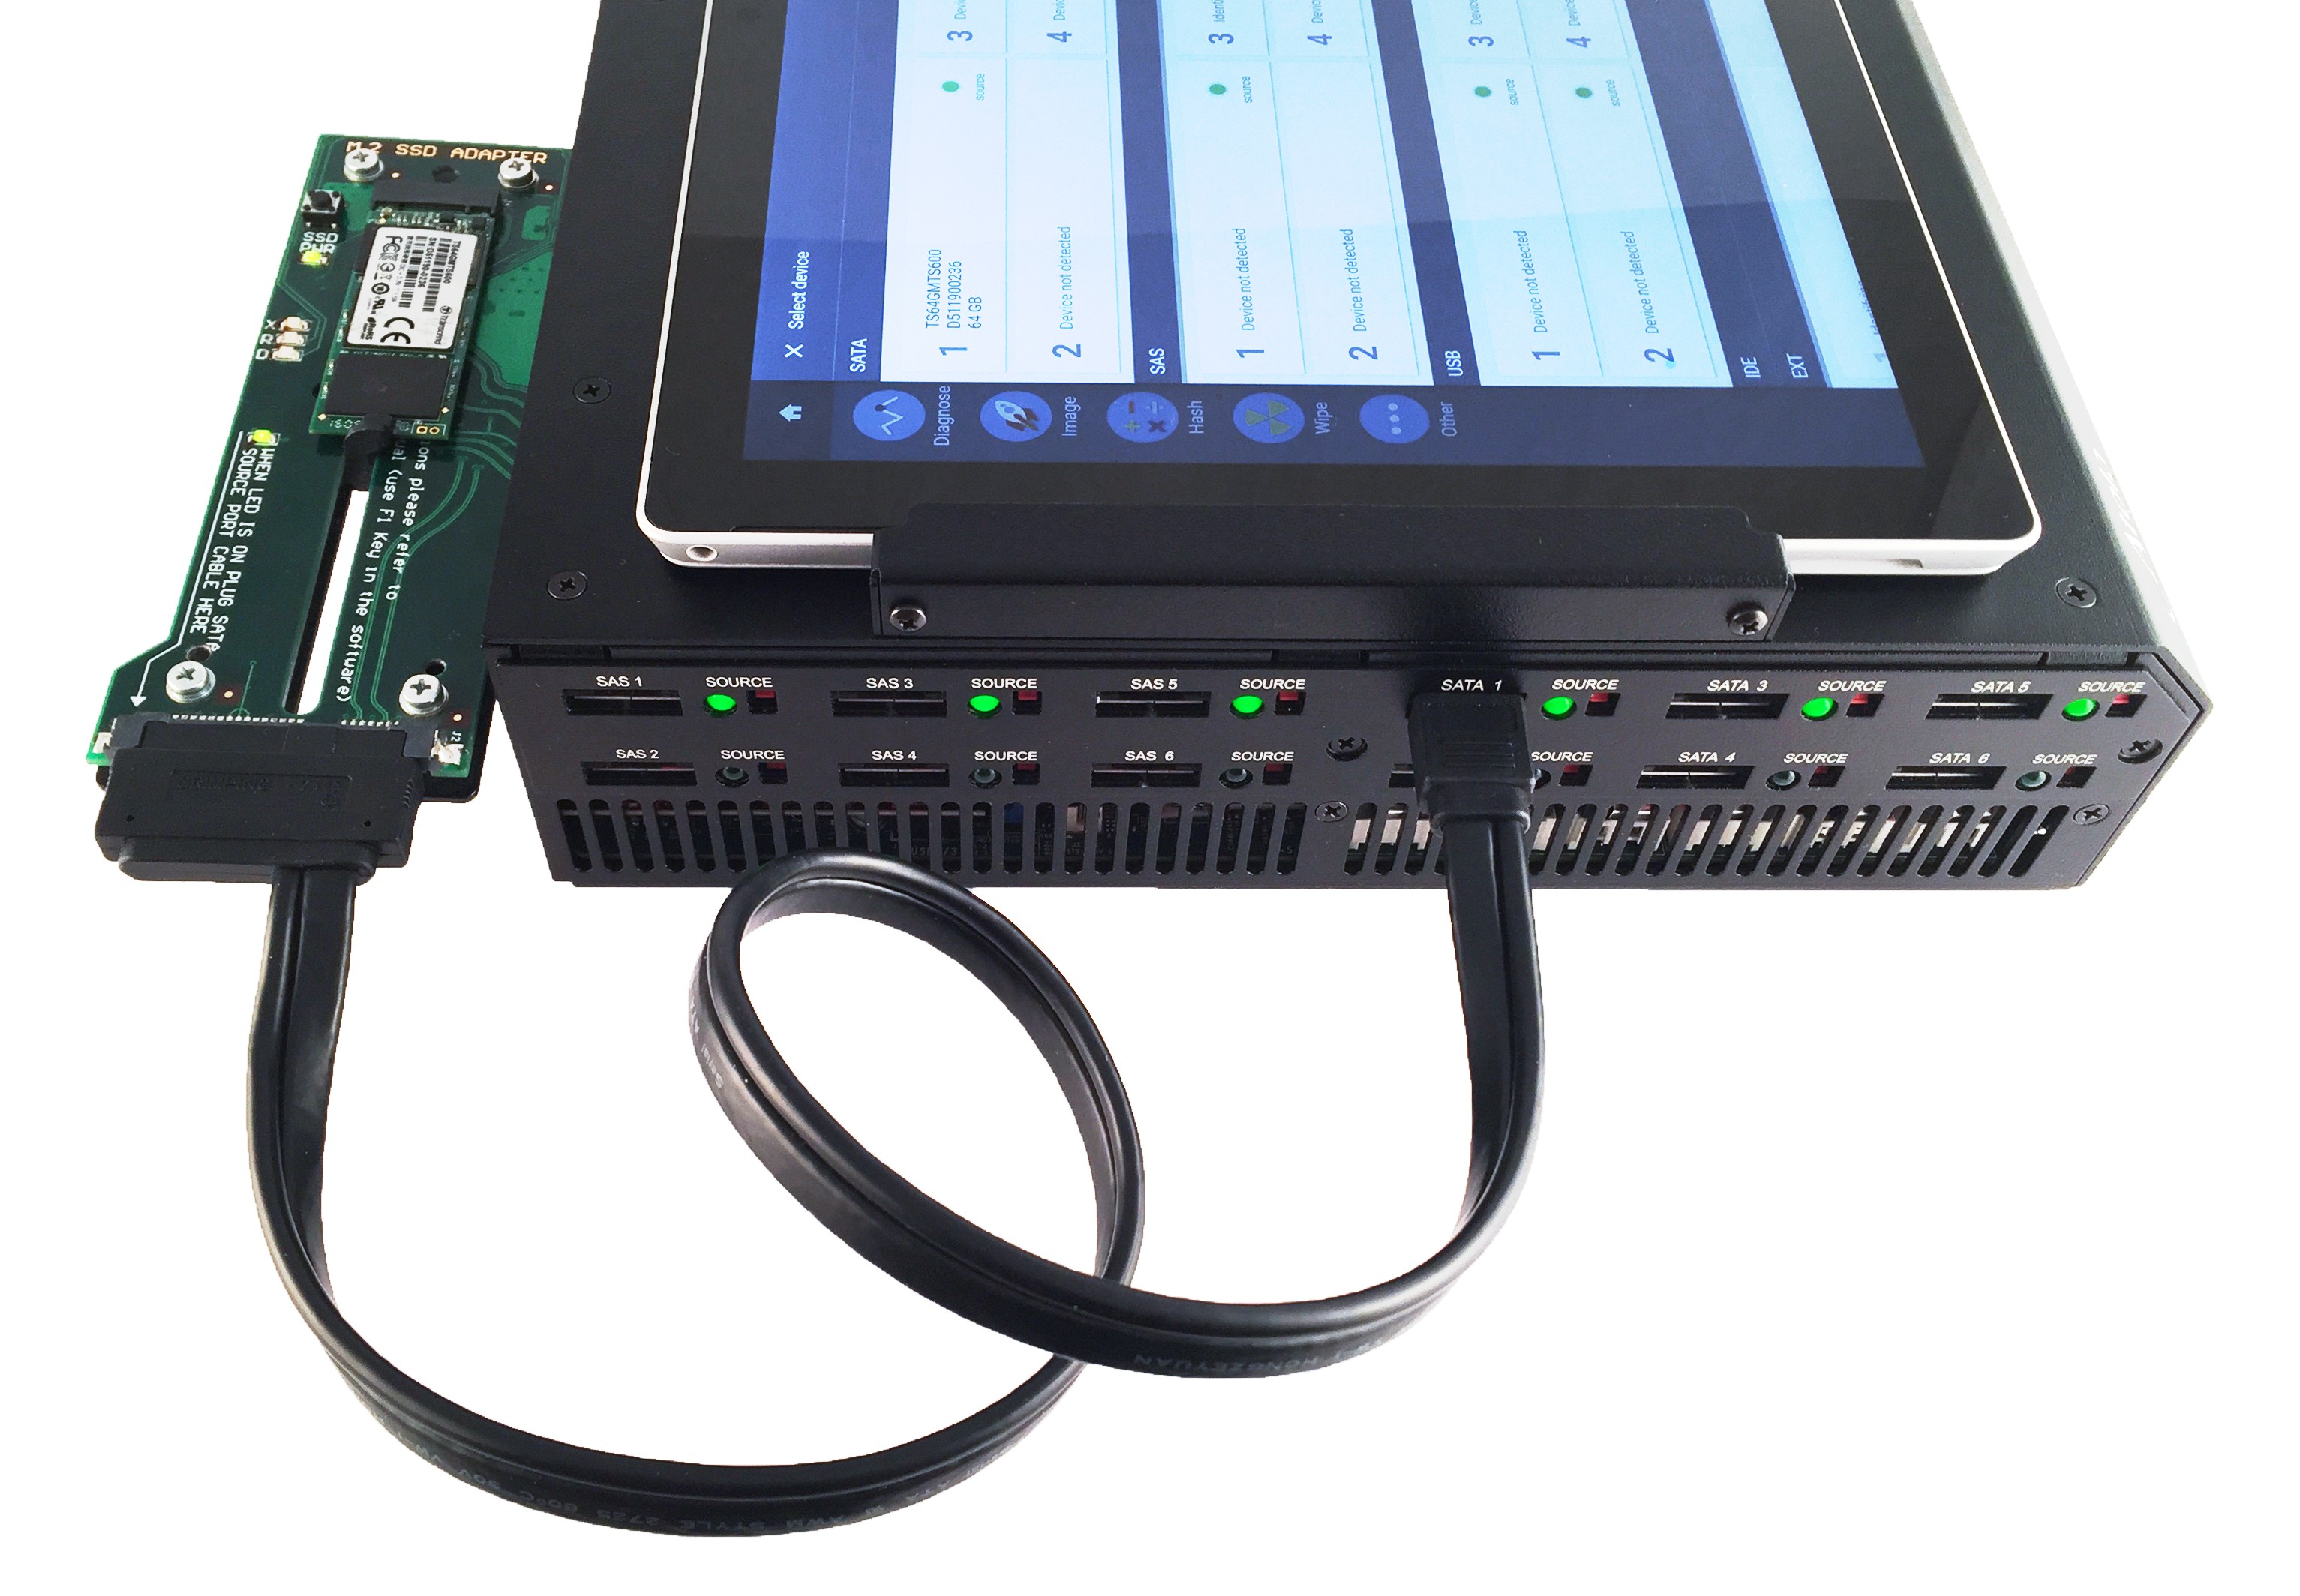
We are pleased to announce NVMe support in TaskForce! NVMe is the latest and greatest technology in the world of storage devices. NVMe drives achieve unprecedented speeds, which has made them very popular devices for laptops, desktop and corporate computers alike. NVMe drives can now be imaged with the help of our M.2 SSD extension module.


To image a drive:

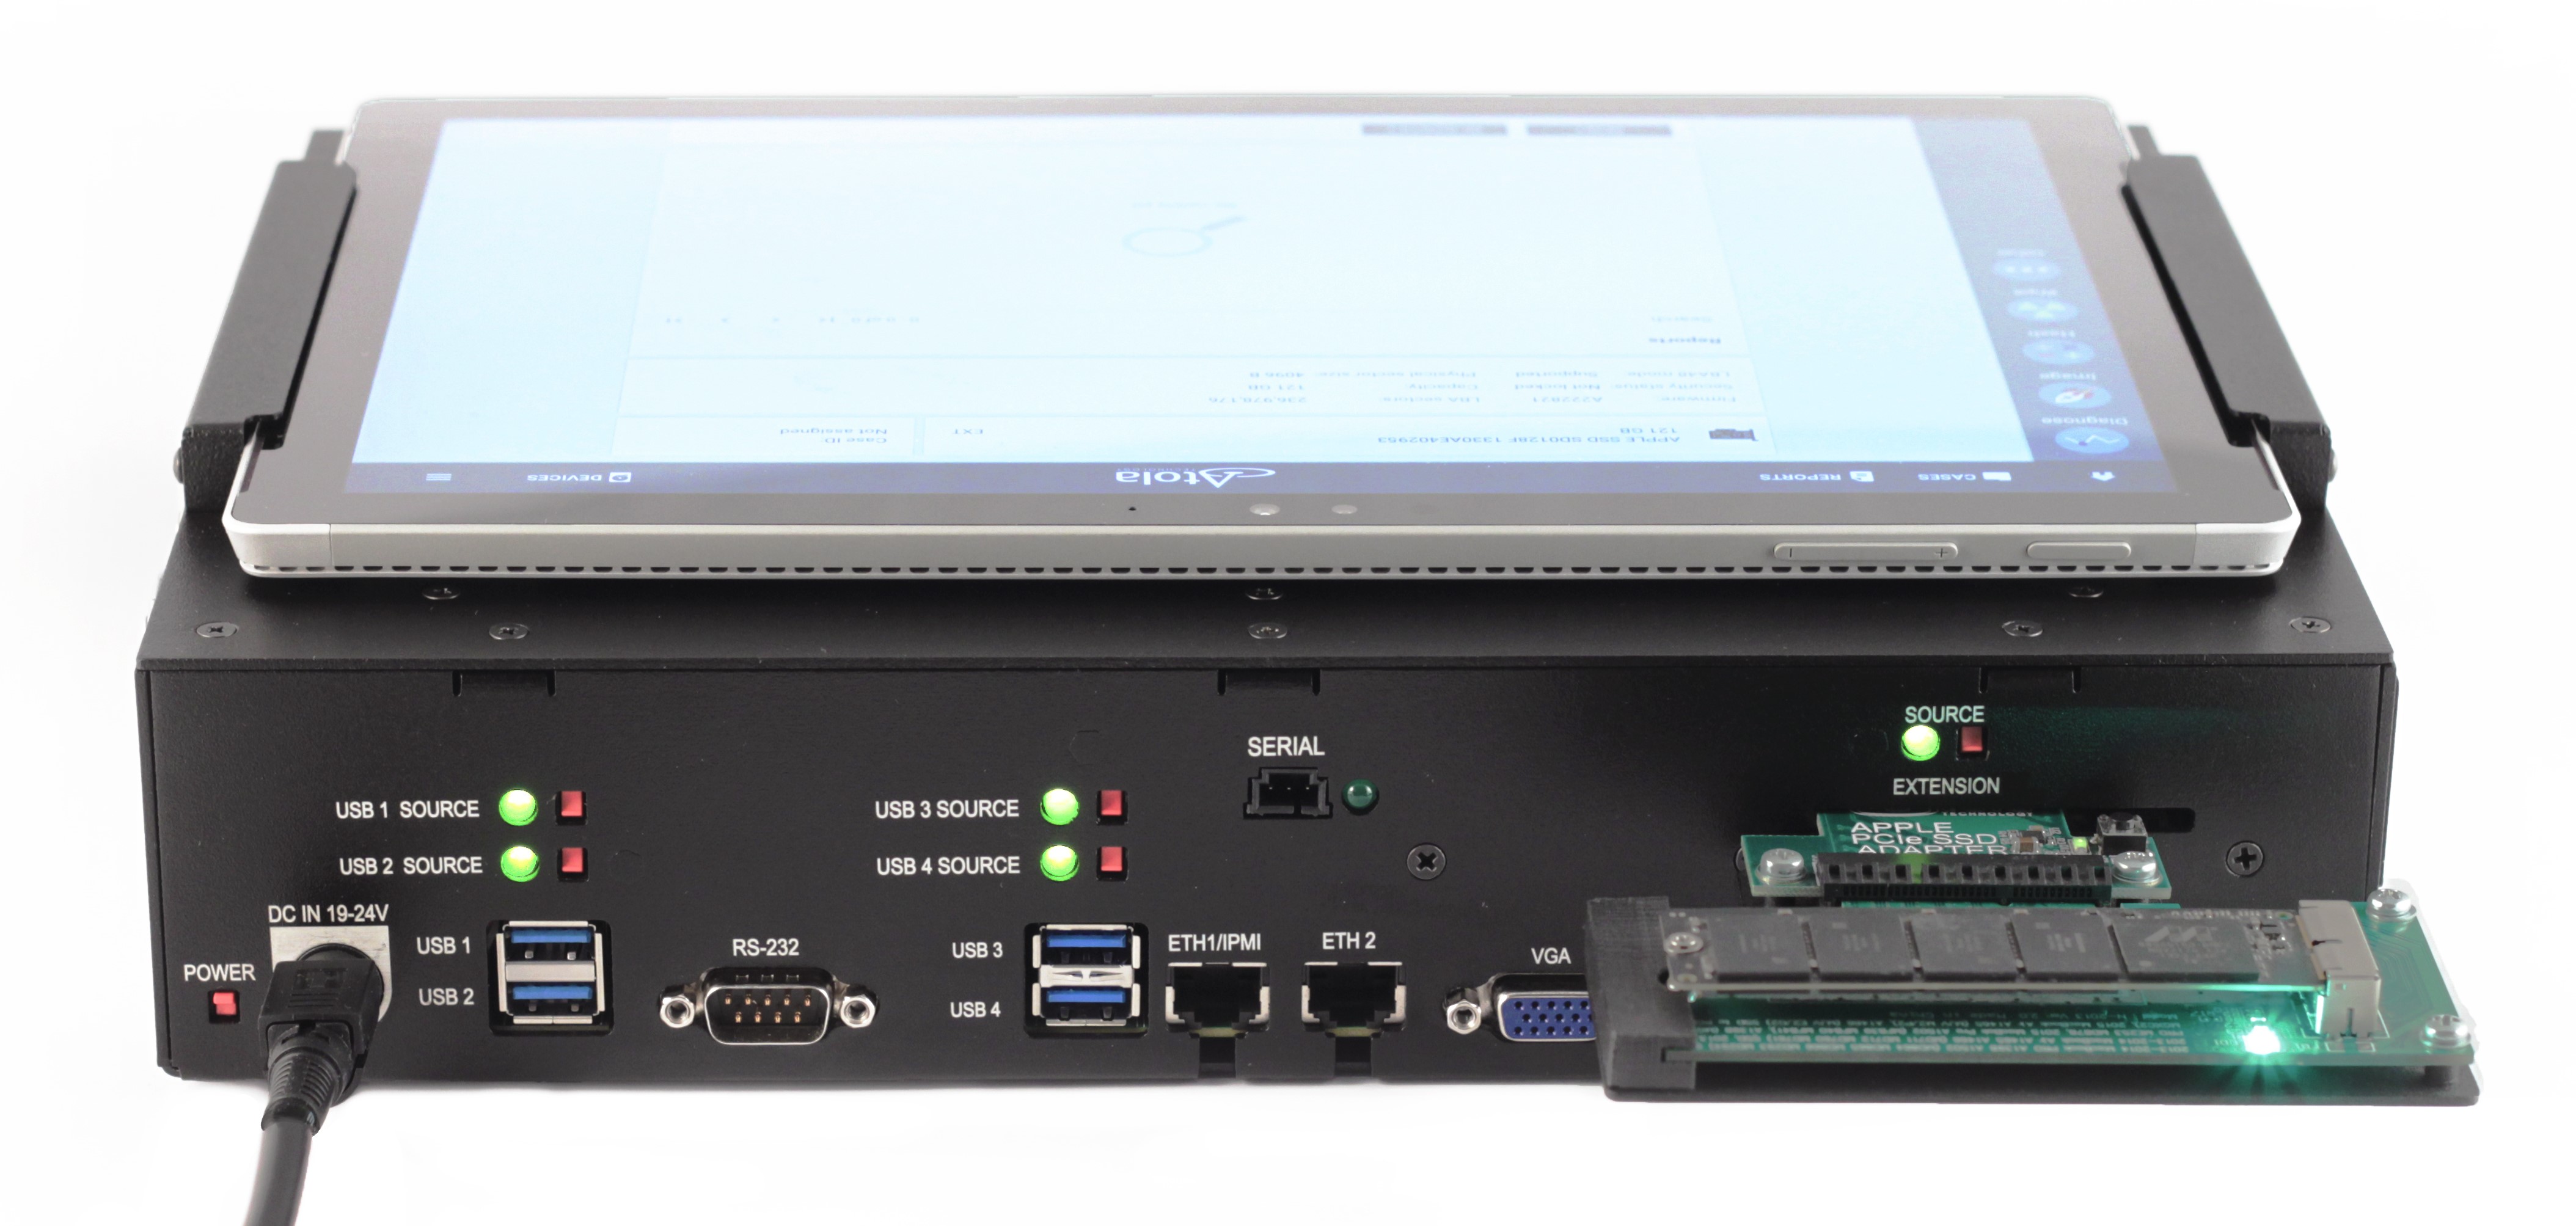
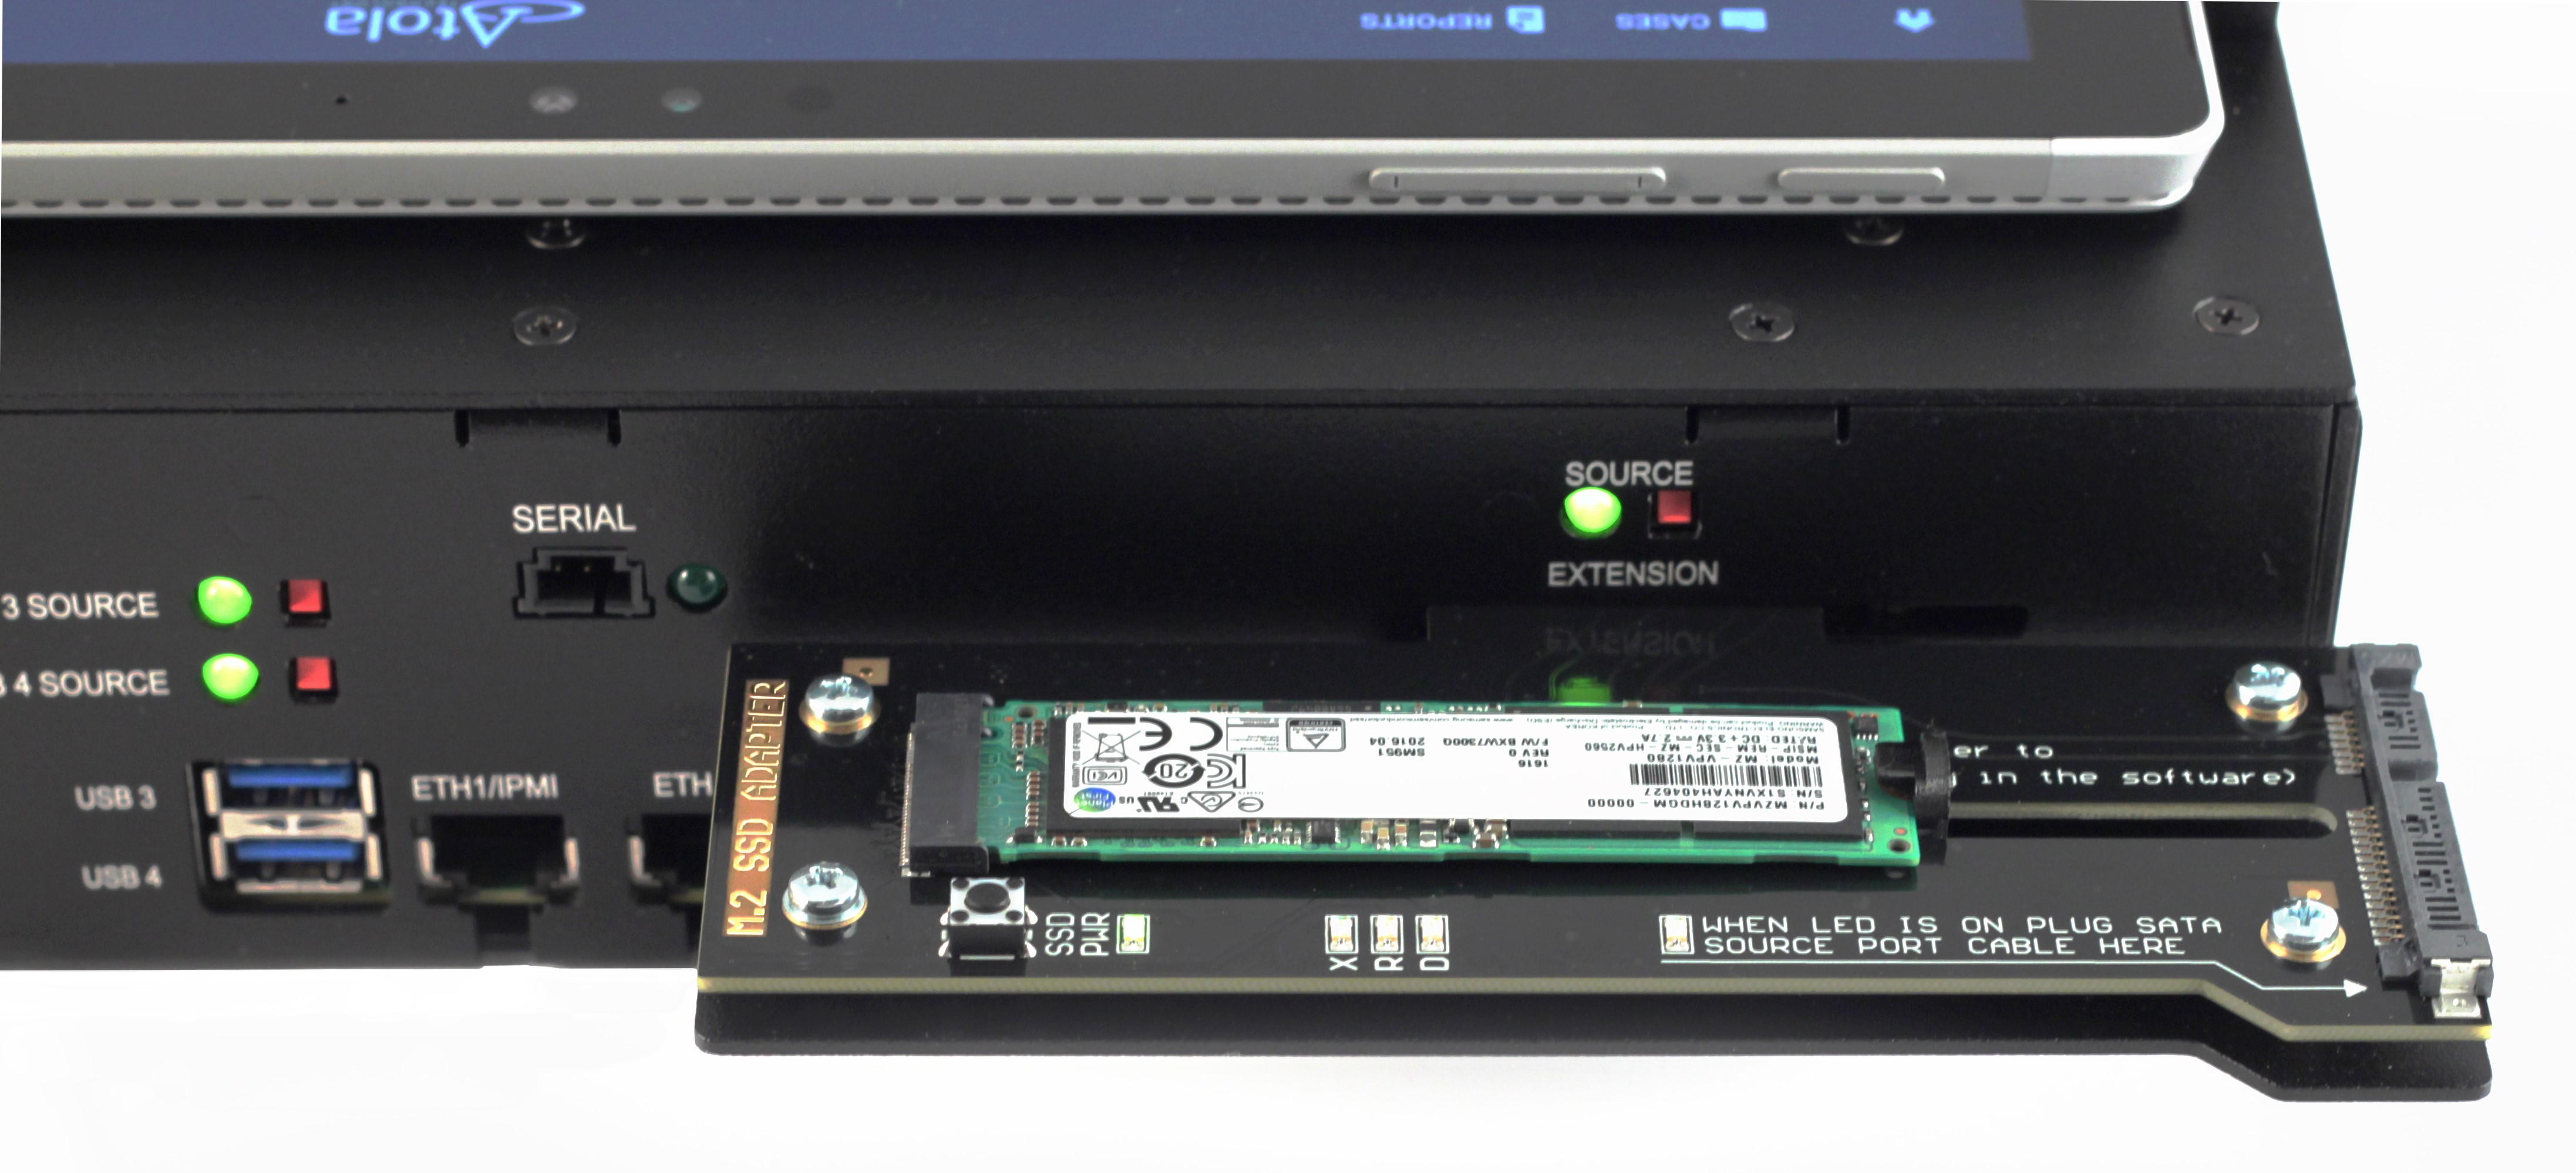
  1. Plug M.2 extension module with NVMe drive to TaskForce while it is powered off
  2. Boot the system
  3. Click Image in the left-side menu
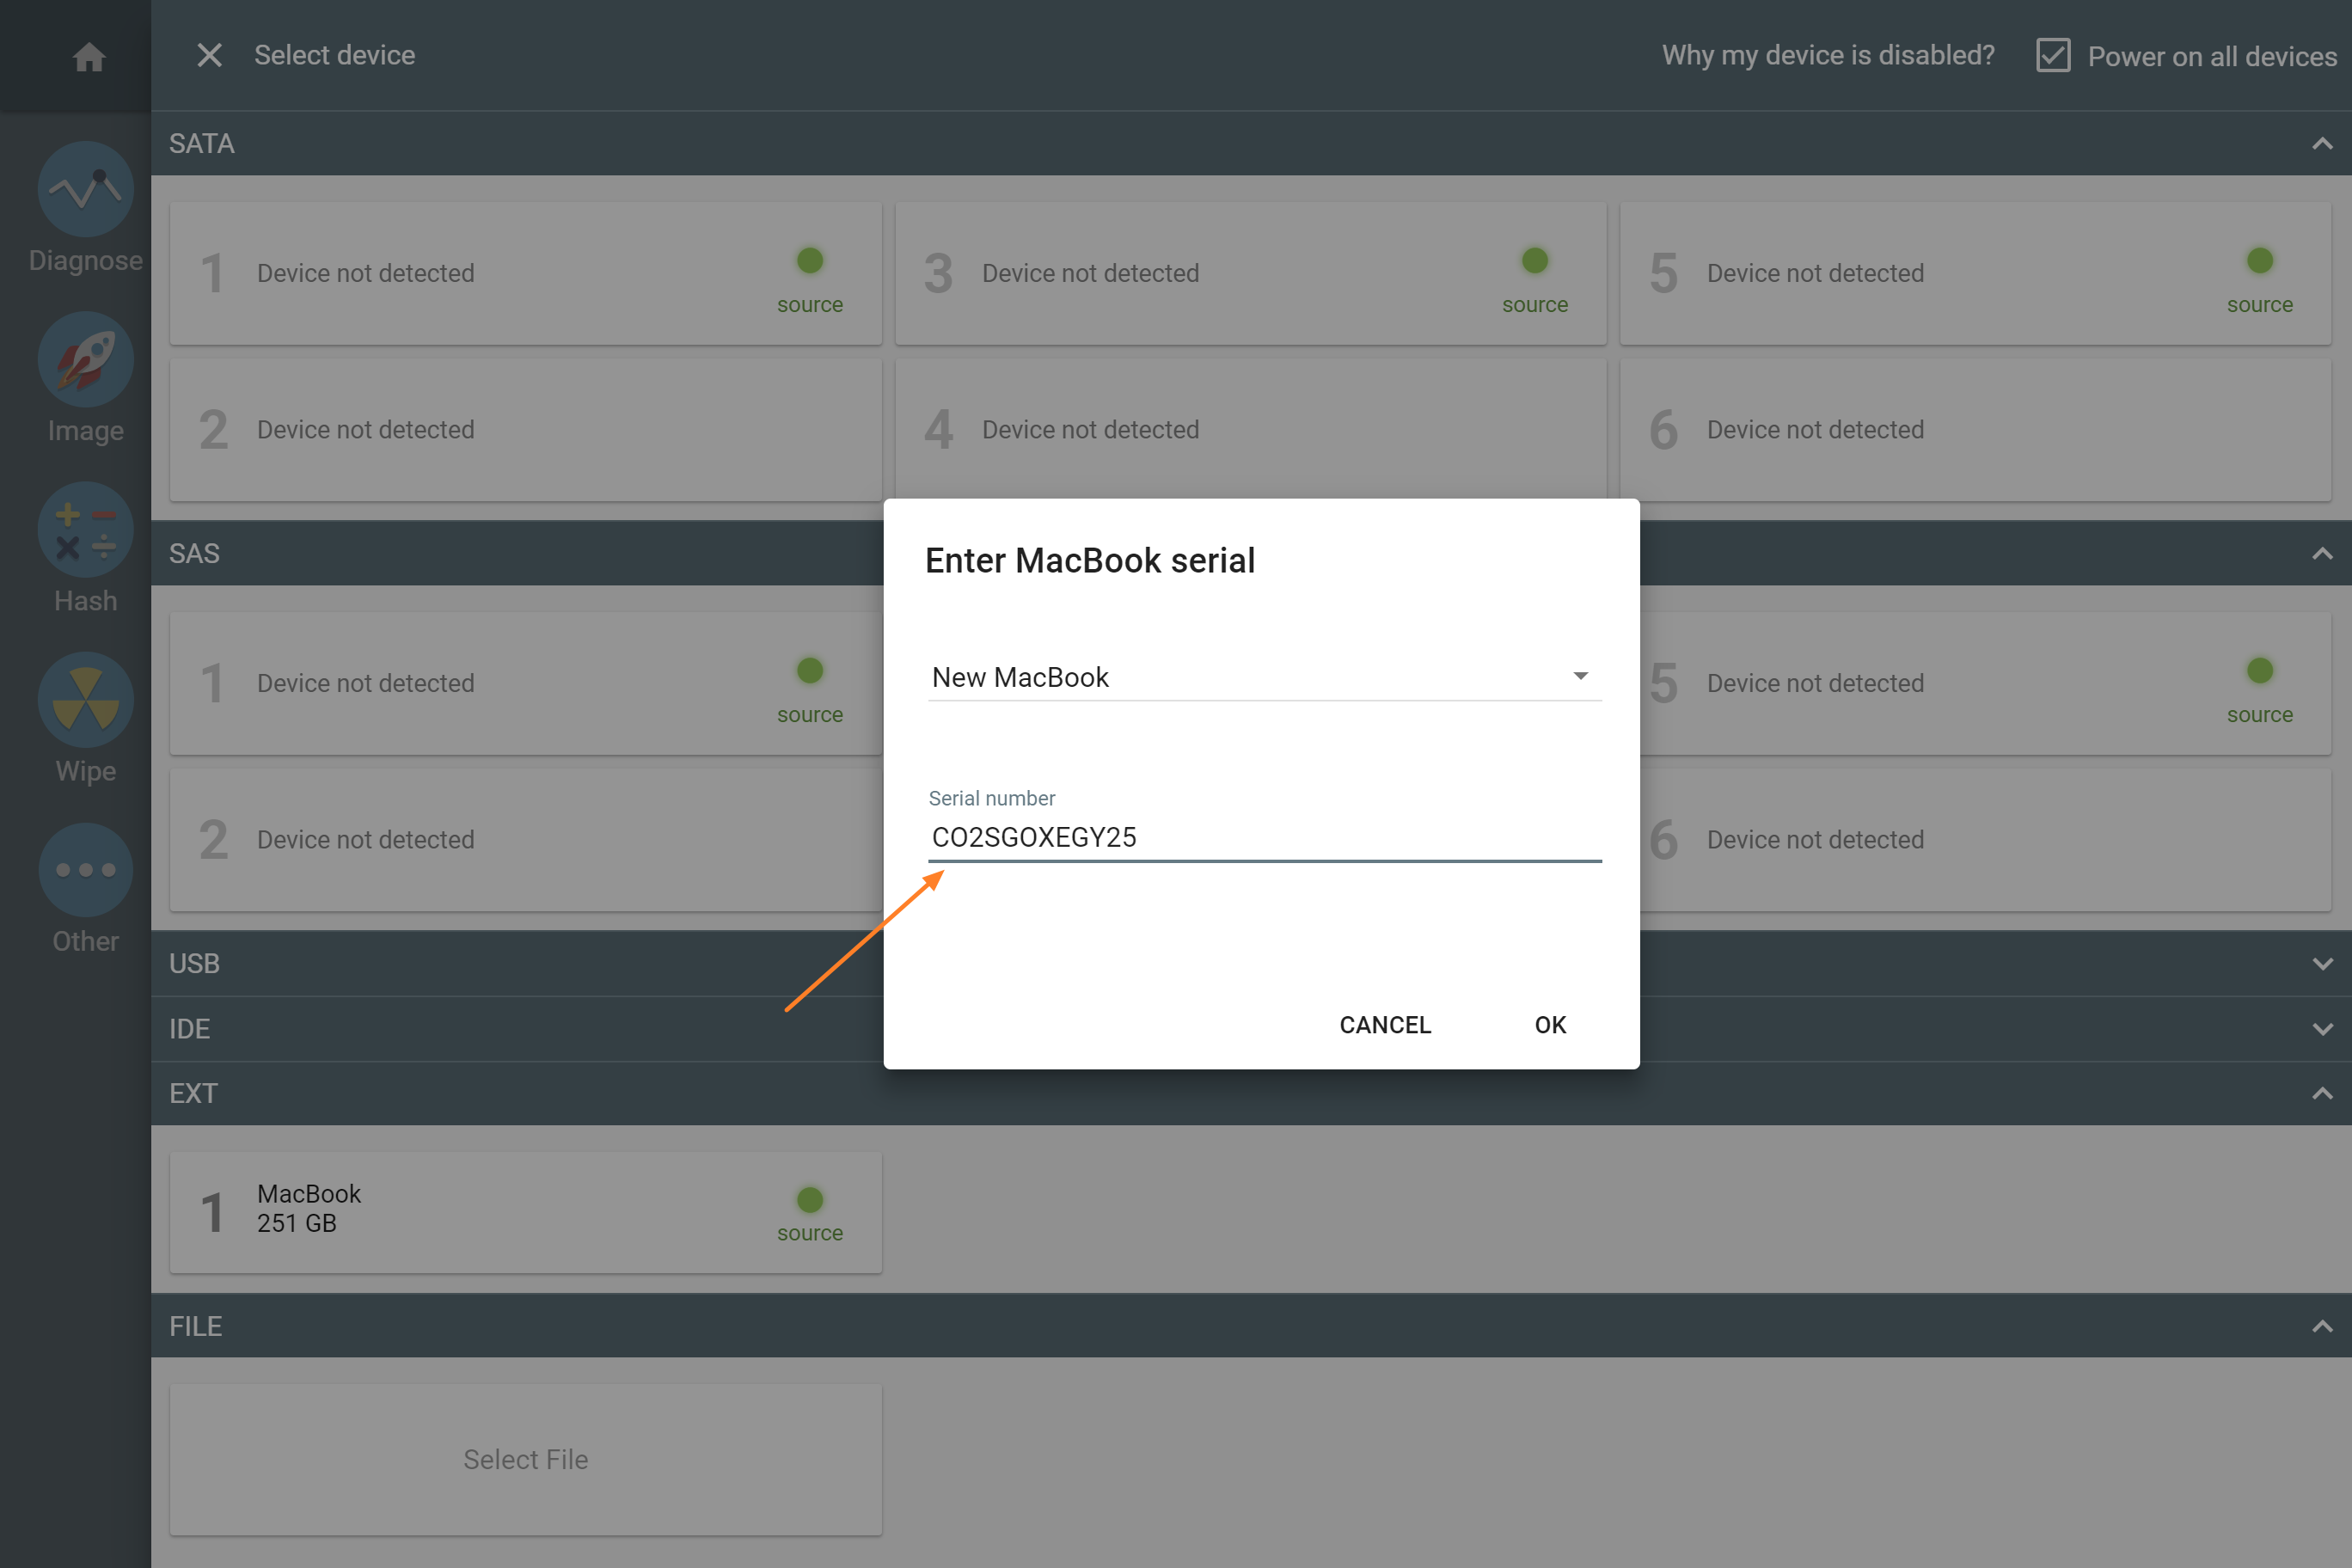
  4. Select the drive in Extension section of the Select source menu
  5. Click the target drive in the Select target menu
  6. Click Start to proceed with imaging

Imaging an NVMe drive


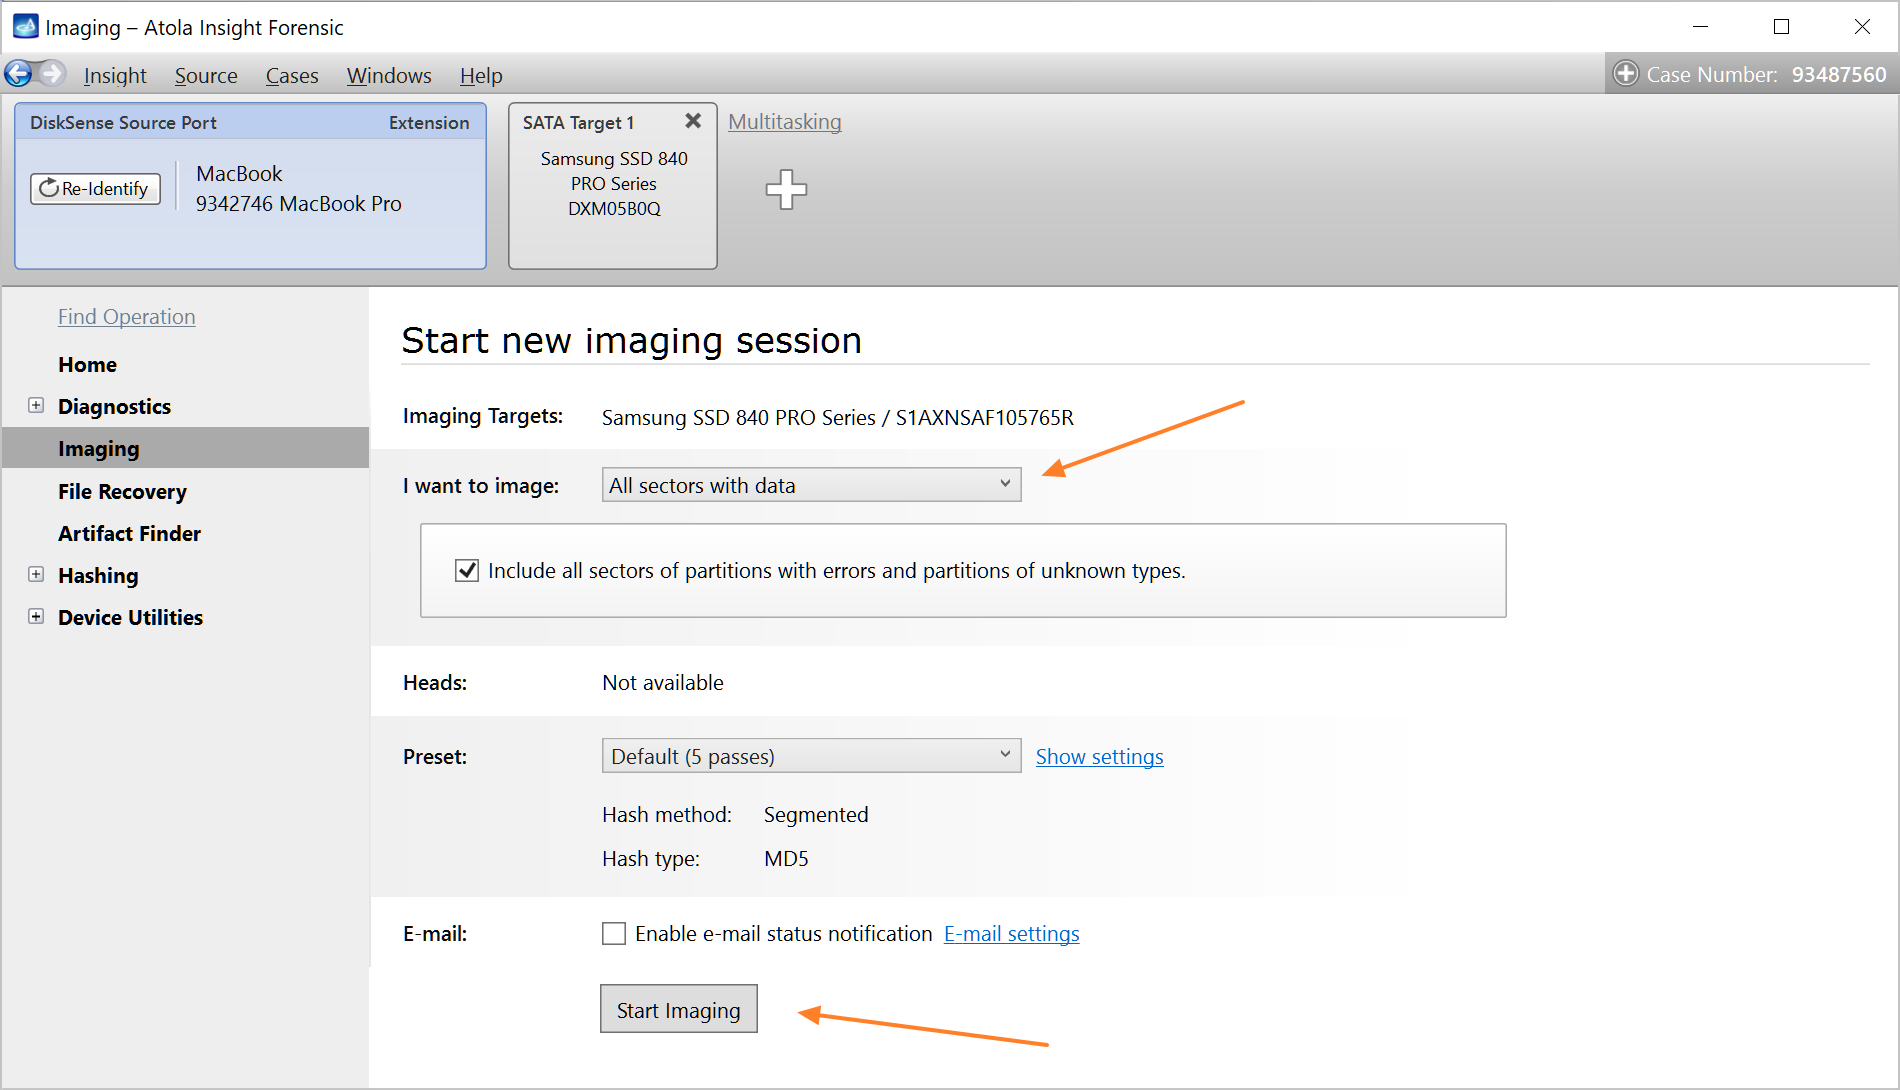
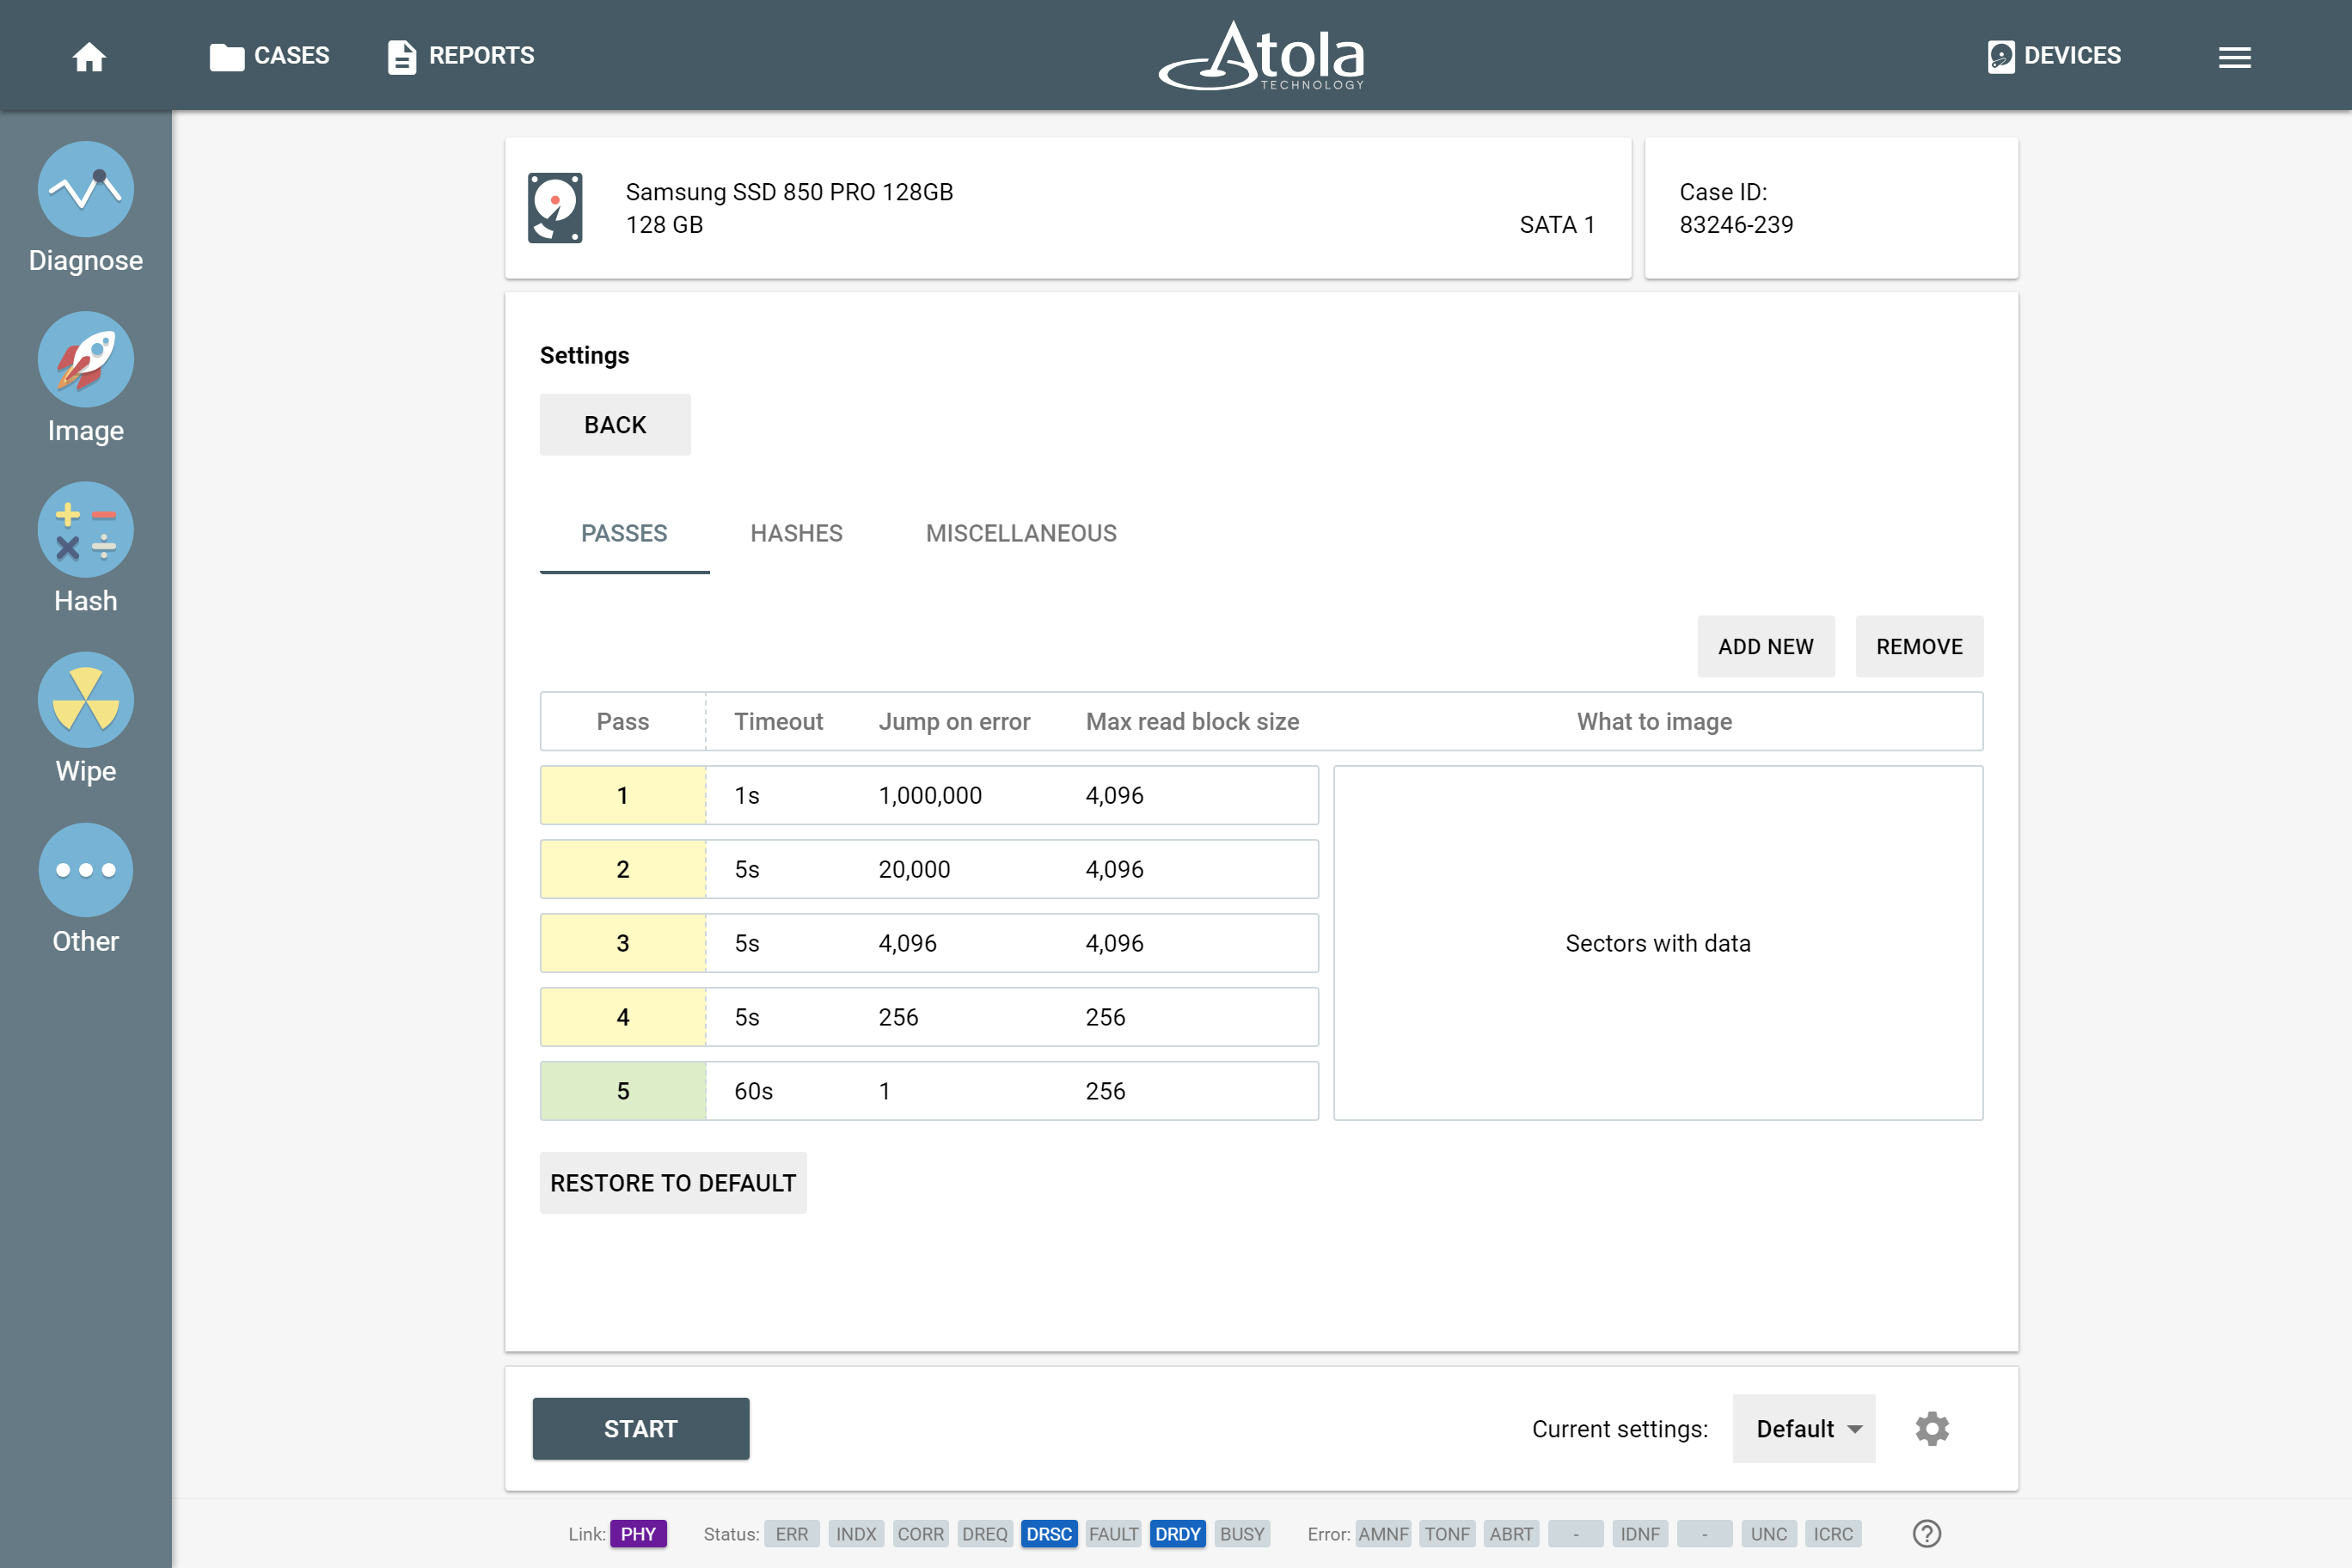
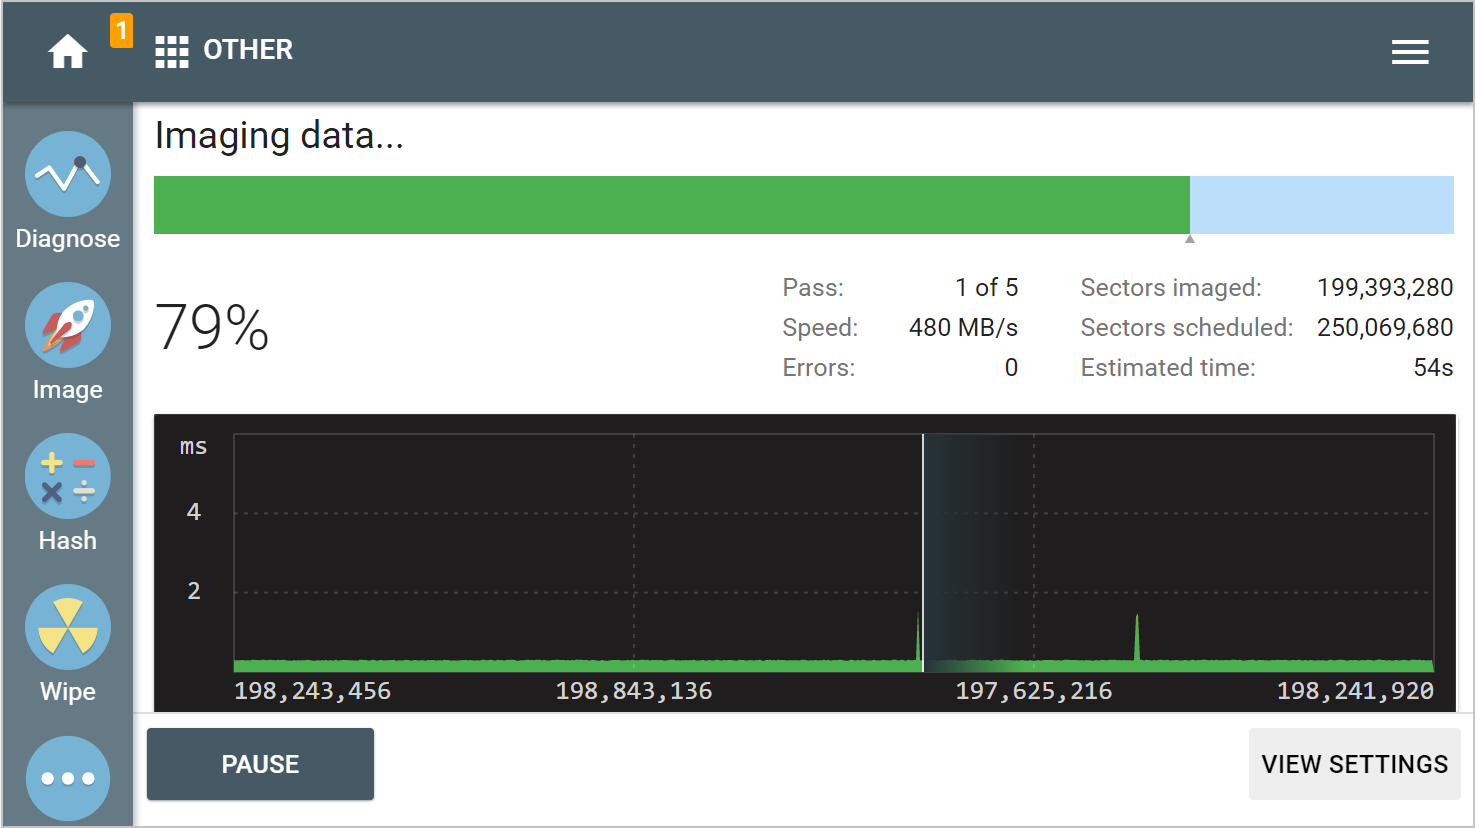
Imaging all sectors with data

We are extending selective imaging functionality and have made it possible to image only sectors containing data. This feature is supported in these file systems: NTFS, APFS, Ext 2/3/4, HFS, HFS+, ExFAT, FAT16, FAT32.

  1. Click Change button to adjust imaging settings
  2. In Passes tab, click on the value in What to image column
  3. Select Sectors with data
  4. Click Show button to preview the partitions on the source drive
  5. Click Start button to proceed with imaging

Imaging sectors with data (GIF)

Improved user interface

In this release, we have improved the interface to help users easily identify clickable and editable elements.  Pages are now centered for compact distribution of important elements and resemble a printed document layout.

New user interface

New user interface


We have supported responsive design for smartphones so that the interface adjusts to screen resolutions and fits most of the important elements on the page.

Smartphone UI

Smartphone UI

Other changes

Support of M.2, Thunderbolt, and Apple PCIe extension modules

Imaging

  • Unclip HPA until power cycle on source drives
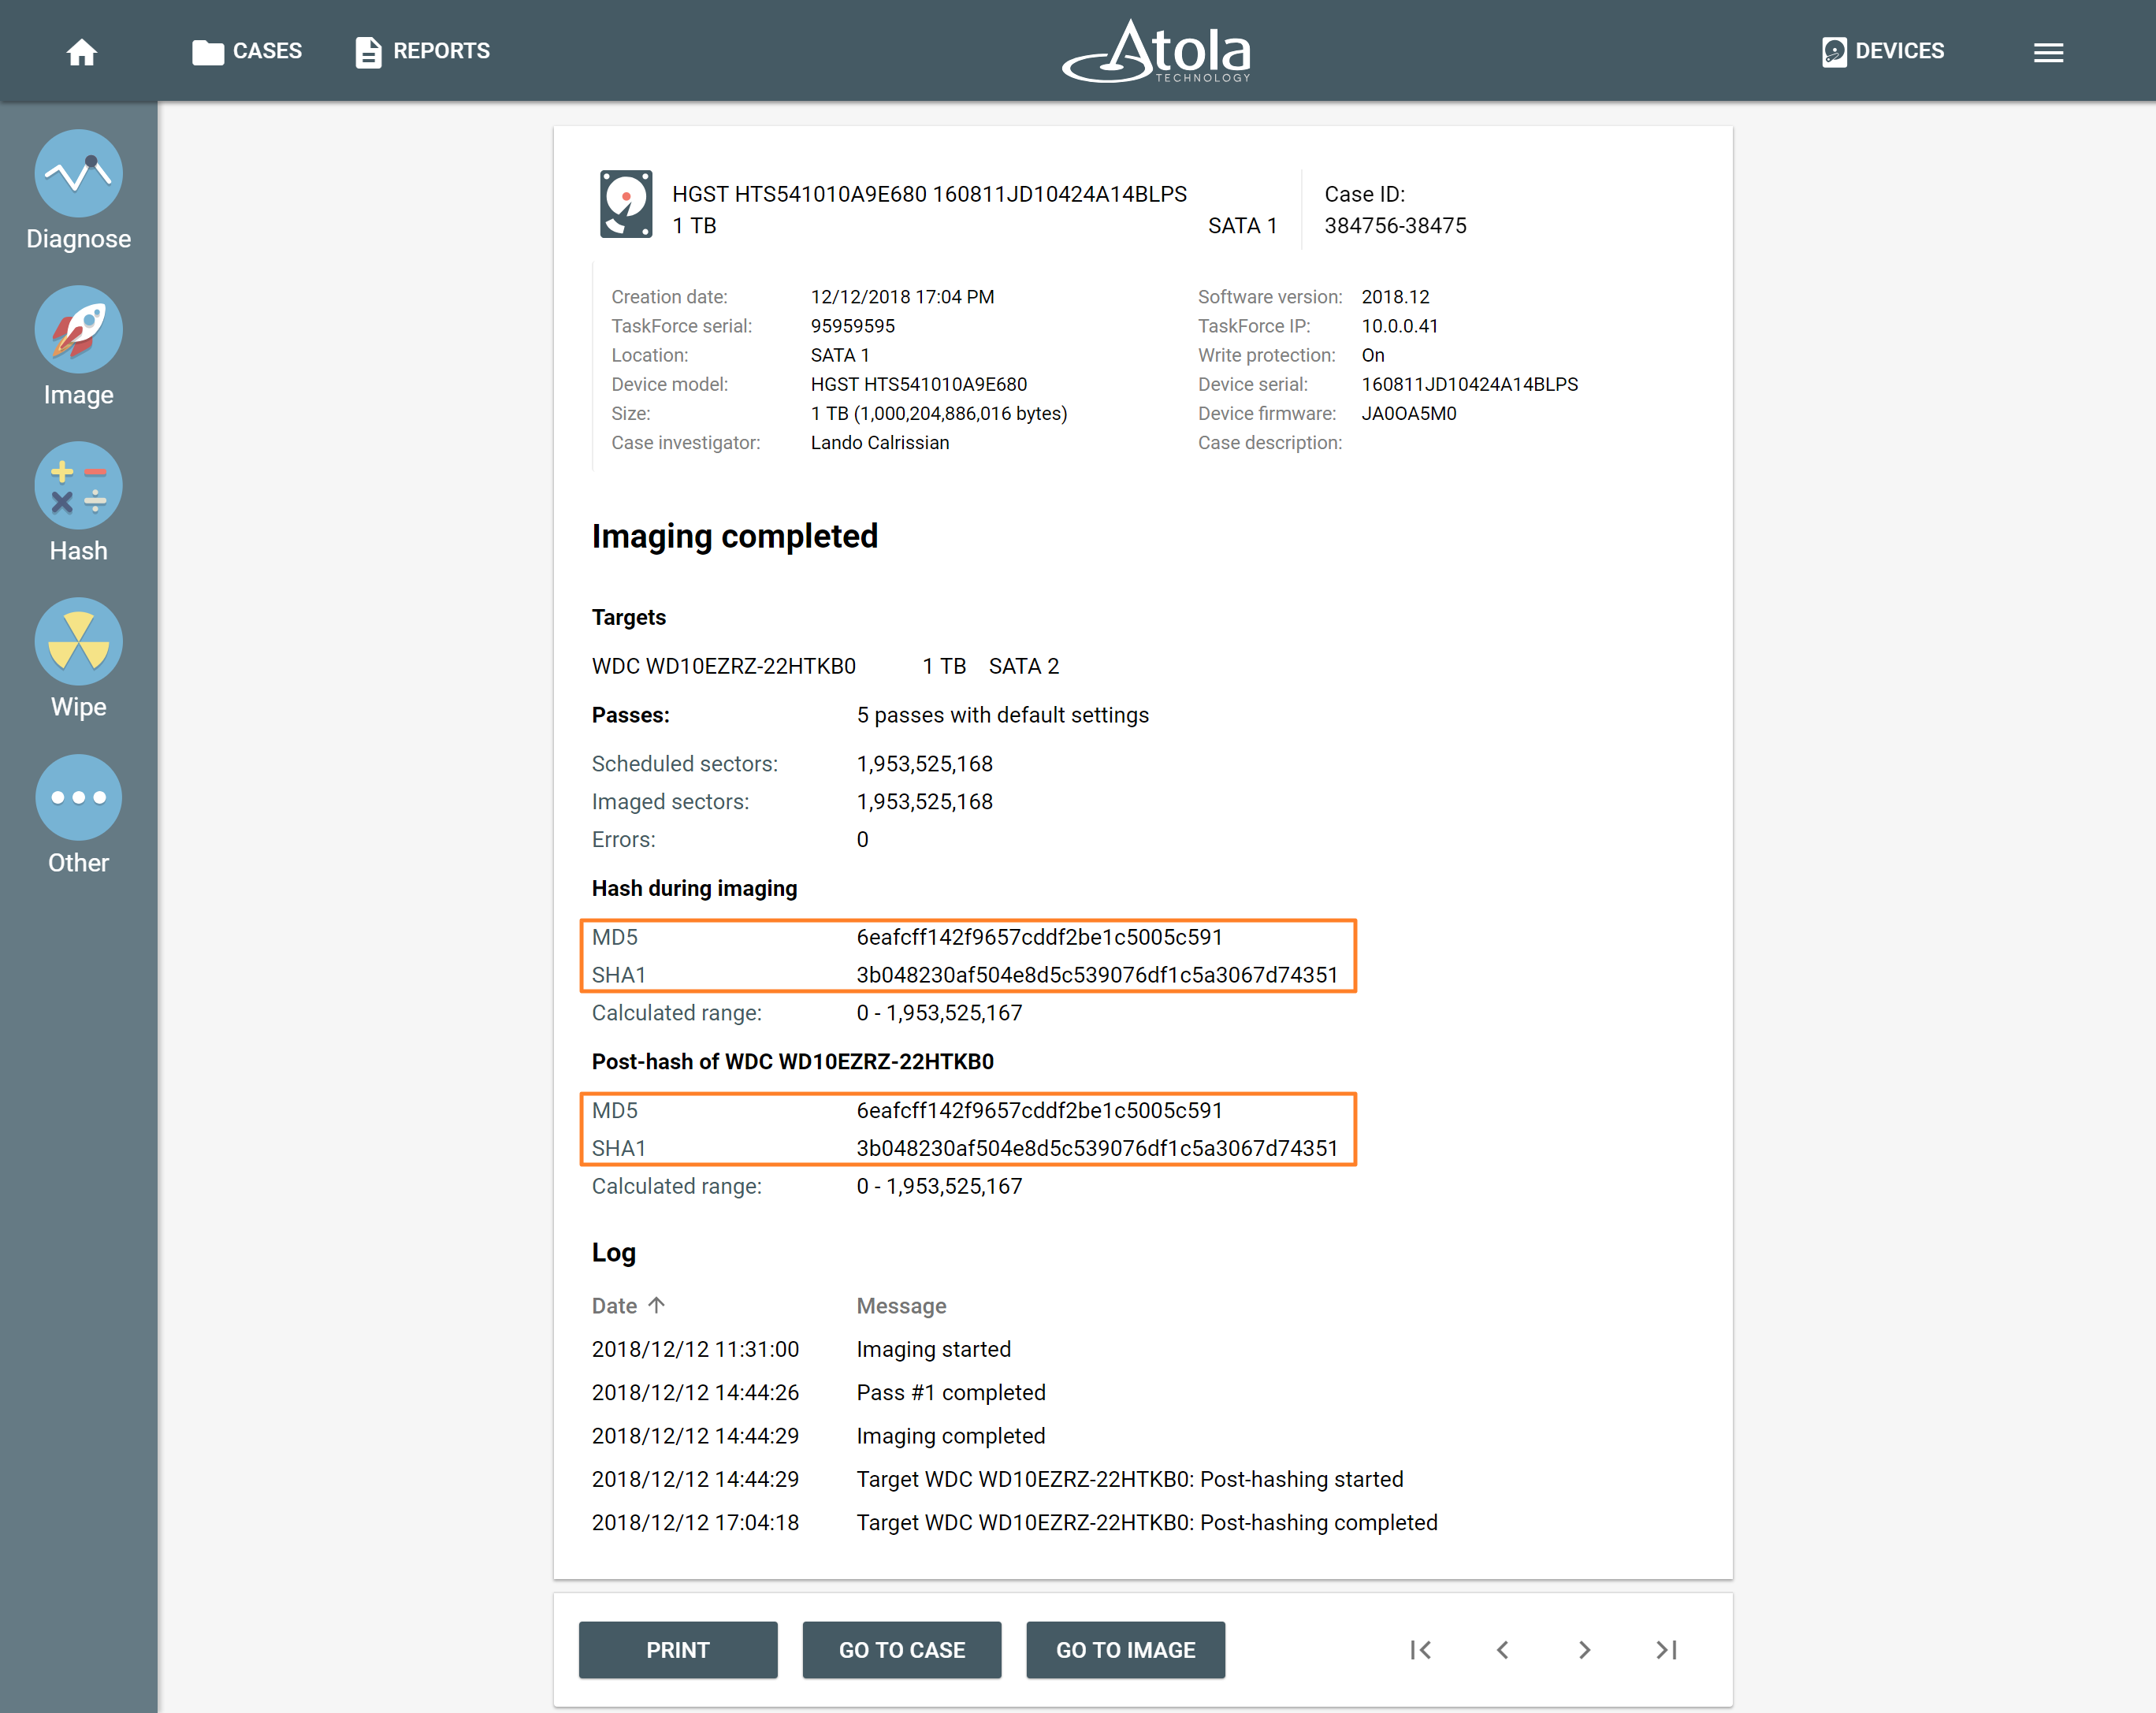
  • Pause and Resume features support for pre-hash and post-hash calculation during an imaging session
  • SAS port. Performance increase by 25%
  • Improved imaging of damaged drives
  • New setting Save report in the target folder when imaging to a file
  • E01 metadata automatically filled with case ID, investigator, description from the case management system

User interface

  • Short values supported (1K, 1M, 1G, 1T) in all LBA text boxes.
    Example: 3M transforms into 3,000,000

4K sector size support on SATA, SAS, USB drives.

Wiping. Added methods: NIST 800-88, DOD 5220, Random, LBA Number.

System menu. Added Release notes page and Toggle full screen feature

Bugfixes

  • USB devices. On certain devices, bad sectors were detected but not reported in the logs
  • Warning when opening E01 file in Encase created by Atola TaskForce
  • HPA/DCO indication missing on SATA devices plugged to SAS ports
  • Issues identifying drives in PUIS mode
  • Unclip HPA/DCO not working on IDE drives
  • Several translation inaccuracies in the Chinese version

For the full list of new TaskForce features and fixes in this and previous releases, please read the changelog.


Where to buy

If you still do not have an Atola TaskForce and would like to place an order, this can be done directly via Atola Technology, or from a distributor near you:

http://atola.com/wheretobuy/

Please contact Atola Technology sales department to receive more specific information:

  • Call us: +1 888 540-2010, +1 416 833-3501  10am – 6pm ET
  • Or email us

P.S. Dear customers, we appreciate your feedback and take it into consideration when updating our products. Please feel free to write your thoughts and ideas in the comments section below.

The post Atola TaskForce 2018.12 release is out! appeared first on Atola Blog.

The 2018 Atola Year in Review

$
0
0

2018 was an amazing year for Atola Technology! We look back at this important and eventful year and want to thank everyone who helped make it very special.


Atola TaskForce launch

First and foremost, we have launched Atola TaskForce, a breakthrough acquisition tool for the digital forensics market. It is capable of imaging 12 or more evidence drives simultaneously at speed exceeding 15 TB/hour!

Atola TaskForce


The development process for this tool was as tough as it was fun for the team. And we are extremely happy with the result. It is already being used by our customers in the field as a standalone tool and in the lab by multiple examiners simultaneously.


TaskForce software upgrades

We constantly work to extend our tools’ functionality. Throughout 2018, we released firmware updates with 30+ new features for TaskForce which included the support of NVMe drives.

NVMe is the latest great technology from the world of drives: they demonstrate extra high data transfer rate. Despite the high price tag, these drives have gained popularity among both individual users and businesses.

With the help of our M.2 SSD adapter, TaskForce images and calculates hash on these devices.

Imaging an NVMe drive


Insight software upgrades

We have continued to develop Atola Insight Forensic as well. Among other great upgrades, there is now a separate Artifact finder feature. It enables in-depth triage of data on an evidence drive.

ArtifactFinder in Atola Insight Forensic


More engineers joined Atola

Our team has grown again: we hired five talented engineers! They have already become an integral part of the team and are contributing to our development process.

Our CTO Vitaliy and the new teammates: Mikhail, Dmytro, Vlad, Aleksey, and Dasha


Atola in events worldwide

2018 is the year when we set a new record by participating in 20+ conferences and exhibitions. Atola people traveled extensively to meet our customers and friends in dozens of cities on three continents.

Places we have visited in 2018


Presentations and workshops

Vitaliy, Yulia, Andrew, and Tetiana held training sessions for our customers and delivered presentations at some of the most prominent forensic events of 2018. Our ‘Need for Speed’ presentation was very popular among these audiences. We explained the current trends in the world of drives, why imaging takes more time these days and how to tackle this issue.

A slide from our ‘Need for Speed’ presentation


Atola turned 15!

Atola Technology was established in 2003, and we have gone a long way since then. In recent interviews with our CEO Dmitry Postrigan and CTO Vitaliy Mokosiy published on Forensic Focus, they shared their thoughts about the company history, its current state and the factors that will define its way forward.

Atola celebrated 15 year anniversary


We thank our customers!

Last but not least, as we look back at 2018, we are grateful to all our customers, who have been very supportive and inspiring to us throughout this year! Our users provided us with great feedback, shared their success stories involving our tools and stayed loyal to our products. We promise to keep up the good work to help you solve forensic cases!

Atola CTO, Vitaliy Mokosiy hands the very first TaskForce unit to John Farrugia of DRPS on May 15


We wish you a very happy holiday season and look forward to meeting you in 2019!

The post The 2018 Atola Year in Review appeared first on Atola Blog.

Calculating hash in the course of imaging

$
0
0

Atola TaskForce supports hash calculation of both the evidence drive and the image in conjunction with imaging. We have developed highly flexible functionality to help optimize evidence acquisition process to fit one’s internal procedures while avoiding further damage to fragile media.

To calculate hash of both the evidence and the image:

  1. Click Image category of the left-side menu
  2. Select the Source device and the Target device or file
  3. Click Change button in the Settings summary page
  4. In the Hashes tab there are three checkboxes:
  • Pre-hash source device
  • Hash source during imaging
  • Post-hash target device
Selecting hash methods to calculate hash during forensic imaging of a hard drive

Select hash methods


Multiselect is available, which allows a user to use all three of these options.

However, Pre-hash source drive option must be used with caution: although pre-hashing can be required by an investigator’s internal procedures,
when dealing with drives that have been diagnosed with hardware failure, this operation may cause further damage to the drive before essential data is imaged.

On the contrary, Hash source during imaging is the most appropriate way to calculate the hash of a fragile source evidence drive.
In this case, TaskForce only needs to read the data on the drive once to image and calculate hash simultaneously, thus minimally using the drive’s hardware.

NB Linear hash can only be calculated by reading data in sectors consecutively in one pass. When it encounters a bad sector, linear hash calculation is discontinued. Thus it shows resulting hash values up to the first bad sector.
In upcoming releases, we will support Segmented hashing so that hash can be calculated for damaged drives.

Post-hash target device option allows to properly record the calculated hash in the case.

Imaging results with hash values for both hash during forensic imaging and post-hash

Imaging results with hash values for both hash during imaging and post-hash


The post Calculating hash in the course of imaging appeared first on Atola Blog.

Lifting HPA and DCO with Atola TaskForce

$
0
0

Host protected area (HPA) and device configuration overlay (DCO) are special hidden areas. They were developed as a feature by hard drive manufacturers for secure storage of vendor utilities or to make a drive appear to have smaller capacity than the drive actually has. But for a while now, proficient users have known how to create and modify them, store data there, etc., by using open source tools. The ability to detect such areas on a drive and image the whole drive space, including HPA or DCO-protected parts, becomes critical for forensic examiners. Otherwise, the evidence they get may be incomplete and lead to inaccurate investigative conclusions.

Once you plug a drive to TaskForce unit, its software sends a number of commands. In addition to the standard Identify device command, two other commands look up the drive size as set in drive’s firmware: Read native max address and Device configuration identify. If there are DCO or HPA limitations on the drive, TaskForce will notify about these changes. An indication in red color will appear in the device menu.

Notification about HPA and DCO in device menu


To get more details about the restrictions applied to the drive’s firmware, run Diagnostics and see the Firmware section of the Diagnostics report.

HPA and DCO limitations are indicated in the Diagnostics summary


The report contains three parameters indicating the drive’s Max Address according to different records in the drive’s firmware.

  1. The Max Address according to device ID line shows the max address from the ID sector, affected by both HPA and DCO restrictions if those are applied.
  2. Native Max Address indicates max address ignoring HPA limitation that may have been enabled, yet affected by DCO restriction.
  3. Max Address from DCO is the line that gives you the actual drive size.

A Diagnostics report of a drive that does not have HPA or DCO activated will have the same value in all three lines.

HPA and DCO restriction details in the Firmware section of the Diagnostics report


To disable HPA limitations applied to the drive’s firmware and get access to the hidden area, click on the Unclip HPA/DCO subcategory under Other category of the left-side menu and click on Unclip button.

NB Please note that the drive needs to be in the Target mode. Please disable Source switch on the port. Unclip HPA/DCO function implies making changes to the drive’s firmware, and that is impossible when the drive is in the Source mode and write-protection is on.

Remove HPA and DCO by clicking Unclip button


In a matter of seconds, Atola TaskForce lifts HPA and DCO, thus enabling access to the data on the whole drive space.

HPA and DCO unclip report

Lift HPA until power cycle

To ensure the forensically sound process, it can be necessary to avoid making any changes to the drive. Therefore it is prohibited to disable HPA and DCO restrictions and access data in the hidden areas. With Atola TaskForce it is possible to lift HPA restriction until the next power cycle. This helps avoid permanent changes to the drive.

  1. Click Imaging in the left-side Task Menu.
  2. Select the Source and the Target
  3. In a pop-up window suggesting you unclip the drive until power cycle, click Yes button.

Changing native max address until power cycle


This will allow temporary access to the data in HPA-protected area, but as soon as you power off or unplug the drive, the HPA will be back again.

NB If a drive freezes in the course of imaging TaskForce forcibly performs power cycles to continue imaging the drive. However, such power cycles will not affect the temporarily disabled HPA. TaskForce will be temporarily removing HPA max address restriction after each power cycle performed during imaging. The HPA-protected area will remain accessible throughout the imaging process.


The post Lifting HPA and DCO with Atola TaskForce appeared first on Atola Blog.

Using extension modules with TaskForce

$
0
0

TaskForce system allows expanding its compatibility with other device interfaces via hardware extension modules.

How to plug an extension module

TaskForce system must be powered off before an extension module can be plugged:

  1. Power off TaskForce
  2. Plug extension module into the Extension port
  3. Power on TaskForce

Thunderbolt extension module

With the help of Thunderbolt extension module TaskForce supports imaging, hash calculation, write protection on all MacBooks with FireWire, Thunderbolt 2 and Thunderbolt 3 interfaces.

Thunderbolt extension


Connecting MacBook via Thunderbolt extension module

  1. Connect MacBook to TaskForce unit with the help of Thunderbolt extension and the FireWire cable. Use adapters if needed (included).
  2. To boot MacBook in Target Disk Mode, start it up while holding down the T key until you see a Firewire or Thunderbolt icon displayed on screen signifying Target Disk Mode.
  3. Power on TaskForce and wait for the booting to be completed.
  4. Open Device menu.
  5. Click the port in Extension section of the Device menu.
  6. In the Enter MacBook serial pop-up window, enter the serial number located on the bottom side of the MacBook and click OK.

Enter MacBook serial number


Apple PCIe SSD extension module

This module supports custom proprietary PCIe SSDs from Apple MacBooks (Mid 2013 – 2015).

Important: Drive hotplug is not supported yet. TaskForce must be powered off before installing or replacing drives.

Apple PCIe SSD extension


M.2 SSD extension module

Only M key interface drives are supported by this module. Differences between M.2 MVMe, M.2 SATA and M.2 PCIe support:

Features M.2 NVMe M.2 SATA M.2 PCIe
All TaskForce operations Partial Yes Partial
Drive hotplug No Yes No
Power management No Yes No


M.2 SSD features supported:

  • Max read/write speed: 1300MB/s
  • Damaged drive support
  • Calculate hash
  • Write protection


Connecting an M.2 NVMe or M.2 PCIe drive via extension module

Important: Drive hotplug is not supported yet. TaskForce must be powered off before installing or replacing drives.

M.2 PCIe SSD extension


Connecting an M.2 SATA drive via extension module

  1. Connect the eSATAp cable end to the extension
  2. Power off SATA or SAS port in Atola TaskForce software
  3. Plug M.2 SATA drive into the extension and fix it in place with the plastic latch
  4. Power on SATA or SAS port in Atola TaskForce software

For M.2 SATA, drive hotplug is supported. It allows installing and replacing drives by powering off the extension port in Atola TaskForce software.

M.2 SATA SSD extension


The post Using extension modules with TaskForce appeared first on Atola Blog.

Calculating dual hash of an existing E01 file

$
0
0

Some source evidence drives and their images can be involved in a long-running investigation case and wait to be presented in court for months or years on end. Data stored on such drives and their image files may eventually get corrupt. Therefore it may be critical for an investigator to ensure the integrity of data on such devices or image files before resuming to work with them or presenting them in court.

Over the years, E01 file format has become a popular format for forensic purposes due to its ability to store not both the image of the drive, but also case and evidence details. E01 file can also contain both MD5 and SHA-1 hash values.

To view the previously calculated hash calculated for an E01 file with Atola TaskForce, open the imaging report in the case management system. It contains the hash values calculated during imaging.

Alternatively, you can look up the metadata stored in the E01 file itself:

  1. Open Devices menu by clicking the Devices button in the top bar.
  2. Click Select file box in the File category.
  3. Select the E01 file in the file browser.

Hash calculated during imaging stored in E01 file’s metadata


To ensure the integrity of the data in the file, you can recalculate its hash.

  1. Click Hash in the left-side task menu. This will open the devices to choose the one for which you want to calculate hash.
  2. Click Select file box in the File category.
  3. Select the E01 file in the file browser.
  4. Make sure to select the same hashing types (MD5, SHA1, etc.)
  5. Click Start button

Start hash calculation


Adjust hashing settings and start hash calculation by clicking the Start button.

When the hash calculation is completed, you can make sure that the two sets of hashes are identical.

Compare the calculated hash values to the ones calculated during imaging


The post Calculating dual hash of an existing E01 file appeared first on Atola Blog.


Working with MacBooks via Thunderbolt extension module

$
0
0

Thunderbolt extension enables TaskForce to operate on all MacBooks with these interfaces: FireWire, Thunderbolt 2 and Thunderbolt 3 (2016 – 2017 models).

There is no need to remove the SSD, Thunderbolt extension allows connecting the whole Apple laptop to TaskForce.  Moreover, it is possible to work with all the recent MacBooks that have their SSDs soldered in.

The extension module comes with:

  • Thunderbolt 3 to Thunderbolt 2 adapter (by Apple)
  • Thunderbolt 2 to FireWire adapter (by Apple)
  • FireWire cable (comes in white or black color)

Thunderbolt 2, Thunderbolt 3 and FireWire cables

Connecting MacBook to TaskForce unit

In the Enter MacBook serial pop-up window, enter the serial number located on the bottom side of the MacBook and click OK.

1. Connect MacBook to TaskForce unit with the help of Thunderbolt extension and the FireWire cable (NB Both MacBook and TaskForce have to be turned off).
Use adapters to connect to the MacBooks with Thunderbolt 2 or Thunderbolt 3 interface.

2. Boot the MacBook in Target Disk Mode. To do that, start it up while holding down the T key. You should see a Firewire or Thunderbolt icon displayed on screen signifying that Target Disk Mode is detected and working.

MacBook connected to TaskForce via Thunderbolt extension

3. Power on TaskForce and wait for the booting to be completed.

4. Open Device menu.

5. Click the device box in Extension section of the Device menu.

Select MacBook device in Device menu

6. If this is the first time this MacBook is identified by TaskForce, you need to enter the serial number in the Enter MacBook serial pop-up window and click OK.

Enter MacBook’s serial number

NB serial number located on the bottom side of the MacBook.

MacBook’s serial number

Now you can image and calculate hash and do it in write-protected mode with the connected MacBook.

During the subsequent identifications of a MacBook connected to TaskForce, its serial number can be selected from the drop-down menu in the Enter MacBook serial pop-up window. TaskForce will look up its case management system and will offer the choice of MacBooks with the same drive size.

Select the MacBook with serial number you have connected to TaskForce

The post Working with MacBooks via Thunderbolt extension module appeared first on Atola Blog.

Screencast: Forensic imaging of an NVMe drive with Atola TaskForce

Atola Insight Forensic 4.12 – Image file located on source drive

$
0
0

We have just released Atola Insight Forensic 4.12 with Image file on source drive, automatic exFAT partition creation with performance-optimized parameters, hidden Smartware area detection for WD USB drives and other new exciting features!

Image File on Source

It is a new source type in Atola Insight Forensic that you can image.

Say, there is a 10 TB hard drive, and an E01 file stored on it only takes up 500 GB of the space. Therefore one would need a 20-hour-long imaging session to image a file that only requires 1 hour or 20 times less!

If you have an image file on a drive with a capacity that considerably exceeds the size of the image file, it can take an excessively long time to image a small amount of data.

To help you expedite imaging of such files, Atola Insight Forensic is now equipped with new Image File on Source device type.

To Select the file on source drive that you want to image:

1. Click Source in the top-level menu of Insight and click Select Source

2. Click Select image file on source link in Source device selection window

3. In Select Image File window, click the file you want to image and then click Select button.

4. Insight takes a few seconds validating the file to make sure that it is not corrupt. Once validation is over, the file appears as the source. You can review the file details.

5. Then you can proceed with imaging as usual.

Other great updates to Atola Insight Forensic include:

New Features

New source type:

  • Image file on source device

Imaging:

  • New way to select what to image via sector list files (.csv, .lst)
  • Suggestion to disable damaged/degraded heads when starting the first imaging session
  • BitLocker volume GUID added to the imaging log
  • Automatic exclusion of hidden Smartware area for WD USB drives
  • Image file on Target. Automatic exFAT partition creation with performance-optimized parameters
  • Support of Read SMART before/after imaging for USB drives

Automatic Checkup:

  • Imaging speed estimation for good drives
  • Hidden Smartware area detection for WD USB drives
  • Media surface speeds for outer, middle, inner LBA ranges
  • Disk temperature graph with its usage timespans
  • BitLocker volume detection

Fill or Erase, Compare:

  • Improved support of 4Kn drives when LBA pattern selected

Case management:

  • Better logging of actions with attached files.

Bugfixes

  • Intel DC S4500 did not identify and could not be imaged
  • HGST HUH728080ALN600 8ТB was shown as 1TB drive
  • Issues in head detection algorithm for Toshiba MG* and MQ* drive models
  • Automatic Checkup. Issues during PCB check of WDC WD5000AAKS and ST500LM021-1KJ152 models
  • Automatic Checkup. Fixed a few issues with head graph drawing
  • Current Oscilloscope adapted for large resolutions (4K and alike)
  • Multiple Chinese/Japanese translation issues

For the full list of new Atola Insight Forensic features and fixes in this and previous releases, please read the changelog.

Where to buy

If you still do not have an Atola Insight Forensicand would like to place an order, this can be done directly via Atola Technology, or from a distributor near you:

http://atola.com/wheretobuy/

Please contact Atola Technology sales department to receive more specific information:

  • Call us: +1 888 540-2010, +1 416 833-3501  10am – 6pm ET
  • Or email us

P.S. Dear customers, we appreciate your feedback and take it into consideration when updating our products. Please feel free to write your thoughts and ideas in the comments section below.

The post Atola Insight Forensic 4.12 – Image file located on source drive appeared first on Atola Blog.

Printing all reports from a case

$
0
0

When you work on an investigation and want to have complete information about the evidence drive and all operations that have been taken to diagnose, image, calculate hash, etc., you can address Atola TaskForce’s case management system to print out all reports concerning your evidence.

To do that:

1) Click Print button at the bottom of the case page.

Print reports

2) In the pop-up window, you can choose if you want the printed reports to include non-device reports and logs.

NB Non-device reports are case-related reports that register case details changes, case imports, exports etc. Logs are parts of the reports that give detailed information about the start and the end of a task, problems encountered during the operation (e.g. inability to read a sector within the time allocated for the operation), actions taken (e.g. jumps from a bad sector, completed pass of imaging, performed resets and power cycles etc.)

Print multiple reports from a case and include logs and non-device reports

3) Click Generate button. This will redirect you to a page with full reports. There they are put in the same order as the order, in which they were listed on the case page (either by date or by title).

Generated reports

NB If you selected the Information about unit’s components, the last report generated will include the description of all storage devices contained in current TaskForce system.

Generated report listing all storage devices contained in current TaskForce unit

4) In this page, there is another Print button. After clicking it you can configure printing settings.

Each report will be printed on a new page.

The post Printing all reports from a case appeared first on Atola Blog.

Imaging to server faster using Jumbo frames in TaskForce

$
0
0

In TaskForce, Jumbo frames are activated by default to ensure maximum data transfer rates when imaging to a file on your server.

However, if Jumbo frames have been disabled, it is easy to enable them again and experience substantial boost to the speed of imaging!

First, create a file on the server, to which you will be imaging.

When you start to image to your server with Jumbo frame disabled, the data transfer speed will not exceed 500 MB/s. The actual speed will also depend on the configuration and current traffic in the network.

To boost the speed:

1. Pause the imaging session

2. Click the Service menu in the right corner of the top bar.

3. Click Settings

4. Enable Jumbo frames of the Ethernet port you are using and set MTU to 9000.

NB For fast imaging of files to your server via 10 Gigabit network, you need to activate Jumbo framework in the settings of the server’s network adapter as well as in the settings of the network switch, should it be necessary (10Gb switches normally have Jumbo framework activated by default).

Then you can return to your imaging session by clicking Image button and selecting the source and clicking Resume button. This time, the speed will be way higher!

The post Imaging to server faster using Jumbo frames in TaskForce appeared first on Atola Blog.

Viewing all 194 articles
Browse latest View live